Python包含几个标准的编程数据结构,例如list,tuple,dict和set,作为其内置类型的一部分。许多应用程序不需要其他结构,但是当它们需要时,标准库提供了可供使用的功能强大且经过良好测试的版本。
enum 模块提供枚举类型的实现,具有迭代和比较功能。它可用于为值创建定义良好的符号,而不是使用文字字符串或整数。
collections模块包括几个数据结构的实现,扩展了其他模块中的数据结构,例如,Deque是一个双端队列,允许从任一端添加或删除项目。 defaultdict是一个字典,如果缺少一个键,它会以默认值响应,而OrderedDict会记住添加项目的顺序。namedtuple扩展了普通元组,除了数字索引外,还为每个成员项提供了一个属性名称。
对于大量数据,array可以比list更有效地使用内存。由于数组仅限于单个数据类型,因此它可以使用比通用列表更紧凑的内存表示。同时,可以使用许多与列表相同的方法来操作数组实例,因此可以在应用程序中使用数组替换列表而无需进行大量其他更改。
对序列中的项进行排序是数据操作的基本方面。Python的list包含一个sort()方法,但有时在每次列表内容更改时,维护列表的顺序比重新排序更有效。 heapq中的函数以较低的开销修改列表的内容,同时维护列表的顺序。
构建排序列表或数组的另一个选项是bisect。它使用二进制搜索来查找新项目的插入点,并且是重复排序频繁更改的列表的替代方法。
虽然内置列表可以使用insert()和pop()方法模拟队列,但它不是线程安全的。对于线程之间的真正有序通信,请使用queue模块。multiprocessing 模块包括在进程之间工作的Queue版本,从而可以更轻松地将多线程程序转换为使用进程。
struct可用于将来自另一个应用程序的数据(可能来自二进制文件或数据流)解码为Python的本机类型的操作变得简单。
本章介绍与内存管理相关的两个模块。对于高度互连的数据结构,例如图和树,使用weakref来维护引用,同时仍然允许垃圾收集器在不再需要它们之后清理它们。使用copy的函数来复制数据结构及其内容,包括使用deepcopy()进行递归复制。
调试数据结构可能非常耗时,尤其是在涉及大型序列或字典的打印输出时。使用pprint创建易于阅读的表示形式,可以打印到控制台或写入日志文件以便于调试。
最后,如果可用类型不满足要求,则将其中一个本机类型子类化并对其进行自定义,或者使用collections中定义的抽象基类之一作为起点构建新的容器类型。
enum – Enumeration Type
enum模块定义了具有迭代和比较功能的枚举类型。 它可用于为值创建定义明确的符号,而不是使用文字整数或字符串。
Creating Enumerations
通过继承Enum并添加描述值的类属性,使用class语法定义新的枚举。
#enum_create.py
import enum

class BugStatus(enum.Enum):

    new = 7
    incomplete = 6
    invalid = 5
    wont_fix = 4
    in_progress = 3
    fix_committed = 2
    fix_released = 1

print('\nMember name: {}'.format(BugStatus.wont_fix.name))
print('Member value: {}'.format(BugStatus.wont_fix.value))
在解析类时,Enum的成员将转换为实例。 每个实例都具有与成员名称对应的name属性和与在类定义中分配给名称的值对应的value属性。
$ python3 enum_create.py

Member name: wont_fix
Member value: 4
Iteration
迭代枚举类会产生枚举的各个成员。
#enum_iterate.py
import enum

class BugStatus(enum.Enum):

    new = 7
    incomplete = 6
    invalid = 5
    wont_fix = 4
    in_progress = 3
    fix_committed = 2
    fix_released = 1

for status in BugStatus:
    print('{:15} = {}'.format(status.name, status.value))
成员按照在类定义中声明的顺序生成。 名称和值不用于任何形式的成员排序。
$ python3 enum_iterate.py

new             = 7
incomplete      = 6
invalid         = 5
wont_fix        = 4
in_progress     = 3
fix_committed   = 2
fix_released    = 1
Comparing Enums
由于枚举成员未被排序,因此它们仅支持通过同一性和相等性进行比较。
#enum_comparison.py
import enum

class BugStatus(enum.Enum):

    new = 7
    incomplete = 6
    invalid = 5
    wont_fix = 4
    in_progress = 3
    fix_committed = 2
    fix_released = 1

actual_state = BugStatus.wont_fix
desired_state = BugStatus.fix_released

print('Equality:',
      actual_state == desired_state,
      actual_state == BugStatus.wont_fix)
print('Identity:',
      actual_state is desired_state,
      actual_state is BugStatus.wont_fix)
print('Ordered by value:')
try:
    print('\n'.join('  ' + s.name for s in sorted(BugStatus)))
except TypeError as err:
    print('  Cannot sort: {}'.format(err))
大于和小于比较运算符会引发TypeError异常。
$ python3 enum_comparison.py

Equality: False True
Identity: False True
Ordered by value:
  Cannot sort: '<' not supported between instances of 'BugStatus
' and 'BugStatus'
如果成员需要表现得更像数字使用IntEnum类进行枚举,例如,以支持比较。
#enum_intenum.py
import enum

class BugStatus(enum.IntEnum):

    new = 7
    incomplete = 6
    invalid = 5
    wont_fix = 4
    in_progress = 3
    fix_committed = 2
    fix_released = 1

print('Ordered by value:')
print('\n'.join('  ' + s.name for s in sorted(BugStatus)))
$ python3 enum_intenum.py

Ordered by value:
  fix_released
  fix_committed
  in_progress
  wont_fix
  invalid
  incomplete
  new
Unique Enumeration Values
具有相同值的枚举成员将作为对同一成员对象的别名引用进行跟踪。 别名不会导致Enum的迭代器中出现重复值。
#enum_aliases.py
import enum

class BugStatus(enum.Enum):

    new = 7
    incomplete = 6
    invalid = 5
    wont_fix = 4
    in_progress = 3
    fix_committed = 2
    fix_released = 1

    by_design = 4
    closed = 1

for status in BugStatus:
    print('{:15} = {}'.format(status.name, status.value))

print('\nSame: by_design is wont_fix: ',
      BugStatus.by_design is BugStatus.wont_fix)
print('Same: closed is fix_released: ',
      BugStatus.closed is BugStatus.fix_released)
因为by_design和closed是其他成员的别名,所以在迭代Enum时它们不会单独出现在输出中。 成员的规范名称是附加到值的第一个名称。
$ python3 enum_aliases.py

new             = 7
incomplete      = 6
invalid         = 5
wont_fix        = 4
in_progress     = 3
fix_committed   = 2
fix_released    = 1

Same: by_design is wont_fix:  True
Same: closed is fix_released:  True
如果要求所有成员都具有唯一值,请将@unique装饰器添加到Enum。
#enum_unique_enforce.py
import enum

@enum.unique
class BugStatus(enum.Enum):

    new = 7
    incomplete = 6
    invalid = 5
    wont_fix = 4
    in_progress = 3
    fix_committed = 2
    fix_released = 1

    # This will trigger an error with unique applied.
    by_design = 4
    closed = 1
具有重复值的成员在解释Enum类时会触发ValueError异常。
$ python3 enum_unique_enforce.py

Traceback (most recent call last):
  File "enum_unique_enforce.py", line 11, in <module>
    class BugStatus(enum.Enum):
  File ".../lib/python3.6/enum.py", line 834, in unique
    (enumeration, alias_details))
ValueError: duplicate values found in <enum 'BugStatus'>:
by_design -> wont_fix, closed -> fix_released
Creating Enumerations Programmatically
在某些情况下,以编程方式创建枚举更方便,而不是在类定义中对它们进行硬编码。 对于这些情况,Enum还支持将成员名称和值传递给类构造函数。
#enum_programmatic_create.py
import enum

BugStatus = enum.Enum(
    value='BugStatus',
    names=('fix_released fix_committed in_progress '
           'wont_fix invalid incomplete new'),
)

print('Member: {}'.format(BugStatus.new))

print('\nAll members:')
for status in BugStatus:
    print('{:15} = {}'.format(status.name, status.value))
value参数是枚举的名称,用于构建成员的表示形式。 names参数列出了枚举的成员。 当传递单个字符串时,它将在空格和逗号上拆分,并且生成的标记将用作成员的名称,这些成员将自动分配以1开头的值。
$ python3 enum_programmatic_create.py

Member: BugStatus.new

All members:
fix_released    = 1
fix_committed   = 2
in_progress     = 3
wont_fix        = 4
invalid         = 5
incomplete      = 6
new             = 7
为了更好地控制与成员关联的值,可以使用双值元组序列或将名称映射到值的字典替换名称字符串。
#enum_programmatic_mapping.py
import enum

BugStatus = enum.Enum(
    value='BugStatus',
    names=[
        ('new', 7),
        ('incomplete', 6),
        ('invalid', 5),
        ('wont_fix', 4),
        ('in_progress', 3),
        ('fix_committed', 2),
        ('fix_released', 1),
    ],
)

print('All members:')
for status in BugStatus:
    print('{:15} = {}'.format(status.name, status.value))
在此示例中,给出了由双值组成的元组的列表,而不是仅包含成员名称的单个字符串。 这使得可以使用与enum_create.py中定义的版本相同的顺序重构BugStatus枚举。
$ python3 enum_programmatic_mapping.py

All members:
new             = 7
incomplete      = 6
invalid         = 5
wont_fix        = 4
in_progress     = 3
fix_committed   = 2
fix_released    = 1
Non-integer Member Values
枚举成员值不限于整数。 实际上,任何类型的对象都可以与成员相关联。 如果值是元组,则元组的成员将作为单独的参数传递给__init __()。
#enum_tuple_values.py
import enum

class BugStatus(enum.Enum):

    new = (7, ['incomplete',
               'invalid',
               'wont_fix',
               'in_progress'])
    incomplete = (6, ['new', 'wont_fix'])
    invalid = (5, ['new'])
    wont_fix = (4, ['new'])
    in_progress = (3, ['new', 'fix_committed'])
    fix_committed = (2, ['in_progress', 'fix_released'])
    fix_released = (1, ['new'])

    def __init__(self, num, transitions):
        self.num = num
        self.transitions = transitions

    def can_transition(self, new_state):
        return new_state.name in self.transitions

print('Name:', BugStatus.in_progress)
print('Value:', BugStatus.in_progress.value)
print('Custom attribute:', BugStatus.in_progress.transitions)
print('Using attribute:',  BugStatus.in_progress.can_transition(BugStatus.new))
在此示例中,每个成员值是一个元组,其中包含数字ID(例如可能存储在数据库中)和可从当前状态转换的有效转换列表。
$ python3 enum_tuple_values.py

Name: BugStatus.in_progress
Value: (3, ['new', 'fix_committed'])
Custom attribute: ['new', 'fix_committed']
Using attribute: True
对于更复杂的情况,元组可能变得笨拙。 由于成员值可以是任何类型的对象,因此字典可用于每个枚举值要跟踪大量单独属性的情况。 复合值直接传递给__init __()作为除self之外的唯一参数。
#enum_complex_values.py
import enum

class BugStatus(enum.Enum):

    new = {
        'num': 7,
        'transitions': [
            'incomplete',
            'invalid',
            'wont_fix',
            'in_progress',
        ],
    }
    incomplete = {
        'num': 6,
        'transitions': ['new', 'wont_fix'],
    }
    invalid = {
        'num': 5,
        'transitions': ['new'],
    }
    wont_fix = {
        'num': 4,
        'transitions': ['new'],
    }
    in_progress = {
        'num': 3,
        'transitions': ['new', 'fix_committed'],
    }
    fix_committed = {
        'num': 2,
        'transitions': ['in_progress', 'fix_released'],
    }
    fix_released = {
        'num': 1,
        'transitions': ['new'],
    }

    def __init__(self, vals):
        self.num = vals['num']
        self.transitions = vals['transitions']

    def can_transition(self, new_state):
        return new_state.name in self.transitions

print('Name:', BugStatus.in_progress)
print('Value:', BugStatus.in_progress.value)
print('Custom attribute:', BugStatus.in_progress.transitions)
print('Using attribute:',  BugStatus.in_progress.can_transition(BugStatus.new))
此示例使用字典而不是元组表示与上一示例相同的数据。
$ python3 enum_complex_values.py

Name: BugStatus.in_progress
Value: {'num': 3, 'transitions': ['new', 'fix_committed']}
Custom attribute: ['new', 'fix_committed']
Using attribute: True
collections — Container Data Types
目的:容器数据类型。
collections模块包括内置类型list,dict和tuple之外的容器数据类型。
ChainMap — Search Multiple Dictionaries
ChainMap类管理一系列字典,并按照给定的顺序搜索它们以查找与键相关联的值。 ChainMap是一个很好的“上下文”容器,因为它可以被视为一个堆栈,当堆栈增长时表示发生了更改,随着堆栈的缩小,这些更改会再次被丢弃。
Accessing Values
ChainMap支持与常规字典相同的API,用于访问现有值。
#collections_chainmap_read.py
import collections

a = {'a': 'A', 'c': 'C'}
b = {'b': 'B', 'c': 'D'}

m = collections.ChainMap(a, b)

print('Individual Values')
print('a = {}'.format(m['a']))
print('b = {}'.format(m['b']))
print('c = {}'.format(m['c']))
print()

print('Keys = {}'.format(list(m.keys())))
print('Values = {}'.format(list(m.values())))
print()

print('Items:')
for k, v in m.items():
    print('{} = {}'.format(k, v))
print()

print('"d" in m: {}'.format(('d' in m)))
子映射按照它们传递给构造函数的顺序进行搜索,因此为键“c”报告的值来自a字典。
$ python3 collections_chainmap_read.py

Individual Values
a = A
b = B
c = C

Keys = ['c', 'b', 'a']
Values = ['C', 'B', 'A']

Items:
c = C
b = B
a = A

"d" in m: False
Reordering
ChainMap在其maps属性中存储映射列表,用于搜索。 此列表是可变的,因此可以直接添加新映射或更改元素的顺序以控制查找和更新行为。
#collections_chainmap_reorder.py
import collections

a = {'a': 'A', 'c': 'C'}
b = {'b': 'B', 'c': 'D'}

m = collections.ChainMap(a, b)

print(m.maps)
print('c = {}\n'.format(m['c']))

# reverse the list
m.maps = list(reversed(m.maps))

print(m.maps)
print('c = {}'.format(m['c']))
当映射列表反转时,与“c”关联的值会发生变化。
$ python3 collections_chainmap_reorder.py

[{'a': 'A', 'c': 'C'}, {'b': 'B', 'c': 'D'}]
c = C

[{'b': 'B', 'c': 'D'}, {'a': 'A', 'c': 'C'}]
c = D
Updating Values
ChainMap不会缓存子映射中的值。 因此,如果修改了它们的内容,则在访问ChainMap时会反映结果。
#collections_chainmap_update_behind.py
import collections

a = {'a': 'A', 'c': 'C'}
b = {'b': 'B', 'c': 'D'}

m = collections.ChainMap(a, b)
print('Before: {}'.format(m['c']))
a['c'] = 'E'
print('After : {}'.format(m['c']))
更改与现有键关联的值和添加新元素的方式相同。
$ python3 collections_chainmap_update_behind.py

Before: C
After : E
也可以直接通过ChainMap设置值,尽管实际上只修改了链中的第一个映射。
#collections_chainmap_update_directly.py
import collections

a = {'a': 'A', 'c': 'C'}
b = {'b': 'B', 'c': 'D'}

m = collections.ChainMap(a, b)
print('Before:', m)
m['c'] = 'E'
print('After :', m)
print('a:', a)
使用m存储新值时,将更新a映射。
$ python3 collections_chainmap_update_directly.py

Before: ChainMap({'a': 'A', 'c': 'C'}, {'b': 'B', 'c': 'D'})
After : ChainMap({'a': 'A', 'c': 'E'}, {'b': 'B', 'c': 'D'})
a: {'a': 'A', 'c': 'E'}
ChainMap提供了一种方便的方法,用于创建 在maps列表的前面增加一个额外映射的 新实例,以便于避免修改现有的底层数据结构。
#collections_chainmap_new_child.py
import collections

a = {'a': 'A', 'c': 'C'}
b = {'b': 'B', 'c': 'D'}

m1 = collections.ChainMap(a, b)
m2 = m1.new_child()

print('m1 before:', m1)
print('m2 before:', m2)

m2['c'] = 'E'

print('m1 after:', m1)
print('m2 after:', m2)
这种堆迭行为使得将ChainMap实例用作模板或应用程序上下文变得方便。 具体来说,在一次迭代中很容易添加或更新值,然后在下一次迭代中丢弃更改。
$ python3 collections_chainmap_new_child.py

m1 before: ChainMap({'a': 'A', 'c': 'C'}, {'b': 'B', 'c': 'D'})
m2 before: ChainMap({}, {'a': 'A', 'c': 'C'}, {'b': 'B', 'c': 'D'})
m1 after: ChainMap({'a': 'A', 'c': 'C'}, {'b': 'B', 'c': 'D'})
m2 after: ChainMap({'c': 'E'}, {'a': 'A', 'c': 'C'}, {'b': 'B', 'c': 'D'})
对于新上下文已知或预先构建的情况,也可以将映射传递给new_child()。
#collections_chainmap_new_child_explicit.py
import collections

a = {'a': 'A', 'c': 'C'}
b = {'b': 'B', 'c': 'D'}
c = {'c': 'E'}

m1 = collections.ChainMap(a, b)
m2 = m1.new_child(c)

print('m1["c"] = {}'.format(m1['c']))
print('m2["c"] = {}'.format(m2['c']))
这相当于:
m2 = collections.ChainMap(c, *m1.maps)
产生输出:
$ python3 collections_chainmap_new_child_explicit.py

m1["c"] = C
m2["c"] = E
Counter — Count Hashable Objects
Counter是一个容器,用于跟踪添加等效值的次数。 它可用于实现相同的算法,其他语言通常使用bag或multiset数据结构。
Initializing
Counter支持三种初始化形式。 可以使用一系列items、包含键和计数的字典、或使用将字符串名称映射到计数的关键字参数来调用其构造函数。
#collections_counter_init.py
import collections

print(collections.Counter(['a', 'b', 'c', 'a', 'b', 'b']))
print(collections.Counter({'a': 2, 'b': 3, 'c': 1}))
print(collections.Counter(a=2, b=3, c=1))
所有三种初始化形式的结果都是相同的。
$ python3 collections_counter_init.py

Counter({'b': 3, 'a': 2, 'c': 1})
Counter({'b': 3, 'a': 2, 'c': 1})
Counter({'b': 3, 'a': 2, 'c': 1})
可以构造一个没有参数的空Counter,并通过update()方法填充。
#collections_counter_update.py
import collections

c = collections.Counter()
print('Initial :', c)

c.update('abcdaab')
print('Sequence:', c)

c.update({'a': 1, 'd': 5})
print('Dict    :', c)
计数值基于新数据增加而不是替换。 在前面的示例中,a的计数从3到4。
$ python3 collections_counter_update.py

Initial : Counter()
Sequence: Counter({'a': 3, 'b': 2, 'c': 1, 'd': 1})
Dict    : Counter({'d': 6, 'a': 4, 'b': 2, 'c': 1})
Accessing Counts
Counter 生成后,可以使用字典API检索其值。
#collections_counter_get_values.py
import collections

c = collections.Counter('abcdaab')

for letter in 'abcde':
    print('{} : {}'.format(letter, c[letter]))
Counter不会引发未知项的KeyError。 如果输入中未显示某个值(在本例中为e),则其计数为0。
$ python3 collections_counter_get_values.py

a : 3
b : 2
c : 1
d : 1
e : 0
elements()方法返回一个迭代器,它生成Counter所知的所有项。
#collections_counter_elements.py
import collections

c = collections.Counter('extremely')
c['z'] = 0
print(c)
print(list(c.elements()))
不保证元素的顺序,并且不包括计数小于或等于零的项目。
$ python3 collections_counter_elements.py

Counter({'e': 3, 'x': 1, 't': 1, 'r': 1, 'm': 1, 'l': 1, 'y': 1, 'z': 0})
['e', 'e', 'e', 'x', 't', 'r', 'm', 'l', 'y']
使用most_common()生成n个最常遇到的输入值及其各自计数的序列。
#collections_counter_most_common.py
import collections

c = collections.Counter()
with open('/usr/share/dict/words', 'rt') as f:
    for line in f:
        c.update(line.rstrip().lower())

print('Most common:')
for letter, count in c.most_common(3):
    print('{}: {:>7}'.format(letter, count))
此示例计算出现在系统字典中所有单词中的字母以生成频率分布,然后打印三个最常见的字母。如果省略most_common()的参数,会按频率顺序生成所有项的列表。
$ python3 collections_counter_most_common.py

Most common:
e:  235331
i:  201032
a:  199554
Arithmetic
Counter实例支持聚合结果的算术和集合操作。 此示例显示了用于创建新Counter实例的标准运算符,但也支持in-place运算符+=、-=、&=、|=。
#collections_counter_arithmetic.py
import collections

c1 = collections.Counter(['a', 'b', 'c', 'a', 'b', 'b'])
c2 = collections.Counter('alphabet')

print('C1:', c1)
print('C2:', c2)

print('\nCombined counts:')
print(c1 + c2)

print('\nSubtraction:')
print(c1 - c2)

print('\nIntersection (taking positive minimums):')
print(c1 & c2)

print('\nUnion (taking maximums):')
print(c1 | c2)
每次通过操作生成新Counter时,将丢弃具有零或负计数的任何项目。 a的计数在c1和c2中是相同的,因此减法将其变为零。
$ python3 collections_counter_arithmetic.py

C1: Counter({'b': 3, 'a': 2, 'c': 1})
C2: Counter({'a': 2, 'l': 1, 'p': 1, 'h': 1, 'b': 1, 'e': 1, 't': 1})

Combined counts:
Counter({'a': 4, 'b': 4, 'c': 1, 'l': 1, 'p': 1, 'h': 1, 'e': 1, 't': 1})

Subtraction:
Counter({'b': 2, 'c': 1})

Intersection (taking positive minimums):
Counter({'a': 2, 'b': 1})

Union (taking maximums):
Counter({'b': 3, 'a': 2, 'c': 1, 'l': 1, 'p': 1, 'h': 1, 'e': 1, 't': 1})
defaultdict — Missing Keys Return a Default Value
标准字典包括用于检索值的方法setdefault(),如果该值不存在则建立默认值。 相比之下,defaultdict允许调用者在初始化容器时指定默认值。
#collections_defaultdict.py
import collections

def default_factory():
    return 'default value'

d = collections.defaultdict(default_factory, foo='bar')
print('d:', d)
print('foo =>', d['foo'])
print('bar =>', d['bar'])
只要所有键具有相同的默认值是合适的,此方法就可以正常工作。 如果默认值是用于聚合或累积值的类型(例如list,set或甚至int),则它尤其有用。 标准库文档包括几个以这种方式使用defaultdict的示例。
$ python3 collections_defaultdict.py

d: defaultdict(<function default_factory at 0x101341950>,
{'foo': 'bar'})
foo => bar
bar => default value
deque — Double-Ended Queue
双端队列即deque支持从队列的任一端添加和删除元素。 堆栈和队列更常用的是退化形式的deques,其中输入和输出仅限于单端。
#collections_deque.py
import collections

d = collections.deque('abcdefg')
print('Deque:', d)
print('Length:', len(d))
print('Left end:', d[0])
print('Right end:', d[-1])

d.remove('c')
print('remove(c):', d)
由于deques是一种序列容器,它们支持一些与list相同的操作,例如使用__getitem __()检查内容,确定长度,以及通过匹配标识符从队列中间删除元素。
$ python3 collections_deque.py

Deque: deque(['a', 'b', 'c', 'd', 'e', 'f', 'g'])
Length: 7
Left end: a
Right end: g
remove(c): deque(['a', 'b', 'd', 'e', 'f', 'g'])
Populating
可以从任一端填充双端队列,在Python实现中称为“左”和“右”。
#collections_deque_populating.py
import collections

# Add to the right
d1 = collections.deque()
d1.extend('abcdefg')
print('extend    :', d1)
d1.append('h')
print('append    :', d1)

# Add to the left
d2 = collections.deque()
d2.extendleft(range(6))
print('extendleft:', d2)
d2.appendleft(6)
print('appendleft:', d2)
extendleft()函数遍历其输入并为每个项执行appendleft()的等效操作。 最终结果是双端队列以相反的顺序包含输入序列。
$ python3 collections_deque_populating.py

extend    : deque(['a', 'b', 'c', 'd', 'e', 'f', 'g'])
append    : deque(['a', 'b', 'c', 'd', 'e', 'f', 'g', 'h'])
extendleft: deque([5, 4, 3, 2, 1, 0])
appendleft: deque([6, 5, 4, 3, 2, 1, 0])
Consuming
类似地,取决于所应用的算法,可以从两端或任一端消耗双端队列的元素。
#collections_deque_consuming.py
import collections

print('From the right:')
d = collections.deque('abcdefg')
while True:
    try:
        print(d.pop(), end='')
    except IndexError:
        break
print()

print('\nFrom the left:')
d = collections.deque(range(6))
while True:
    try:
        print(d.popleft(), end='')
    except IndexError:
        break
print()
pop()从双端队列的“右”端移除一项,popleft()从“左”端中取出一项。
$ python3 collections_deque_consuming.py

From the right:
gfedcba

From the left:
012345
由于deques是线程安全的,因此甚至可以用单独的线程同时从两端消耗内容。
#collections_deque_both_ends.py
import collections
import threading
import time

candle = collections.deque(range(5))

def burn(direction, nextSource):
    while True:
        try:
            next = nextSource()
        except IndexError:
            break
        else:
            print('{:>8}: {}'.format(direction, next))
            time.sleep(0.1)
    print('{:>8} done'.format(direction))
    return

left = threading.Thread(target=burn,
                        args=('Left', candle.popleft))
right = threading.Thread(target=burn,
                         args=('Right', candle.pop))

left.start()
right.start()

left.join()
right.join()
此示例中的线程在每个端点之间交替,删除项目直到deque为空。
$ python3 collections_deque_both_ends.py

 Left: 0
Right: 4
Right: 3
 Left: 1
Right: 2
 Left done
Right done
Rotating
双端队列的另一个用处是能够在任一方向上旋转它,以便跳过一些项目。
#collections_deque_rotate.py
import collections

d = collections.deque(range(10))
print('Normal        :', d)

d = collections.deque(range(10))
d.rotate(2)
print('Right rotation:', d)

d = collections.deque(range(10))
d.rotate(-2)
print('Left rotation :', d)
向右旋转双端(使用正向旋转值)从右端取出物品并将它们移动到左端。 向左旋转(带负值)从左端获取项目并将它们移动到右端。
$ python3 collections_deque_rotate.py

Normal        : deque([0, 1, 2, 3, 4, 5, 6, 7, 8, 9])
Right rotation: deque([8, 9, 0, 1, 2, 3, 4, 5, 6, 7])
Left rotation : deque([2, 3, 4, 5, 6, 7, 8, 9, 0, 1])
限制队列大小
deque实例可以配置一个最大长度,以使其永远不会超出该大小。 当队列达到指定长度时,将在添加新项目时丢弃现有项目。 此行为对于查找未确定长度的流中的最后n个项非常有用。
#collections_deque_maxlen.py
import collections
import random

# Set the random seed so we see the same output each time
# the script is run.
random.seed(1)

d1 = collections.deque(maxlen=3)
d2 = collections.deque(maxlen=3)

for i in range(5):
    n = random.randint(0, 100)
    print('n =', n)
    d1.append(n)
    d2.appendleft(n)
    print('D1:', d1)
    print('D2:', d2)
无论项目添加到哪一端,都会保持双端队列长度。
$ python3 collections_deque_maxlen.py

n = 17
D1: deque([17], maxlen=3)
D2: deque([17], maxlen=3)
n = 72
D1: deque([17, 72], maxlen=3)
D2: deque([72, 17], maxlen=3)
n = 97
D1: deque([17, 72, 97], maxlen=3)
D2: deque([97, 72, 17], maxlen=3)
n = 8
D1: deque([72, 97, 8], maxlen=3)
D2: deque([8, 97, 72], maxlen=3)
n = 32
D1: deque([97, 8, 32], maxlen=3)
D2: deque([32, 8, 97], maxlen=3)
namedtuple — Tuple Subclass with Named Fields
标准元组使用数字索引来访问其成员。
#collections_tuple.py
bob = ('Bob', 30, 'male')
print('Representation:', bob)

jane = ('Jane', 29, 'female')
print('\nField by index:', jane[0])

print('\nFields by index:')
for p in [bob, jane]:
    print('{} is a {} year old {}'.format(*p))
对于简单使用的情况,元组是一个方便的容器。
$ python3 collections_tuple.py

Representation: ('Bob', 30, 'male')

Field by index: Jane

Fields by index:
Bob is a 30 year old male
Jane is a 29 year old female
相反,记住每个值应该使用哪个索引可能会导致错误,特别是如果元组有很多字段并且构造的位置远离使用的位置。 namedtuple为每个成员分配名称和数字索引。
Defining
namedtuple实例与常规元组一样具有内存效率,因为它们没有每实例字典。 每种namedtuple都由它自己的类表示,它是使用namedtuple()工厂函数创建的。 参数是新类的名称和包含元素名称的字符串。
#collections_namedtuple_person.py
import collections

Person = collections.namedtuple('Person', 'name age')

bob = Person(name='Bob', age=30)
print('\nRepresentation:', bob)

jane = Person(name='Jane', age=29)
print('\nField by name:', jane.name)

print('\nFields by index:')
for p in [bob, jane]:
    print('{} is {} years old'.format(*p))
如示例所示,可以按名称使用点分表示法(obj.attr)以及使用标准元组的位置索引来访问namedtuple的字段。
$ python3 collections_namedtuple_person.py

Representation: Person(name='Bob', age=30)

Field by name: Jane

Fields by index:
Bob is 30 years old
Jane is 29 years old
就像常规元组一样,一个命名元组是不可变的。 此限制允许元组实例具有一致的哈希值,这使得可以将它们用作字典中的键或包含在集合中。
#collections_namedtuple_immutable.py
import collections

Person = collections.namedtuple('Person', 'name age')

pat = Person(name='Pat', age=12)
print('\nRepresentation:', pat)

pat.age = 21
尝试通过其命名属性更改值会导致AttributeError。
$ python3 collections_namedtuple_immutable.py

Representation: Person(name='Pat', age=12)
Traceback (most recent call last):
  File "collections_namedtuple_immutable.py", line 17, in
<module>
    pat.age = 21
AttributeError: can't set attribute
Invalid Field Names
如果字段名称重复或与Python关键字冲突,则字段名称无效。
#collections_namedtuple_bad_fields.py
import collections

try:
    collections.namedtuple('Person', 'name class age')
except ValueError as err:
    print(err)

try:
    collections.namedtuple('Person', 'name age age')
except ValueError as err:
    print(err)
在解析字段名称时,无效值会导致ValueError异常。
$ python3 collections_namedtuple_bad_fields.py

Type names and field names cannot be a keyword: 'class'
Encountered duplicate field name: 'age'
在基于程序控制之外的值创建namedtuple的情况下(例如,表示数据库查询返回的行,其中模式未提前知道),rename选项应设置为True,这样无效字段会被重命名。
#collections_namedtuple_rename.py
import collections

with_class = collections.namedtuple(
    'Person', 'name class age',
    rename=True)
print(with_class._fields)

two_ages = collections.namedtuple(
    'Person', 'name age age',
    rename=True)
print(two_ages._fields)
重命名字段的新名称取决于它们在元组中的索引,因此class字段变为_1,重复的age字段变为_2。
$ python3 collections_namedtuple_rename.py

('name', '_1', 'age')
('name', 'age', '_2')
Special Attributes
namedtuple提供了几个有用的属性和方法来处理子类和实例。 所有这些内置属性的名称都以下划线(_)为前缀,(_)按照惯例在大多数Python程序中表示私有属性。 但是,对于namedtuple,前缀旨在保护名称不与用户提供的属性名称冲突。
传递给namedtuple以定义新类的字段名称保存在_fields属性中。
#collections_namedtuple_fields.py
import collections

Person = collections.namedtuple('Person', 'name age')

bob = Person(name='Bob', age=30)
print('Representation:', bob)
print('Fields:', bob._fields)
虽然参数是单个空格分隔的字符串,但存储的值是各个名称的序列。
$ python3 collections_namedtuple_fields.py

Representation: Person(name='Bob', age=30)
Fields: ('name', 'age')
可以使用_asdict()将namedtuple实例转换为OrderedDict实例。
#collections_namedtuple_asdict.py
import collections

Person = collections.namedtuple('Person', 'name age')

bob = Person(name='Bob', age=30)
print('Representation:', bob)
print('As Dictionary:', bob._asdict())
OrderedDict的键与namedtuple的字段顺序相同。
$ python3 collections_namedtuple_asdict.py

Representation: Person(name='Bob', age=30)
As Dictionary: OrderedDict([('name', 'Bob'), ('age', 30)])
_replace()方法构建一个新实例,替换进程中某些字段的值。
#collections_namedtuple_replace.py
import collections

Person = collections.namedtuple('Person', 'name age')

bob = Person(name='Bob', age=30)
print('\nBefore:', bob)
bob2 = bob._replace(name='Robert')
print('After:', bob2)
print('Same?:', bob is bob2)
虽然名称暗示它正在修改现有对象,但由于namedtuple实例是不可变的,因此该方法实际上返回一个新对象。
$ python3 collections_namedtuple_replace.py

Before: Person(name='Bob', age=30)
After: Person(name='Robert', age=30)
Same?: False
OrderedDict — Remember the Order Keys are Added to a Dictionary
OrderedDict是一个字典子类,它会记住元素添加的顺序。
#collections_ordereddict_iter.py
import collections

print('Regular dictionary:')
d = {}
d['a'] = 'A'
d['b'] = 'B'
d['c'] = 'C'

for k, v in d.items():
    print(k, v)

print('\nOrderedDict:')
d = collections.OrderedDict()
d['a'] = 'A'
d['b'] = 'B'
d['c'] = 'C'

for k, v in d.items():
    print(k, v)
在Python 3.6之前,常规字典没有跟踪插入顺序,并且迭代它会根据密钥在哈希表中的存储方式按顺序生成值,而哈希表又受随机值的影响以减少冲突。 相反,在OrderedDict中,在创建迭代器时会记住并使用插入项的顺序。
$ python3.5 collections_ordereddict_iter.py

Regular dictionary:
c C
b B
a A

OrderedDict:
a A
b B
c C
在Python 3.6下,内置的dict确实跟踪了插入顺序,尽管这种行为是实现更改的副作用,不应该依赖它。
$ python3.6 collections_ordereddict_iter.py

Regular dictionary:
a A
b B
c C

OrderedDict:
a A
b B
c C
Equality
在测试相等性时,常规字典会查看其内容。 OrderedDict还会考虑项目添加的顺序。
#collections_ordereddict_equality.py
import collections

print('dict       :', end=' ')
d1 = {}
d1['a'] = 'A'
d1['b'] = 'B'
d1['c'] = 'C'

d2 = {}
d2['c'] = 'C'
d2['b'] = 'B'
d2['a'] = 'A'

print(d1 == d2)

print('OrderedDict:', end=' ')

d1 = collections.OrderedDict()
d1['a'] = 'A'
d1['b'] = 'B'
d1['c'] = 'C'

d2 = collections.OrderedDict()
d2['c'] = 'C'
d2['b'] = 'B'
d2['a'] = 'A'

print(d1 == d2)
在这种情况下,由于两个有序词典是以不同顺序的值创建的,因此它们被认为是不同的。
$ python3 collections_ordereddict_equality.py

dict       : True
OrderedDict: False
Reordering
通过使用move_to_end()将键移动到序列的开头或结尾,可以更改OrderedDict中键的顺序。
#collections_ordereddict_move_to_end.py
import collections

d = collections.OrderedDict(
    [('a', 'A'), ('b', 'B'), ('c', 'C')]
)

print('Before:')
for k, v in d.items():
    print(k, v)

d.move_to_end('b')

print('\nmove_to_end():')
for k, v in d.items():
    print(k, v)

d.move_to_end('b', last=False)

print('\nmove_to_end(last=False):')
for k, v in d.items():
    print(k, v)
last参数告诉move_to_end()是将项目移动到键序列中的最后一项(当为True时)还是第一项(当为False时)。
$ python3 collections_ordereddict_move_to_end.py

Before:
a A
b B
c C

move_to_end():
a A
c C
b B

move_to_end(last=False):
b B
a A
c C
collections.abc — 容器的抽象基类
目的:容器数据类型的抽象基类。
collections.abc模块包含抽象基类,这些基类定义了Python内置的容器数据结构的API,由collections模块提供。 请参阅下表以获取类及其用途的列表。
Abstract Base Classes
| Class | Base Class(es) | API Purpose |
|---|---|---|
| Container | 基本容器功能,例如in运算符 | |
| Hashable | 添加了对容器实例提供哈希值的支持。 | |
| Iterable | 可以在容器内容上创建迭代器。 | |
| Iterator | Iterable | 是容器内容的迭代器。 |
| Generator | Iterator | 使用PEP 342中的生成器协议扩展迭代器。 |
| Sized | 添加容器的方法,知道它们有多大。 | |
| Callable | 对于可以作为函数调用的容器。 | |
| Sequence | Sized, Iterable, Container | 支持检索单个项目,迭代和更改项目的顺序。 |
| MutableSequence | Sequence | 支持在创建实例后添加和删除项目。 |
| ByteString | Sequence | 字节和bytearray的组合API。 |
| Set | Sized, Iterable, Container | 支持设置操作,例如交集和并集。 |
| MutableSet | Set | 添加在创建后操纵设置内容的方法。 |
| Mapping | Sized, Iterable, Container | 定义dict使用的只读API。 |
| MutableMapping | Mapping | 定义在创建映射后操作映射内容的方法。 |
| MappingView | Sized | 定义用于从迭代器访问映射的视图API。 |
| ItemsView | MappingView, Set | Part of the view API. |
| KeysView | MappingView, Set | Part of the view API. |
| ValuesView | MappingView | Part of the view API. |
| Awaitable | 可以在等待表达式中使用的对象的API,例如协同程序。 | |
| Coroutine | Awaitable | 用于实现协程协议的类的API。 |
| AsyncIterable | 与PEP 492中定义的async兼容的迭代API。 | |
| AsyncIterator | AsyncIterable | 异步迭代器的API。 |
除了明确定义具有不同语义的容器的API之外,这些抽象基类还可用于在使用isinstance()调用对象之前测试对象是否支持API。 有些类还提供了方法的实现,它们可以用作混合来构建自定义容器类型,而无需从头开始实现每个方法。
array — Sequence of Fixed-type Data
目的:高效地管理固定类型数值数据序列。
array模块定义了一个看起来非常像列表的序列数据结构,除了所有成员必须是相同的基本类型。 支持的类型都是数字或其他固定大小的基本类型,如字节。
有关某些支持的类型,请参阅下表。 array的标准库文档包含完整的类型代码列表。
Type Codes for array Members
| Codes | Type | Minimum size (bytes) |
|---|---|---|
| b | int | 1 |
| B | int | 1 |
| h | signed short | 2 |
| H | unsigned short | 2 |
| i | signed int | 2 |
| I | unsigned int | 2 |
| l | signed long | 4 |
| L | unsigned long | 4 |
| q | signed long long | 8 |
| Q | unsigned long long | 8 |
| f | float | 4 |
| d | double float | 8 |
Initialization
使用一个允许的数据类型参数来实例化数组,并且可能带有一个初始数据序列,。
#array_string.py
import array
import binascii

s = b'This is the array.'
a = array.array('b', s)

print('As byte string:', s)
print('As array      :', a)
print('As hex        :', binascii.hexlify(a))
在此示例中,数组配置为保存字节序列,并使用简单的字节字符串进行初始化。
$ python3 array_string.py

As byte string: b'This is the array.'
As array      : array('b', [84, 104, 105, 115, 32, 105, 115, 32,
 116, 104, 101, 32, 97, 114, 114, 97, 121, 46])
As hex        : b'54686973206973207468652061727261792e'
Manipulating Arrays
可以使用与其他Python序列相同的方式扩展和操作数组。
#array_sequence.py
import array
import pprint

a = array.array('i', range(3))
print('Initial :', a)

a.extend(range(3))
print('Extended:', a)

print('Slice   :', a[2:5])

print('Iterator:')
print(list(enumerate(a)))
支持的操作包括切片,迭代和添加元素到最后。
$ python3 array_sequence.py

Initial : array('i', [0, 1, 2])
Extended: array('i', [0, 1, 2, 0, 1, 2])
Slice   : array('i', [2, 0, 1])
Iterator:
[(0, 0), (1, 1), (2, 2), (3, 0), (4, 1), (5, 2)]
Arrays and Files
数组可以使用专用高效的内置方法向文件写入和读取内容。
#array_file.py
import array
import binascii
import tempfile

a = array.array('i', range(5))
print('A1:', a)

# Write the array of numbers to a temporary file
output = tempfile.NamedTemporaryFile()
a.tofile(output.file)  # must pass an *actual* file
output.flush()

# Read the raw data
with open(output.name, 'rb') as input:
    raw_data = input.read()
    print('Raw Contents:', binascii.hexlify(raw_data))

    # Read the data into an array
    input.seek(0)
    a2 = array.array('i')
    a2.fromfile(input, len(a))
    print('A2:', a2)
此示例说明直接从二进制文件读取数据“raw”,与将其读入新数组并将字节转换为适当的类型对比。
$ python3 array_file.py

A1: array('i', [0, 1, 2, 3, 4])
Raw Contents: b'0000000001000000020000000300000004000000'
A2: array('i', [0, 1, 2, 3, 4])
tofile()使用tobytes()来格式化数据,而fromfile()使用frombytes()将其转换回数组实例。
#array_tobytes.py
import array
import binascii

a = array.array('i', range(5))
print('A1:', a)

as_bytes = a.tobytes()
print('Bytes:', binascii.hexlify(as_bytes))

a2 = array.array('i')
a2.frombytes(as_bytes)
print('A2:', a2)
tobytes()和frombytes()都处理字节字符串,而不是Unicode字符串。
$ python3 array_tobytes.py

A1: array('i', [0, 1, 2, 3, 4])
Bytes: b'0000000001000000020000000300000004000000'
A2: array('i', [0, 1, 2, 3, 4])
Alternative Byte Ordering
在Python中,如果数组中的数据不是本机字节顺序,或者数据需要在发送到具有不同字节顺序(或通过网络)的系统之前进行交换,则可以转换整个数组而无需迭代元素。
#array_byteswap.py
import array
import binascii

def to_hex(a):
    chars_per_item = a.itemsize * 2  # 2 hex digits
    hex_version = binascii.hexlify(a)
    num_chunks = len(hex_version) // chars_per_item
    for i in range(num_chunks):
        start = i * chars_per_item
        end = start + chars_per_item
        yield hex_version[start:end]

start = int('0x12345678', 16)
end = start + 5
a1 = array.array('i', range(start, end))
a2 = array.array('i', range(start, end))
a2.byteswap()

fmt = '{:>12} {:>12} {:>12} {:>12}'
print(fmt.format('A1 hex', 'A1', 'A2 hex', 'A2'))
print(fmt.format('-' * 12, '-' * 12, '-' * 12, '-' * 12))
fmt = '{!r:>12} {:12} {!r:>12} {:12}'
for values in zip(to_hex(a1), a1, to_hex(a2), a2):
    print(fmt.format(*values))
byteswap()方法从C中切换数组中项的字节顺序,因此它比在Python中循环数据更有效。
$ python3 array_byteswap.py

      A1 hex           A1       A2 hex           A2
------------ ------------ ------------ ------------
 b'78563412'    305419896  b'12345678'   2018915346
 b'79563412'    305419897  b'12345679'   2035692562
 b'7a563412'    305419898  b'1234567a'   2052469778
 b'7b563412'    305419899  b'1234567b'   2069246994
 b'7c563412'    305419900  b'1234567c'   2086024210
heapq – Heap Sort Algorithm
目的:heapq实现了适用于Python列表的最小堆排序算法。
堆是一种树状数据结构,其中子节点与父节点具有排序顺序关系。 可以使用有组织的列表或数组来表示二进制堆,使得元素N的子元素位于2*N+1和2*N+2的位置(对于从零开始的索引)。 这种布局可以就地重新排列堆,因此在添加或删除项目时无需重新分配尽可能多的内存。
max-heap确保父节点大于或等于其子节点。 min-heap要求父节点小于或等于其子节点。 Python的heapq模块实现了一个min-heap。
Example Data
本节中的示例使用heapq_heapdata.py中的数据。
#heapq_heapdata.py
# This data was generated with the random module.

data = [19, 9, 4, 10, 11]
使用heapq_showtree.py打印堆输出。
#heapq_showtree.py
import math
from io import StringIO

def show_tree(tree, total_width=36, fill=' '):
    """Pretty-print a tree."""
    output = StringIO()
    last_row = -1
    for i, n in enumerate(tree):
        if i:
            row = int(math.floor(math.log(i + 1, 2)))
        else:
            row = 0
        if row != last_row:
            output.write('\n')
        columns = 2 ** row
        col_width = int(math.floor(total_width / columns))
        output.write(str(n).center(col_width, fill))
        last_row = row
    print(output.getvalue())
    print('-' * total_width)
    print()
Creating a Heap
创建堆有两种基本方法:heappush()和heapify()。
#heapq_heappush.py
import heapq
from heapq_showtree import show_tree
from heapq_heapdata import data

heap = []
print('random :', data)
print()

for n in data:
    print('add {:>3}:'.format(n))
    heapq.heappush(heap, n)
    show_tree(heap)
使用heappush(),在从数据源添加新项目时维护元素的堆排序顺序。
$ python3 heapq_heappush.py

random : [19, 9, 4, 10, 11]

add  19:

                 19
------------------------------------

add   9:

                 9
        19
------------------------------------

add   4:

                 4
        19                9
------------------------------------

add  10:

                 4
        10                9
    19
------------------------------------

add  11:

                 4
        10                9
    19       11
------------------------------------
如果数据已经在内存中,则使用heapify()重新排列列表中的项目会更有效。
#heapq_heapify.py
import heapq
from heapq_showtree import show_tree
from heapq_heapdata import data

print('random    :', data)
heapq.heapify(data)
print('heapified :')
show_tree(data)
以堆顺序一次一个元素构建一个列表的结果与构建无序列表然后调用heapify()相同
$ python3 heapq_heapify.py

random    : [19, 9, 4, 10, 11]
heapified :

                 4
        9                 19
    10       11
------------------------------------
Accessing the Contents of a Heap
正确组织堆后,使用heappop()删除具有最低值的元素。
#heapq_heappop.py
import heapq
from heapq_showtree import show_tree
from heapq_heapdata import data

print('random    :', data)
heapq.heapify(data)
print('heapified :')
show_tree(data)
print()

for i in range(2):
    smallest = heapq.heappop(data)
    print('pop    {:>3}:'.format(smallest))
    show_tree(data)
在此示例中,改编自stdlib文档,heapify()和heappop()用于对数字列表进行排序。
$ python3 heapq_heappop.py

random    : [19, 9, 4, 10, 11]
heapified :

                 4
        9                 19
    10       11
------------------------------------


pop      4:

                 9
        10                19
    11
------------------------------------

pop      9:

                 10
        11                19
------------------------------------
要删除现有元素并在单个操作中用新值替换它们,请使用heapreplace()。
#heapq_heapreplace.py
import heapq
from heapq_showtree import show_tree
from heapq_heapdata import data

heapq.heapify(data)
print('start:')
show_tree(data)

for n in [0, 13]:
    smallest = heapq.heapreplace(data, n)
    print('replace {:>2} with {:>2}:'.format(smallest, n))
    show_tree(data)
替换元素可以维护固定大小的堆,例如按优先级排序的作业队列。
$ python3 heapq_heapreplace.py

start:

                 4
        9                 19
    10       11
------------------------------------

replace  4 with  0:

                 0
        9                 19
    10       11
------------------------------------

replace  0 with 13:

                 9
        10                19
    13       11
------------------------------------
Data Extremes from a Heap
heapq还包括两个函数来检查iterable并查找它包含的最大值或最小值的范围。
#heapq_extremes.py
import heapq
from heapq_heapdata import data

print('all       :', data)
print('3 largest :', heapq.nlargest(3, data))
print('from sort :', list(reversed(sorted(data)[-3:])))
print('3 smallest:', heapq.nsmallest(3, data))
print('from sort :', sorted(data)[:3])
使用nlargest()和nsmallest()仅对n> 1的相对较小的值有效,但在少数情况下仍然可以派上用场。
$ python3 heapq_extremes.py

all       : [19, 9, 4, 10, 11]
3 largest : [19, 11, 10]
from sort : [19, 11, 10]
3 smallest: [4, 9, 10]
from sort : [4, 9, 10]
Efficiently Merging Sorted Sequences
将几个排序的序列组合成一个新序列对于小数据集来说很容易。
list(sorted(itertools.chain(*data)))
对于较大的数据集,此技术会占用大量内存。 merge()不是对整个组合序列进行排序,而是使用堆一次一个元素的生成一个新序列,使用固定数量的内存确定下一个元素。
#heapq_merge.py
import heapq
import random

random.seed(2016)

data = []
for i in range(4):
    new_data = list(random.sample(range(1, 101), 5))
    new_data.sort()
    data.append(new_data)

for i, d in enumerate(data):
    print('{}: {}'.format(i, d))

print('\nMerged:')
for i in heapq.merge(*data):
    print(i, end=' ')
print()
由于merge()的实现使用堆,因此它会根据要合并的序列数消耗内存,而不是这些序列中的项数。
$ python3 heapq_merge.py

0: [33, 58, 71, 88, 95]
1: [10, 11, 17, 38, 91]
2: [13, 18, 39, 61, 63]
3: [20, 27, 31, 42, 45]

Merged:
10 11 13 17 18 20 27 31 33 38 39 42 45 58 61 63 71 88 91 95
bisect — Maintain Lists in Sorted Order
目的:按排序顺序维护一个列表,而不必在每次将元素添加到列表时调用排序。
bisect模块实现了一种算法,用于将元素插入列表,同时按排序顺序维护列表。
Inserting in Sorted Order
下面是一个简单的示例,其中使用insort()按排序顺序将元素插入到列表中。
#bisect_example.py
import bisect

# A series of random numbers
values = [14, 85, 77, 26, 50, 45, 66, 79, 10, 3, 84, 77, 1]

print('New  Pos  Contents')
print('---  ---  --------')

l = []
for i in values:
    position = bisect.bisect(l, i)
    bisect.insort(l, i)
    print('{:3}  {:3}'.format(i, position), l)
输出的第一列显示新的随机数。 第二列显示数字将插入列表的位置。 每行的其余部分是当前排序列表。
$ python3 bisect_example.py

New  Pos  Contents
---  ---  --------
 14    0 [14]
 85    1 [14, 85]
 77    1 [14, 77, 85]
 26    1 [14, 26, 77, 85]
 50    2 [14, 26, 50, 77, 85]
 45    2 [14, 26, 45, 50, 77, 85]
 66    4 [14, 26, 45, 50, 66, 77, 85]
 79    6 [14, 26, 45, 50, 66, 77, 79, 85]
 10    0 [10, 14, 26, 45, 50, 66, 77, 79, 85]
  3    0 [3, 10, 14, 26, 45, 50, 66, 77, 79, 85]
 84    9 [3, 10, 14, 26, 45, 50, 66, 77, 79, 84, 85]
 77    8 [3, 10, 14, 26, 45, 50, 66, 77, 77, 79, 84, 85]
  1    0 [1, 3, 10, 14, 26, 45, 50, 66, 77, 77, 79, 84, 85]
这是一个简单的例子。 事实上,考虑到被操作的数据量,简单地构建列表然后对其进行一次排序可能会更快。 相比之下,对于长列表,使用诸如此类的插入排序算法可以实现显着的减少时间和内存的使用,尤其是当比较列表的两个成员的操作需要复杂的计算时。
Handling Duplicates
前面显示的结果集包含重复值77. bisect模块提供了两种处理重复的方法:可以将新值插入现有值的左侧或右侧。 insort()函数实际上是insort_right()的别名,它在现有值之后插入重复元素。 相应的函数insort_left()在现有值之前插入。
#bisect_example2.py
import bisect

# A series of random numbers
values = [14, 85, 77, 26, 50, 45, 66, 79, 10, 3, 84, 77, 1]

print('New  Pos  Contents')
print('---  ---  --------')

# Use bisect_left and insort_left.
l = []
for i in values:
    position = bisect.bisect_left(l, i)
    bisect.insort_left(l, i)
    print('{:3}  {:3}'.format(i, position), l)
当使用bisect_left()和insort_left()操作相同的数据时,结果是相同的排序列表,但插入位置对于重复值是不同的。
$ python3 bisect_example2.py

New  Pos  Contents
---  ---  --------
 14    0 [14]
 85    1 [14, 85]
 77    1 [14, 77, 85]
 26    1 [14, 26, 77, 85]
 50    2 [14, 26, 50, 77, 85]
 45    2 [14, 26, 45, 50, 77, 85]
 66    4 [14, 26, 45, 50, 66, 77, 85]
 79    6 [14, 26, 45, 50, 66, 77, 79, 85]
 10    0 [10, 14, 26, 45, 50, 66, 77, 79, 85]
  3    0 [3, 10, 14, 26, 45, 50, 66, 77, 79, 85]
 84    9 [3, 10, 14, 26, 45, 50, 66, 77, 79, 84, 85]
 77    7 [3, 10, 14, 26, 45, 50, 66, 77, 77, 79, 84, 85]
  1    0 [1, 3, 10, 14, 26, 45, 50, 66, 77, 77, 79, 84, 85]
queue — Thread-Safe FIFO Implementation
目的:提供线程安全的FIFO实现
queue模块提供适用于多线程编程的先进先出(FIFO)数据结构。 它可用于安全地在生产者和消费者线程之间传递消息或其他数据。 它自动为调用者处理锁,因此许多线程可以安全、轻松地使用同一个Queue实例。 队列的大小(它包含的元素数量)可能受内存使用阀值和进程的限制。
Basic FIFO Queue
Queue类实现了一个基本的先进先出容器。 使用put()将元素添加到序列的一端,并使用get()从另一端删除元素。
#queue_fifo.py
import queue

q = queue.Queue()

for i in range(5):
    q.put(i)

while not q.empty():
    print(q.get(), end=' ')
print()
此示例使用单个线程来说明元素是按照插入它们的顺序从队列中删除的。
$ python3 queue_fifo.py

0 1 2 3 4
LIFO Queue
与Queue的标准FIFO实现相反,LifoQueue使用后进先出顺序(通常与堆栈数据结构相关联)。
#queue_lifo.py
import queue

q = queue.LifoQueue()

for i in range(5):
    q.put(i)

while not q.empty():
    print(q.get(), end=' ')
print()
最近放入队列的项目由get删除。
$ python3 queue_lifo.py

4 3 2 1 0
Priority Queue
有时,队列中项目的处理顺序需要基于这些项目的特征,而不仅仅是它们创建或添加到队列的顺序。 例如,工资单部门的打印作业可能优先于开发人员想要打印的代码清单。 PriorityQueue使用队列内容的排序顺序来决定要检索的项目。
#queue_priority.py
import functools
import queue
import threading

@functools.total_ordering
class Job:

    def __init__(self, priority, description):
        self.priority = priority
        self.description = description
        print('New job:', description)
        return

    def __eq__(self, other):
        try:
            return self.priority == other.priority
        except AttributeError:
            return NotImplemented

    def __lt__(self, other):
        try:
            return self.priority < other.priority
        except AttributeError:
            return NotImplemented

q = queue.PriorityQueue()

q.put(Job(3, 'Mid-level job'))
q.put(Job(10, 'Low-level job'))
q.put(Job(1, 'Important job'))

def process_job(q):
    while True:
        next_job = q.get()
        print('Processing job:', next_job.description)
        q.task_done()

workers = [
    threading.Thread(target=process_job, args=(q,)),
    threading.Thread(target=process_job, args=(q,)),
]
for w in workers:
    w.setDaemon(True)
    w.start()

q.join()
此示例具有多个消耗作业的线程,这些作业在调用get()时根据队列中项目的优先级进行处理。 在消费者线程运行时,添加到队列的项的处理顺序取决于线程上下文切换。
$ python3 queue_priority.py

New job: Mid-level job
New job: Low-level job
New job: Important job
Processing job: Important job
Processing job: Mid-level job
Processing job: Low-level job
Building a Threaded Podcast Client
本节中播客客户端的源代码演示了如何将Queue类与多个线程一起使用。 该程序读取一个或多个RSS源,将每个要下载的feed的最近5个enclosure排入队列,并使用线程并行处理多个下载。 对于真正的产品来说它没有完善的错误处理,但框架的实现说明了queue模块的使用。
首先,建立一些操作参数。 通常,这些将来自用户输入(例如,偏好或数据库)。 该示例使用硬编码值来表示线程数和要获取的URL列表。
#fetch_podcasts.py
from queue import Queue
import threading
import time
import urllib
from urllib.parse import urlparse

import feedparser

# Set up some global variables
num_fetch_threads = 2
enclosure_queue = Queue()

# A real app wouldn't use hard-coded data...
feed_urls = [
    'http://talkpython.fm/episodes/rss',
]


def message(s):
    print('{}: {}'.format(threading.current_thread().name, s))
函数download_enclosures()在工作线程中运行,并使用urllib处理下载。
def download_enclosures(q):
    """This is the worker thread function.
    It processes items in the queue one after
    another.  These daemon threads go into an
    infinite loop, and exit only when
    the main thread ends.
    """
    while True:
        message('looking for the next enclosure')
        url = q.get()
        filename = url.rpartition('/')[-1]
        message('downloading {}'.format(filename))
        response = urllib.request.urlopen(url)
        data = response.read()
        # Save the downloaded file to the current directory
        message('writing to {}'.format(filename))
        with open(filename, 'wb') as outfile:
            outfile.write(data)
        q.task_done()
一旦定义了线程的目标函数,就可以启动工作线程。 当download_enclosures()处理语句url = q.get()时,它会阻塞并等待,直到队列有内容返回。 这意味着在队列中有任何内容之前启动线程是安全的。
# Set up some threads to fetch the enclosures
for i in range(num_fetch_threads):
    worker = threading.Thread(
        target=download_enclosures,
        args=(enclosure_queue,),
        name='worker-{}'.format(i),
    )
    worker.setDaemon(True)
    worker.start()
下一步是使用feedparser模块检索feed内容,并将enclosures的URL排入队列。 只要将第一个URL添加到队列中,其中一个工作线程就会将其选中并开始下载。 这个循环持续添加项目,直到feed耗尽,并且工作线程轮流将URL从队列中取出以下载它们。
# Download the feed(s) and put the enclosure URLs into
# the queue.
for url in feed_urls:
    response = feedparser.parse(url, agent='fetch_podcasts.py')
    for entry in response['entries'][:5]:
        for enclosure in entry.get('enclosures', []):
            parsed_url = urlparse(enclosure['url'])
            message('queuing {}'.format(
                parsed_url.path.rpartition('/')[-1]))
            enclosure_queue.put(enclosure['url'])
剩下要做的就是等待队列再次清空,使用join()。
# Now wait for the queue to be empty, indicating that we have
# processed all of the downloads.
message('*** main thread waiting')
enclosure_queue.join()
message('*** done')
运行示例脚本会生成类似于以下内容的输出。
$ python3 fetch_podcasts.py

worker-0: looking for the next enclosure
worker-1: looking for the next enclosure
MainThread: queuing turbogears-and-the-future-of-python-web-frameworks.mp3
MainThread: queuing continuum-scientific-python-and-the-business-of-open-source.mp3
MainThread: queuing openstack-cloud-computing-built-on-python.mp3
MainThread: queuing pypy.js-pypy-python-in-your-browser.mp3
MainThread: queuing machine-learning-with-python-and-scikit-learn.mp3
MainThread: *** main thread waiting
worker-0: downloading turbogears-and-the-future-of-python-web-frameworks.mp3
worker-1: downloading continuum-scientific-python-and-the-business-of-open-source.mp3
worker-0: looking for the next enclosure
worker-0: downloading openstack-cloud-computing-built-on-python.mp3
worker-1: looking for the next enclosure
worker-1: downloading pypy.js-pypy-python-in-your-browser.mp3
worker-0: looking for the next enclosure
worker-0: downloading machine-learning-with-python-and-scikit-learn.mp3
worker-1: looking for the next enclosure
worker-0: looking for the next enclosure
MainThread: *** done
实际输出取决于所用RSS源的内容。
struct — Binary Data Structures
目的:在字符串和二进制数据之间转换。
struct模块包括用于在字节串和本机Python数据类型(如数字和字符串)之间进行转换的函数。
Functions vs Struct Class
一组模块级函数以及Struct类可用于处理结构化值。格式说明符从其字符串格式转换为被编译的表示形式,类似于处理正则表达式的方式。转换需要一些资源,因此在创建Struct实例并在实例上调用方法而不是使用模块级函数时,通常更有效。以下所有示例都使用Struct类。
Packing and Unpacking
Structs支持将数据打包成字符串,并使用格式说明符从字符串中解压缩数据,格式说明符由表示数据类型和可选计数和字节顺序指示符的字符组成。有关支持的格式说明符的完整列表,请参阅标准库文档。
在此示例中,说明符要求整数或长整数值、双字节字符串和浮点数。包含在格式说明符中的空格以分隔类型指示符,并在编译格式时被忽略。
#struct_pack.py
import struct
import binascii

values = (1, 'ab'.encode('utf-8'), 2.7)
s = struct.Struct('I 2s f')
packed_data = s.pack(*values)

print('Original values:', values)
print('Format string  :', s.format)
print('Uses           :', s.size, 'bytes')
print('Packed Value   :', binascii.hexlify(packed_data))
该示例将打包值转换为十六进制字节序列,以便使用binascii.hexlify()进行打印,因为某些字符为空。
$ python3 struct_pack.py

Original values: (1, b'ab', 2.7)
Format string  : b'I 2s f'
Uses           : 12 bytes
Packed Value   : b'0100000061620000cdcc2c40'
使用unpack()从其压缩表示中提取数据。
#struct_unpack.py
import struct
import binascii

packed_data = binascii.unhexlify(b'0100000061620000cdcc2c40')

s = struct.Struct('I 2s f')
unpacked_data = s.unpack(packed_data)
print('Unpacked Values:', unpacked_data)
将打包值传递给unpack(),返回基本相同的值(注意浮点值的差异)。
$ python3 struct_unpack.py

Unpacked Values: (1, b'ab', 2.700000047683716)
Endianness(字节序)
默认情况下,使用本地C库的字节序概念对值进行编码。 通过在格式字符串中提供显式字节序指令,可以轻松覆盖该选项。
#struct_endianness.py
import struct
import binascii

values = (1, 'ab'.encode('utf-8'), 2.7)
print('Original values:', values)

endianness = [
    ('@', 'native, native'),
    ('=', 'native, standard'),
    ('<', 'little-endian'),
    ('>', 'big-endian'),
    ('!', 'network'),
]

for code, name in endianness:
    s = struct.Struct(code + ' I 2s f')
    packed_data = s.pack(*values)
    print()
    print('Format string  :', s.format, 'for', name)
    print('Uses           :', s.size, 'bytes')
    print('Packed Value   :', binascii.hexlify(packed_data))
    print('Unpacked Value :', s.unpack(packed_data))
下表列出了Struct使用的字节顺序说明符。
Byte Order Specifiers for struct
| Code | Meaning |
|---|---|
@ |
Native order |
= |
Native standard |
< |
little-endian |
> |
big-endian |
! |
Network order |
$ python3 struct_endianness.py

Original values: (1, b'ab', 2.7)

Format string  : b'@ I 2s f' for native, native
Uses           : 12 bytes
Packed Value   : b'0100000061620000cdcc2c40'
Unpacked Value : (1, b'ab', 2.700000047683716)

Format string  : b'= I 2s f' for native, standard
Uses           : 10 bytes
Packed Value   : b'010000006162cdcc2c40'
Unpacked Value : (1, b'ab', 2.700000047683716)

Format string  : b'< I 2s f' for little-endian
Uses           : 10 bytes
Packed Value   : b'010000006162cdcc2c40'
Unpacked Value : (1, b'ab', 2.700000047683716)

Format string  : b'> I 2s f' for big-endian
Uses           : 10 bytes
Packed Value   : b'000000016162402ccccd'
Unpacked Value : (1, b'ab', 2.700000047683716)

Format string  : b'! I 2s f' for network
Uses           : 10 bytes
Packed Value   : b'000000016162402ccccd'
Unpacked Value : (1, b'ab', 2.700000047683716)
Buffers
使用二进制打包数据通常保留用于对性能敏感的情况或将数据传入和传出扩展模块。 通过避免为每个打包结构分配新缓冲区的开销,可以优化这些情况。 pack_into()和unpack_from()方法支持直接写入预分配的缓冲区。
#struct_buffers.py
import array
import binascii
import ctypes
import struct

s = struct.Struct('I 2s f')
values = (1, 'ab'.encode('utf-8'), 2.7)
print('Original:', values)

print()
print('ctypes string buffer')

b = ctypes.create_string_buffer(s.size)
print('Before  :', binascii.hexlify(b.raw))
s.pack_into(b, 0, *values)
print('After   :', binascii.hexlify(b.raw))
print('Unpacked:', s.unpack_from(b, 0))

print()
print('array')

a = array.array('b', b'\0' * s.size)
print('Before  :', binascii.hexlify(a))
s.pack_into(a, 0, *values)
print('After   :', binascii.hexlify(a))
print('Unpacked:', s.unpack_from(a, 0))
Struct的size属性告诉我们缓冲区需要多大。
$ python3 struct_buffers.py

Original: (1, b'ab', 2.7)

ctypes string buffer
Before  : b'000000000000000000000000'
After   : b'0100000061620000cdcc2c40'
Unpacked: (1, b'ab', 2.700000047683716)

array
Before  : b'000000000000000000000000'
After   : b'0100000061620000cdcc2c40'
Unpacked: (1, b'ab', 2.700000047683716)
weakref — Impermanent References to Objects
目的:请参阅“昂贵”对象,但如果没有其他非弱引用,则允许垃圾回收器回收其内存。
weakref模块支持对对象的弱引用。 正常引用会增加对象上的引用计数,并防止对其进行垃圾回收。 这种结果并不总是令人满意的,特别是当可能存在循环引用时或者在需要通过删除对象的缓存来获取内存时。 弱引用是对象的句柄,不会阻止它被自动清理。
References
通过ref类管理对对象的弱引用。 要检索原始对象,请调用引用对象。
#weakref_ref.py
import weakref

class ExpensiveObject:
    def __del__(self):
        print('(Deleting {})'.format(self))

obj = ExpensiveObject()
r = weakref.ref(obj)

print('obj:', obj)
print('ref:', r)
print('r():', r())

print('deleting obj')
del obj
print('r():', r())
在这种情况下,由于在第二次调用引用之前删除了obj,因此ref返回None。
$ python3 weakref_ref.py

obj: <__main__.ExpensiveObject object at 0x1007b1a58>
ref: <weakref at 0x1007a92c8; to 'ExpensiveObject' at
0x1007b1a58>
r(): <__main__.ExpensiveObject object at 0x1007b1a58>
deleting obj
(Deleting <__main__.ExpensiveObject object at 0x1007b1a58>)
r(): None
Reference Callbacks
ref构造函数接受可选的回调函数,该函数在删除引用的对象时调用。
#weakref_ref_callback.py
import weakref

class ExpensiveObject:
    def __del__(self):
        print('(Deleting {})'.format(self))

def callback(reference):
    """Invoked when referenced object is deleted"""
    print('callback({!r})'.format(reference))

obj = ExpensiveObject()
r = weakref.ref(obj, callback)

print('obj:', obj)
print('ref:', r)
print('r():', r())

print('deleting obj')
del obj
print('r():', r())
在引用“死掉”并且不再引用原始对象之后,回调函数接收引用对象作为参数。 此功能的一个用途是从缓存中删除弱引用对象。
$ python3 weakref_ref_callback.py

obj: <__main__.ExpensiveObject object at 0x1010b1978>
ref: <weakref at 0x1010a92c8; to 'ExpensiveObject' at
0x1010b1978>
r(): <__main__.ExpensiveObject object at 0x1010b1978>
deleting obj
(Deleting <__main__.ExpensiveObject object at 0x1010b1978>)
callback(<weakref at 0x1010a92c8; dead>)
r(): None
Finalizing Objects
要在清除弱引用时更好地管理资源,请使用finalize将回调函数与对象相关联。 即使应用程序未保留对finalizer的引用,也会保留finalize实例,直到附加的对象被删除。
#weakref_finalize.py
import weakref

class ExpensiveObject:
    def __del__(self):
        print('(Deleting {})'.format(self))

def on_finalize(*args):
    print('on_finalize({!r})'.format(args))

obj = ExpensiveObject()
weakref.finalize(obj, on_finalize, 'extra argument')

del obj
finalize的参数是要跟踪的对象,和在对象被垃圾收集时调用的可调用对象,以及传递给可调用对象的任何位置参数或命名参数。
$ python3 weakref_finalize.py

(Deleting <__main__.ExpensiveObject object at 0x1019b10f0>)
on_finalize(('extra argument',))
finalize实例有一个可写的属性atexit来控制是否在程序退出时调用回调,如果尚未调用的话。
#weakref_finalize_atexit.py
import sys
import weakref

class ExpensiveObject:

    def __del__(self):
        print('(Deleting {})'.format(self))

def on_finalize(*args):
    print('on_finalize({!r})'.format(args))

obj = ExpensiveObject()
f = weakref.finalize(obj, on_finalize, 'extra argument')
f.atexit = bool(int(sys.argv[1]))
默认是调用回调。 将atexit设置为false会禁用该行为。
$ python3 weakref_finalize_atexit.py 1

on_finalize(('extra argument',))
(Deleting <__main__.ExpensiveObject object at 0x1007b10f0>)

$ python3 weakref_finalize_atexit.py 0
为finalize实例提供对其跟踪的对象的引用会导致引用被保留,因此该对象永远不会被垃圾回收。
#weakref_finalize_reference.py
import gc
import weakref

class ExpensiveObject:
    def __del__(self):
        print('(Deleting {})'.format(self))

def on_finalize(*args):
    print('on_finalize({!r})'.format(args))

obj = ExpensiveObject()
obj_id = id(obj)

f = weakref.finalize(obj, on_finalize, obj)
f.atexit = False

del obj

for o in gc.get_objects():
    if id(o) == obj_id:
        print('found uncollected object in gc')
如此示例所示,即使删除了对obj的显式引用,该对象也会保留并通过f对垃圾回收器可见。
$ python3 weakref_finalize_reference.py

found uncollected object in gc
使用被跟踪对象的绑定方法作为可调用对象,也会阻止对象被正确地清除。
#weakref_finalize_reference_method.py
import gc
import weakref

class ExpensiveObject:
    def __del__(self):
        print('(Deleting {})'.format(self))

    def do_finalize(self):
        print('do_finalize')

obj = ExpensiveObject()
obj_id = id(obj)

f = weakref.finalize(obj, obj.do_finalize)
f.atexit = False

del obj

for o in gc.get_objects():
    if id(o) == obj_id:
        print('found uncollected object in gc')
因为给予finalize的可调用对象是实例obj的绑定方法,所以finalize对象保存对obj的引用,obj不能被删除和垃圾回收。
$ python3 weakref_finalize_reference_method.py

found uncollected object in gc
Proxies
使用代理有时比弱引用更方便。 使用代理就好像它们是原始对象一样,并且在对象可访问之前不需要调用代理。 因此,它们可以传递给一个库,该库不知道它正在接收引用而不是真实对象。
#weakref_proxy.py
import weakref

class ExpensiveObject:
    def __init__(self, name):
        self.name = name

    def __del__(self):
        print('(Deleting {})'.format(self))

obj = ExpensiveObject('My Object')
r = weakref.ref(obj)
p = weakref.proxy(obj)

print('via obj:', obj.name)
print('via ref:', r().name)
print('via proxy:', p.name)
del obj
print('via proxy:', p.name)
如果在删除引用对象后访问代理,则引发ReferenceError异常。
$ python3 weakref_proxy.py

via obj: My Object
via ref: My Object
via proxy: My Object
(Deleting <__main__.ExpensiveObject object at 0x1007aa7b8>)
Traceback (most recent call last):
  File "weakref_proxy.py", line 30, in <module>
    print('via proxy:', p.name)
ReferenceError: weakly-referenced object no longer exists
Caching Objects
ref和proxy类被认为是“低级别的”。虽然它们对于维护对单个对象的弱引用以及允许循环被垃圾收集很有用,但WeakKeyDictionary和WeakValueDictionary类提供了一个更合适的API来创建多个对象的缓存。
WeakValueDictionary类使用对它所持有的值的弱引用,允许在其他代码实际上不使用它们时对它们进行垃圾回收。 使用对垃圾收集器的显式调用说明了常规字典的内存处理和WeakValueDictionary之间的区别:
#weakref_valuedict.py
import gc
from pprint import pprint
import weakref

gc.set_debug(gc.DEBUG_UNCOLLECTABLE)

class ExpensiveObject:
    def __init__(self, name):
        self.name = name

    def __repr__(self):
        return 'ExpensiveObject({})'.format(self.name)

    def __del__(self):
        print('    (Deleting {})'.format(self))

def demo(cache_factory):
    # hold objects so any weak references
    # are not removed immediately
    all_refs = {}
    # create the cache using the factory
    print('CACHE TYPE:', cache_factory)
    cache = cache_factory()
    for name in ['one', 'two', 'three']:
        o = ExpensiveObject(name)
        cache[name] = o
        all_refs[name] = o
        del o  # decref

    print('  all_refs =', end=' ')
    pprint(all_refs)
    print('\n  Before, cache contains:', list(cache.keys()))
    for name, value in cache.items():
        print('    {} = {}'.format(name, value))
        del value  # decref

    # remove all references to the objects except the cache
    print('\n  Cleanup:')
    del all_refs
    gc.collect()

    print('\n  After, cache contains:', list(cache.keys()))
    for name, value in cache.items():
        print('    {} = {}'.format(name, value))
    print('  demo returning')
    return

demo(dict)
print()

demo(weakref.WeakValueDictionary)
必须显示清除任何引用被缓存的值的循环变量,以便减少对象的引用计数。 否则,垃圾收集器将不会删除对象,它们将保留在缓存中。 类似地,all_refs变量用于保存引用以防止它们过早地被垃圾收集。
$ python3 weakref_valuedict.py

CACHE TYPE: <class 'dict'>
  all_refs = {'one': ExpensiveObject(one),
 'three': ExpensiveObject(three),
 'two': ExpensiveObject(two)}

  Before, cache contains: ['one', 'three', 'two']
    one = ExpensiveObject(one)
    three = ExpensiveObject(three)
    two = ExpensiveObject(two)

  Cleanup:

  After, cache contains: ['one', 'three', 'two']
    one = ExpensiveObject(one)
    three = ExpensiveObject(three)
    two = ExpensiveObject(two)
  demo returning
    (Deleting ExpensiveObject(one))
    (Deleting ExpensiveObject(three))
    (Deleting ExpensiveObject(two))

CACHE TYPE: <class 'weakref.WeakValueDictionary'>
  all_refs = {'one': ExpensiveObject(one),
 'three': ExpensiveObject(three),
 'two': ExpensiveObject(two)}

  Before, cache contains: ['one', 'three', 'two']
    one = ExpensiveObject(one)
    three = ExpensiveObject(three)
    two = ExpensiveObject(two)

  Cleanup:
    (Deleting ExpensiveObject(one))
    (Deleting ExpensiveObject(three))
    (Deleting ExpensiveObject(two))

  After, cache contains: []
  demo returning
WeakKeyDictionary的工作方式类似,但对键使用弱引用而不是字典中的值。
Warning
weakref的库文档包含此警告:
注意:因为WeakValueDictionary是在Python字典之上构建的,所以在迭代它时不能改变大小。 这对于WeakValueDictionary来说可能很难确保,因为程序在迭代期间执行的操作可能会导致字典中的项目“通过魔法”消失(作为垃圾收集的副作用)。
copy — Duplicate Objects
目的:提供使用浅或深复制语义复制对象的函数。
copy模块包括两个函数,copy()和deepcopy(),用于复制现有对象。
浅拷贝
copy()创建的shallow copy(浅拷贝副本)是一个新容器,其中填充了对原始对象内容的引用。 在制作list对象的浅拷贝副本时,会构造一个新list,并将原始对象的元素附加到其上。
#copy_shallow.py
import copy
import functools

@functools.total_ordering
class MyClass:
    def __init__(self, name):
        self.name = name

    def __eq__(self, other):
        return self.name == other.name

    def __gt__(self, other):
        return self.name > other.name


a = MyClass('a')
my_list = [a]
dup = copy.copy(my_list)

print('             my_list:', my_list)
print('                 dup:', dup)
print('      dup is my_list:', (dup is my_list))
print('      dup == my_list:', (dup == my_list))
print('dup[0] is my_list[0]:', (dup[0] is my_list[0]))
print('dup[0] == my_list[0]:', (dup[0] == my_list[0]))
对于浅拷贝,MyClass实例不重复,因此dup列表中引用的对象和my_list中的是同一对象。
$ python3 copy_shallow.py

             my_list: [<__main__.MyClass object at 0x101f9c160>]
                 dup: [<__main__.MyClass object at 0x101f9c160>]
      dup is my_list: False
      dup == my_list: True
dup[0] is my_list[0]: True
dup[0] == my_list[0]: True
### Deep Copies
deepcopy()创建的深拷贝副本是一个新容器,其中填充了原始对象内容的副本。 要制作列表的深拷贝副本,将构建新列表,复制原始列表的元素,然后将这些副本附加到新列表中。
用deepcopy()替换对copy()的调用会使输出明显不同。
#copy_deep.py
import copy
import functools

@functools.total_ordering
class MyClass:

    def __init__(self, name):
        self.name = name

    def __eq__(self, other):
        return self.name == other.name

    def __gt__(self, other):
        return self.name > other.name

a = MyClass('a')
my_list = [a]
dup = copy.deepcopy(my_list)

print('             my_list:', my_list)
print('                 dup:', dup)
print('      dup is my_list:', (dup is my_list))
print('      dup == my_list:', (dup == my_list))
print('dup[0] is my_list[0]:', (dup[0] is my_list[0]))
print('dup[0] == my_list[0]:', (dup[0] == my_list[0]))
列表的第一个元素不再是相同的对象引用,但是当比较两个对象时,它们仍然评估为相等。
$ python3 copy_deep.py

             my_list: [<__main__.MyClass object at 0x101e9c160>]
                 dup: [<__main__.MyClass object at 0x1044e1f98>]
      dup is my_list: False
      dup == my_list: True
dup[0] is my_list[0]: False
dup[0] == my_list[0]: True
Customizing Copy Behavior
可以使用__copy __()和__deepcopy __()特殊方法控制副本的制作方式。
- 在没有任何参数的情况下调用
__copy __(),返回该对象的浅拷贝副本。 - 使用备忘录字典(memo dict)调用
__deepcopy __(),返回该对象的深拷贝副本。 任何需要深度复制的成员属性都应该与memo字典一起传递给copy.deepcopy(),以用于递归控制。 (备忘录词典稍后会有更详细的解释。)
以下示例说明了如何调用这些方法。
#copy_hooks.py
import copy
import functools

@functools.total_ordering
class MyClass:
    def __init__(self, name):
        self.name = name

    def __eq__(self, other):
        return self.name == other.name

    def __gt__(self, other):
        return self.name > other.name

    def __copy__(self):
        print('__copy__()')
        return MyClass(self.name)

    def __deepcopy__(self, memo):
        print('__deepcopy__({})'.format(memo))
        return MyClass(copy.deepcopy(self.name, memo))

a = MyClass('a')

sc = copy.copy(a)
dc = copy.deepcopy(a)
备忘录字典用于跟踪已经复制的值,以避免无限递归。
$ python3 copy_hooks.py

__copy__()
__deepcopy__({})
Recursion in Deep Copy
为了避免重复递归数据结构的问题,deepcopy()使用字典来跟踪已经复制的对象。 此字典将传递给__deepcopy __()方法,因此也可以在那里进行检查。
下一个示例显示了互连数据结构(如有向图)如何通过实现__deepcopy __()方法来帮助防止递归。
#copy_recursion.py
import copy

class Graph:
    def __init__(self, name, connections):
        self.name = name
        self.connections = connections

    def add_connection(self, other):
        self.connections.append(other)

    def __repr__(self):
        return 'Graph(name={}, id={})'.format(
            self.name, id(self))

    def __deepcopy__(self, memo):
        print('\nCalling __deepcopy__ for {!r}'.format(self))
        if self in memo:
            existing = memo.get(self)
            print('  Already copied to {!r}'.format(existing))
            return existing
        print('  Memo dictionary:')
        if memo:
            for k, v in memo.items():
                print('    {}: {}'.format(k, v))
        else:
            print('    (empty)')
        dup = Graph(copy.deepcopy(self.name, memo), [])
        print('  Copying to new object {}'.format(dup))
        memo[self] = dup
        for c in self.connections:
            dup.add_connection(copy.deepcopy(c, memo))
        return dup

root = Graph('root', [])
a = Graph('a', [root])
b = Graph('b', [a, root])
root.add_connection(a)
root.add_connection(b)

dup = copy.deepcopy(root)
Graph类包括一些基本的有向图方法。 可以使用名称和与其连接的现有节点列表初始化实例。 add_connection()方法用于设置双向连接。 它也被深拷贝操作符使用。
__deepcopy __()方法打印消息以显示它的调用方式,并根据需要管理备忘录字典内容。 它不是复制整个连接列表,而是创建一个新列表,并将各个连接的副本附加到它。 这确保了备忘录字典在每个新节点被复制时更新,并且它避免了递归问题或节点的额外副本。 和以前一样,该方法在完成后返回复制的对象。
具有循环的对象图的深层复制
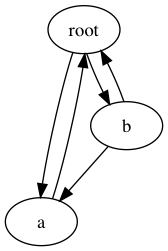 图中显示的图形包括几个循环,但使用备注字典处理递归可防止遍历导致堆栈溢出错误。 复制根节点时,会生成以下输出。
$ python3 copy_recursion.py

Calling __deepcopy__ for Graph(name=root, id=4326183824)
  Memo dictionary:
    (empty)
  Copying to new object Graph(name=root, id=4367233208)

Calling __deepcopy__ for Graph(name=a, id=4326186344)
  Memo dictionary:
    Graph(name=root, id=4326183824): Graph(name=root,
id=4367233208)
  Copying to new object Graph(name=a, id=4367234720)

Calling __deepcopy__ for Graph(name=root, id=4326183824)
  Already copied to Graph(name=root, id=4367233208)

Calling __deepcopy__ for Graph(name=b, id=4326183880)
  Memo dictionary:
    Graph(name=root, id=4326183824): Graph(name=root,
id=4367233208)
    Graph(name=a, id=4326186344): Graph(name=a, id=4367234720)
    4326183824: Graph(name=root, id=4367233208)
    4367217936: [Graph(name=root, id=4326183824), Graph(name=a,
id=4326186344)]
    4326186344: Graph(name=a, id=4367234720)
  Copying to new object Graph(name=b, id=4367235000)
第二次遇到根节点时,在复制a节点时,__ deepcopy__()检测递归并重用备忘录字典中的现有值,而不是创建新对象。
pprint — Pretty-Print Data Structures
目的:漂亮的打印数据结构
pprint模块包含一个“漂亮的打印机”,用于生成美观的数据结构视图。 格式化器生成数据结构的表示,可以由解释器正确解析,并且人们也可以轻松阅读。 如果可能,输出将保留在一行中,并在分割为多行时缩进。
本节中的示例均取决于pprint_data.py,显示如下。
#pprint_data.py
data = [
    (1, {'a': 'A', 'b': 'B', 'c': 'C', 'd': 'D'}),
    (2, {'e': 'E', 'f': 'F', 'g': 'G', 'h': 'H',
         'i': 'I', 'j': 'J', 'k': 'K', 'l': 'L'}),
    (3, ['m', 'n']),
    (4, ['o', 'p', 'q']),
    (5, ['r', 's', 't''u', 'v', 'x', 'y', 'z']),
]
Printing
使用该模块的最简单方法是通过pprint()函数。
#pprint_pprint.py
from pprint import pprint
from pprint_data import data

print('PRINT:')
print(data)
print()
print('PPRINT:')
pprint(data)
pprint()格式化一个对象并将其写入作为参数传入的数据流(或默认情况下为sys.stdout)。
$ python3 pprint_pprint.py

PRINT:
[(1, {'a': 'A', 'b': 'B', 'c': 'C', 'd': 'D'}), (2, {'e': 'E', 'f':
'F', 'g': 'G', 'h': 'H', 'i': 'I', 'j': 'J', 'k': 'K', 'l': 'L'}), (
3, ['m', 'n']), (4, ['o', 'p', 'q']), (5, ['r', 's', 'tu', 'v', 'x',
 'y', 'z'])]

PPRINT:
[(1, {'a': 'A', 'b': 'B', 'c': 'C', 'd': 'D'}),
 (2,
  {'e': 'E',
   'f': 'F',
   'g': 'G',
   'h': 'H',
   'i': 'I',
   'j': 'J',
   'k': 'K',
   'l': 'L'}),
 (3, ['m', 'n']),
 (4, ['o', 'p', 'q']),
 (5, ['r', 's', 'tu', 'v', 'x', 'y', 'z'])]
Formatting
要格式化数据结构而不将其直接写入流(例如,用于日志),请使用pformat()来构建字符串表示。
#pprint_pformat.py
import logging
from pprint import pformat
from pprint_data import data

logging.basicConfig(
    level=logging.DEBUG,
    format='%(levelname)-8s %(message)s',
)

logging.debug('Logging pformatted data')
formatted = pformat(data)
for line in formatted.splitlines():
    logging.debug(line.rstrip())
然后可以单独打印或记录格式化的字符串。
$ python3 pprint_pformat.py

DEBUG    Logging pformatted data
DEBUG    [(1, {'a': 'A', 'b': 'B', 'c': 'C', 'd': 'D'}),
DEBUG     (2,
DEBUG      {'e': 'E',
DEBUG       'f': 'F',
DEBUG       'g': 'G',
DEBUG       'h': 'H',
DEBUG       'i': 'I',
DEBUG       'j': 'J',
DEBUG       'k': 'K',
DEBUG       'l': 'L'}),
DEBUG     (3, ['m', 'n']),
DEBUG     (4, ['o', 'p', 'q']),
DEBUG     (5, ['r', 's', 'tu', 'v', 'x', 'y', 'z'])]
Arbitrary Classes(任意类)
pprint()使用的PrettyPrinter类也可以用于自定义类,如果它定义了__repr __()方法,。
#pprint_arbitrary_object.py
from pprint import pprint

class node:
    def __init__(self, name, contents=[]):
        self.name = name
        self.contents = contents[:]

    def __repr__(self):
        return (
            'node(' + repr(self.name) + ', ' +
            repr(self.contents) + ')'
        )

trees = [
    node('node-1'),
    node('node-2', [node('node-2-1')]),
    node('node-3', [node('node-3-1')]),
]
pprint(trees)
嵌套对象的表示由PrettyPrinter组合以返回完整的字符串表示。
$ python3 pprint_arbitrary_object.py

[node('node-1', []),
 node('node-2', [node('node-2-1', [])]),
 node('node-3', [node('node-3-1', [])])]
Recursion
递归数据结构用对原始数据源的引用表示,格式为
#pprint_recursion.py
from pprint import pprint

local_data = ['a', 'b', 1, 2]
local_data.append(local_data)

print('id(local_data) =>', id(local_data))
pprint(local_data)
在此示例中,列表local_data将添加到自身,从而创建递归引用。
$ python3 pprint_recursion.py

id(local_data) => 4358913288
['a', 'b', 1, 2, <Recursion on list with id=4358913288>]
Limiting Nested Output
对于非常深的数据结构,可能不希望输出包括所有细节。 数据可能格式不正确,格式化文本可能太大而无法管理,或者某些数据可能无关紧要。
#pprint_depth.py
from pprint import pprint
from pprint_data import data

pprint(data, depth=1)
pprint(data, depth=2)
使用depth参数来控制打印嵌套数据结构的递归深度。 未包含在输出中的级别由省略号表示。
$ python3 pprint_depth.py

[(...), (...), (...), (...), (...)]
[(1, {...}), (2, {...}), (3, [...]), (4, [...]), (5, [...])]
Controlling Output Width
格式化文本的默认输出宽度为80列。 要调整该宽度,请使用pprint()的width参数。
#pprint_width.py
from pprint import pprint
from pprint_data import data

for width in [80, 5]:
    print('WIDTH =', width)
    pprint(data, width=width)
    print()
当宽度太小而无法容纳格式化的数据结构时,如果这样做会引入无效语法,则不会截断或包装这些行。
$ python3 pprint_width.py

WIDTH = 80
[(1, {'a': 'A', 'b': 'B', 'c': 'C', 'd': 'D'}),
 (2,
  {'e': 'E',
   'f': 'F',
   'g': 'G',
   'h': 'H',
   'i': 'I',
   'j': 'J',
   'k': 'K',
   'l': 'L'}),
 (3, ['m', 'n']),
 (4, ['o', 'p', 'q']),
 (5, ['r', 's', 'tu', 'v', 'x', 'y', 'z'])]

WIDTH = 5
[(1,
  {'a': 'A',
   'b': 'B',
   'c': 'C',
   'd': 'D'}),
 (2,
  {'e': 'E',
   'f': 'F',
   'g': 'G',
   'h': 'H',
   'i': 'I',
   'j': 'J',
   'k': 'K',
   'l': 'L'}),
 (3,
  ['m',
   'n']),
 (4,
  ['o',
   'p',
   'q']),
 (5,
  ['r',
   's',
   'tu',
   'v',
   'x',
   'y',
   'z'])]
compact标志告诉pprint()尝试在每条单独的行上放置更多数据,而不是跨行传播复杂的数据结构。
#pprint_compact.py
from pprint import pprint
from pprint_data import data

print('DEFAULT:')
pprint(data, compact=False)
print('\nCOMPACT:')
pprint(data, compact=True)
此示例显示当数据结构不适合某一行时,它将被拆分(与数据列表中的第二项一样)。 当多个元素可以放在一条线上时,就像第三个和第四个成员一样,它们就是这样放置的。
$ python3 pprint_compact.py

DEFAULT:
[(1, {'a': 'A', 'b': 'B', 'c': 'C', 'd': 'D'}),
 (2,
  {'e': 'E',
   'f': 'F',
   'g': 'G',
   'h': 'H',
   'i': 'I',
   'j': 'J',
   'k': 'K',
   'l': 'L'}),
 (3, ['m', 'n']),
 (4, ['o', 'p', 'q']),
 (5, ['r', 's', 'tu', 'v', 'x', 'y', 'z'])]

COMPACT:
[(1, {'a': 'A', 'b': 'B', 'c': 'C', 'd': 'D'}),
 (2,
  {'e': 'E',
   'f': 'F',
   'g': 'G',
   'h': 'H',
   'i': 'I',
   'j': 'J',
   'k': 'K',
   'l': 'L'}),
 (3, ['m', 'n']), (4, ['o', 'p', 'q']),
 (5, ['r', 's', 'tu', 'v', 'x', 'y', 'z'])]