Python标准库的优势在于它的大小。它包括程序结构的许多方面的实现,开发人员可以专注于使他们的应用程序独特的东西,而不是一遍又一遍地编写所有基本部分。本章介绍了一些更常用的重用构建块,它们解决了许多应用程序常见的问题。
argparse是用于解析和验证命令行参数的接口。它支持将参数从字符串转换为整数和其他类型,在遇到选项时运行回调,为用户未提供的选项设置默认值,以及自动生成程序的使用说明。 getopt实现了低级参数处理模型,其对C程序和shell脚本可用。它比其他选项解析库具有更少的功能,但这种简单性和熟悉性使其成为一种流行的选择。
交互式程序应使用readline为用户提供命令提示符。它包括用于管理历史记录、自动补全命令以及使用emacs和vi密钥绑定(key-binding)进行交互式编辑的工具。要安全地提示用户输入密码或其他机密值,而不是键入后在屏幕回显该值,请使用getpass。
cmd模块包括一个用于交互式、命令驱动的shell风格程序的框架。它提供主循环并处理与用户的交互,因此应用程序只需要为各个命令实现处理回调。
shlex是一种shell风格语法的解析器,其行由空格分隔的标记(token)组成。它对引号和转义序列很智能,因此带有嵌入空格的文本被视为单个标记。 shlex可以作为域特定语言(如配置文件或编程语言)的标记器。
使用configparser可以轻松管理应用程序配置文件。它可以在程序运行之间保存用户首选项,并在下次应用程序启动时读取它们,甚至可以用作简单的数据文件格式。
在现实世界中部署的应用程序需要为其用户提供调试信息。简单的错误消息和traceback是有帮助的,但是当难以重现问题时,完整活动日志可以直接指向导致失败的事件链。logging模块包括一个功能齐全的API,用于管理日志文件,支持多个线程,甚至还有与远程日志记录守护程序的接口,用于集中日志记录。
Unix环境中程序最常见的模式之一是逐行过滤器,它可以读取数据,修改数据并将其写回。从文件中读取很简单,但是可能没有比使用fileinput模块更简单的方法以创建过滤器应用程序。它的API是一个行迭代器,它产生每个输入行,因此程序的主体是一个简单的for循环。该模块处理解析“要处理的文件名”命令行参数,或者直接从标准输入读回,因此在fileinput上构建的工具可以直接在文件上运行,也可以作为管道的一部分运行。
使用atexit来安排在解释器关闭程序时运行的函数。注册退出回调对于“通过注销远程服务,关闭文件”等来释放资源非常有用。
sched模块实现了一个调度程序,用于在设定的将来时间触发事件。 API没有规定“时间”的定义,因此可以使用从真正的时钟时间到解释器步骤(interpreter steps)的任何内容。
argparse — Command-Line Option and Argument Parsing
目的:命令行选项和参数解析。
argparse模块包括用于构建命令行参数和选项处理器的工具。 它被添加到Python 2.7中作为optparse的替代品。 argparse的实现支持的功能是不容易添加到optparse的,并且需要修改向后不兼容的API,因此新模块被引入库中。 optparse现已弃用。
Setting Up a Parser
使用argparse的第一步是创建一个解析器对象并告诉它期望什么参数。 然后,解析器可用于在程序运行时处理命令行参数。 解析器类(ArgumentParser)的构造函数使用多个参数来为程序设置帮助文本中使用的描述和其他全局行为或设置。
import argparse
parser = argparse.ArgumentParser(
    description='This is a PyMOTW sample program',
)
Defining Arguments
argparse是一个完整的参数处理库。 参数可以触发不同操作,由add_argument()的action参数指定。 支持的操作包括存储参数(单独地或作为列表的一部分),在遇到参数时存储常量值(包括对布尔开关的true/false值的特殊处理),计算参数出现的次数, 并调用回调以使用自定义处理指令。
默认操作是存储参数值。 如果提供了类型,则在存储之前将值转换为该类型。 如果提供了dest参数,则在解析命令行参数时使用该名称保存该值。
Parsing a Command-Line
在定义了所有参数之后,通过将一系列参数字符串传递给parse_args()来解析命令行。 默认情况下,参数取自sys.argv[1:],但可以使用任何字符串列表。 使用GNU/POSIX语法处理选项,因此可以在序列中混合选项和参数值。
parse_args()的返回值是一个包含命令的参数的Namespace。 该对象将参数值保存为属性,因此如果参数的$dest设置为“myoption”,则该值可以用args.myoption访问。
Simple Examples
下面是一个简单的示例,它有三个不同的选项:布尔选项(-a),简单字符串选项(-b)和整数选项(-c)。
#argparse_short.py
import argparse

parser = argparse.ArgumentParser(description='Short sample app')

parser.add_argument('-a', action="store_true", default=False)
parser.add_argument('-b', action="store", dest="b")
parser.add_argument('-c', action="store", dest="c", type=int)

print(parser.parse_args(['-a', '-bval', '-c', '3']))
有几种方法可以将值传递给单字符选项。 前面的示例使用两种不同的形式,-bval和-c val。
$ python3 argparse_short.py

Namespace(a=True, b='val', c=3)
输出中与’c’关联的值的类型是整数,因为ArgumentParser被告知在存储之前转换参数。
“Long” 选项名称(名称中包含多个字符)的处理方式相同。
#argparse_long.py
import argparse

parser = argparse.ArgumentParser(description='Example with long option names',)

parser.add_argument('--noarg', action="store_true", default=False)
parser.add_argument('--witharg', action="store", dest="witharg")
parser.add_argument('--witharg2', action="store", dest="witharg2", type=int)

print( parser.parse_args( ['--noarg', '--witharg', 'val', '--witharg2=3'] ) )
结果是相似的。
$ python3 argparse_long.py

Namespace(noarg=True, witharg='val', witharg2=3)
argparse是一个完整的命令行参数解析器工具,可以处理可选参数和必需参数。
#argparse_arguments.py
import argparse

parser = argparse.ArgumentParser(description='Example with nonoptional arguments',)

parser.add_argument('count', action="store", type=int)
parser.add_argument('units', action="store")

print(parser.parse_args())
在此示例中,“count”参数是一个整数,“units”参数保存为字符串。如果其中任何一个不在命令行,或者给定的值无法转换为正确的类型,则会报告错误。
$ python3 argparse_arguments.py 3 inches

Namespace(count=3, units='inches')

$ python3 argparse_arguments.py some inches

usage: argparse_arguments.py [-h] count units
argparse_arguments.py: error: argument count: invalid int value:
'some'

$ python3 argparse_arguments.py

usage: argparse_arguments.py [-h] count units
argparse_arguments.py: error: the following arguments are
required: count, units
Argument Actions
遇到参数时,可以触发六个内置动作中的任何一个。
- store
在可选择的将其转换为不同的类型后,保存该值。 如果未明确指定,则采用这个默认操作。 - store_const
保存作为参数规范中的定义值,而不是来自参数被解析后的值。这通常用于实现非布尔值的命令行标志。 store_true/store_false
保存适当的布尔值。 这些操作用于实现布尔切换。- append
将值保存到列表中。 如果重复参数,则保存多个值。 - append_const
将参数规范中定义的值保存到列表中。 - version
打印有关该程序的版本详细信息,然后退出。
此示例程序演示了每种操作类型,带有使其工作需要的最低配置。
#argparse_action.py
import argparse

parser = argparse.ArgumentParser()

parser.add_argument('-s', action='store',
                    dest='simple_value',
                    help='Store a simple value')

parser.add_argument('-c', action='store_const',
                    dest='constant_value',
                    const='value-to-store',
                    help='Store a constant value')

parser.add_argument('-t', action='store_true',
                    default=False,
                    dest='boolean_t',
                    help='Set a switch to true')
parser.add_argument('-f', action='store_false',
                    default=True,
                    dest='boolean_f',
                    help='Set a switch to false')

parser.add_argument('-a', action='append',
                    dest='collection',
                    default=[],
                    help='Add repeated values to a list')

parser.add_argument('-A', action='append_const',
                    dest='const_collection',
                    const='value-1-to-append',
                    default=[],
                    help='Add different values to list')
parser.add_argument('-B', action='append_const',
                    dest='const_collection',
                    const='value-2-to-append',
                    help='Add different values to list')

parser.add_argument('--version', action='version',
                    version='%(prog)s 1.0')

results = parser.parse_args()
print('simple_value     = {!r}'.format(results.simple_value))
print('constant_value   = {!r}'.format(results.constant_value))
print('boolean_t        = {!r}'.format(results.boolean_t))
print('boolean_f        = {!r}'.format(results.boolean_f))
print('collection       = {!r}'.format(results.collection))
print('const_collection = {!r}'.format(results.const_collection))
-t和-f选项配置为修改不同的选项值,每个选项值存储True或False。-A和-B的dest值相同,以便将它们的常量值附加到同一列表中。
$ python3 argparse_action.py -h

usage: argparse_action.py [-h] [-s SIMPLE_VALUE] [-c] [-t] [-f]
                          [-a COLLECTION] [-A] [-B] [--version]

optional arguments:
  -h, --help       show this help message and exit
  -s SIMPLE_VALUE  Store a simple value
  -c               Store a constant value
  -t               Set a switch to true
  -f               Set a switch to false
  -a COLLECTION    Add repeated values to a list
  -A               Add different values to list
  -B               Add different values to list
  --version        show program's version number and exit

$ python3 argparse_action.py -s value

simple_value     = 'value'
constant_value   = None
boolean_t        = False
boolean_f        = True
collection       = []
const_collection = []

$ python3 argparse_action.py -c

simple_value     = None
constant_value   = 'value-to-store'
boolean_t        = False
boolean_f        = True
collection       = []
const_collection = []

$ python3 argparse_action.py -t

simple_value     = None
constant_value   = None
boolean_t        = True
boolean_f        = True
collection       = []
const_collection = []

$ python3 argparse_action.py -f

simple_value     = None
constant_value   = None
boolean_t        = False
boolean_f        = False
collection       = []
const_collection = []

$ python3 argparse_action.py -a one -a two -a three

simple_value     = None
constant_value   = None
boolean_t        = False
boolean_f        = True
collection       = ['one', 'two', 'three']
const_collection = []

$ python3 argparse_action.py -B -A

simple_value     = None
constant_value   = None
boolean_t        = False
boolean_f        = True
collection       = []
const_collection = ['value-2-to-append', 'value-1-to-append']

$ python3 argparse_action.py --version

argparse_action.py 1.0
Option Prefixes
options的默认语法基于使用短划线前缀(“-”)表示命令行开关的Unix约定。 argparse支持其他前缀,因此程序可以与本地平台默认值一致(如在Windows上使用“/”)或遵循不同的约定。
#argparse_prefix_chars.py
import argparse

parser = argparse.ArgumentParser(
    description='Change the option prefix characters',
    prefix_chars='-+/',
)

parser.add_argument('-a', action="store_false",
                    default=None,
                    help='Turn A off',
                    )
parser.add_argument('+a', action="store_true",
                    default=None,
                    help='Turn A on',
                    )
parser.add_argument('//noarg', '++noarg',
                    action="store_true",
                    default=False)

print(parser.parse_args())
将ArgumentParser的prefix_chars参数设置为包含允许表示选项的所有字符的字符串。重要的是要理解尽管prefix_chars建立了允许的开关字符,但是各个参数定义指定了给定开关的语法。 这可以明确控制使用不同前缀的选项是否为别名(例如可能是与平台无关的命令行语法的情况)或替换(例如,使用“+”表示打开开关而“-”表示关闭)。 在前面的例子中,+a和-a是单独的参数,// noarg也可以用++noarg,但不能是--noarg。
$ python3 argparse_prefix_chars.py -h

usage: argparse_prefix_chars.py [-h] [-a] [+a] [//noarg]

Change the option prefix characters

optional arguments:
  -h, --help        show this help message and exit
  -a                Turn A off
  +a                Turn A on
  //noarg, ++noarg

$ python3 argparse_prefix_chars.py +a

Namespace(a=True, noarg=False)

$ python3 argparse_prefix_chars.py -a

Namespace(a=False, noarg=False)

$ python3 argparse_prefix_chars.py //noarg

Namespace(a=None, noarg=True)

$ python3 argparse_prefix_chars.py ++noarg

Namespace(a=None, noarg=True)

$ python3 argparse_prefix_chars.py --noarg

usage: argparse_prefix_chars.py [-h] [-a] [+a] [//noarg]
argparse_prefix_chars.py: error: unrecognized arguments: --noarg
Sources of Arguments
在到目前为止的示例中,给予解析器的参数列表来自显式传递的列表,或者是从sys.argv隐式获取的。 当使用argparse处理不是来自命令行的类似命令行指令(例如在配置文件中)时,显式传递列表非常有用。
#argparse_with_shlex.py
import argparse
from configparser import ConfigParser
import shlex

parser = argparse.ArgumentParser(description='Short sample app')

parser.add_argument('-a', action="store_true", default=False)
parser.add_argument('-b', action="store", dest="b")
parser.add_argument('-c', action="store", dest="c", type=int)

config = ConfigParser()
config.read('argparse_with_shlex.ini')
config_value = config.get('cli', 'options')
print('Config  :', config_value)

argument_list = shlex.split(config_value)
print('Arg List:', argument_list)

print('Results :', parser.parse_args(argument_list))
此示例使用configparser读取配置文件。
[cli]
options = -a -b 2
shlex可以轻松拆分存储在配置文件中的字符串。
$ python3 argparse_with_shlex.py

Config  : -a -b 2
Arg List: ['-a', '-b', '2']
Results : Namespace(a=True, b='2', c=None)
在应用程序代码中处理配置文件的另一种方法是告诉argparse如何识别一个参数,该参数指定一个输入文件,该文件包含使用fromfile_prefix_chars处理的一组参数。
#argparse_fromfile_prefix_chars.py
import argparse
import shlex

parser = argparse.ArgumentParser(description='Short sample app',
                                 fromfile_prefix_chars='@',
                                 )

parser.add_argument('-a', action="store_true", default=False)
parser.add_argument('-b', action="store", dest="b")
parser.add_argument('-c', action="store", dest="c", type=int)

print(parser.parse_args(['@argparse_fromfile_prefix_chars.txt']))
此示例在找到以@为前缀的参数时停止,然后读取指定的文件以查找更多参数。 该文件每行应包含一个参数,如本例所示。
#argparse_fromfile_prefix_chars.txt
-a
-b
2
处理argparse_from_prefix_chars.txt时产生的输出如下。
$ python3 argparse_fromfile_prefix_chars.py

Namespace(a=True, b='2', c=None)
Help Output
Automatically Generated Help
如果配置为argparse将自动添加选项以生成帮助。 ArgumentParser的add_help参数控制与帮助相关的选项。
#argparse_with_help.py
import argparse

parser = argparse.ArgumentParser(add_help=True)

parser.add_argument('-a', action="store_true", default=False)
parser.add_argument('-b', action="store", dest="b")
parser.add_argument('-c', action="store", dest="c", type=int)

print(parser.parse_args())
默认情况下会添加帮助选项(-h和--help),但可以通过将add_help设置为false来禁用。
#argparse_without_help.py
import argparse

parser = argparse.ArgumentParser(add_help=False)

parser.add_argument('-a', action="store_true", default=False)
parser.add_argument('-b', action="store", dest="b")
parser.add_argument('-c', action="store", dest="c", type=int)

print(parser.parse_args())
虽然-h和--help是用于请求帮助的实际上的标准选项名称,
但某些应用程序或argparse的使用不需要提供帮助或需要将这些选项名称用于其他目的。
$ python3 argparse_with_help.py -h

usage: argparse_with_help.py [-h] [-a] [-b B] [-c C]

optional arguments:
  -h, --help  show this help message and exit
  -a
  -b B
  -c C

$ python3 argparse_without_help.py -h

usage: argparse_without_help.py [-a] [-b B] [-c C]
argparse_without_help.py: error: unrecognized arguments: -h
Customizing Help
对于需要直接处理帮助输出的应用程序,ArgumentParser的一些实用方法在创建自定义操作(custom actions)以打印带有额外信息的帮助时非常有用。
#argparse_custom_help.py
import argparse

parser = argparse.ArgumentParser(add_help=True)

parser.add_argument('-a', action="store_true", default=False)
parser.add_argument('-b', action="store", dest="b")
parser.add_argument('-c', action="store", dest="c", type=int)

print('print_usage output:')
parser.print_usage()
print()

print('print_help output:')
parser.print_help()
print_usage()打印参数解析器的简短的用法消息,print_help()打印完整的帮助输出。
$ python3 argparse_custom_help.py

print_usage output:
usage: argparse_custom_help.py [-h] [-a] [-b B] [-c C]

print_help output:
usage: argparse_custom_help.py [-h] [-a] [-b B] [-c C]

optional arguments:
  -h, --help  show this help message and exit
  -a
  -b B
  -c C
ArgumentParser使用格式化类来控制帮助输出的外观。 要更改此类,请在实例化ArgumentParser时传递formatter_class。
例如,RawDescriptionHelpFormatter绕过默认格式化程序提供的换行。
#argparse_raw_description_help_formatter.py
import argparse

parser = argparse.ArgumentParser(
    add_help=True,
    formatter_class=argparse.RawDescriptionHelpFormatter,
    description="""
    description
        not
           wrapped""",
    epilog="""
    epilog
      not
         wrapped""",
)

parser.add_argument(
    '-a', action="store_true",
    help="""argument
    help is
    wrapped
    """,
)

parser.print_help()
描述和命令的结尾中的所有文本都将保持不变。
$ python3 argparse_raw_description_help_formatter.py

usage: argparse_raw_description_help_formatter.py [-h] [-a]

    description
        not
           wrapped

optional arguments:
  -h, --help  show this help message and exit
  -a          argument help is wrapped

    epilog
      not
         wrapped
RawTextHelpFormatter将所有帮助文本视为预格式化。
#argparse_raw_text_help_formatter.py
import argparse

parser = argparse.ArgumentParser(
    add_help=True,
    formatter_class=argparse.RawTextHelpFormatter,
    description="""
    description
        not
           wrapped""",
    epilog="""
    epilog
      not
         wrapped""",
)

parser.add_argument(
    '-a', action="store_true",
    help="""argument
    help is not
    wrapped
    """,
)

parser.print_help()
-a参数的帮助文本不再整齐地包装。
$ python3 argparse_raw_text_help_formatter.py

usage: argparse_raw_text_help_formatter.py [-h] [-a]

    description
        not
           wrapped

optional arguments:
  -h, --help  show this help message and exit
  -a          argument
                  help is not
                  wrapped


    epilog
      not
         wrapped
原始格式化器对于在描述或结语中具有示例的应用程序可能是有用的,其中改变文本的格式可能使示例无效。
MetavarTypeHelpFormatter打印每个选项的类型名称,而不是目标变量,这对于具有许多不同类型选项的应用程序非常有用。
#argparse_metavar_type_help_formatter.py
import argparse

parser = argparse.ArgumentParser(
    add_help=True,
    formatter_class=argparse.MetavarTypeHelpFormatter,
)

parser.add_argument('-i', type=int, dest='notshown1')
parser.add_argument('-f', type=float, dest='notshown2')

parser.print_help()
不是显示dest的值,而是打印与该选项关联的类型的名称。
$ python3 argparse_metavar_type_help_formatter.py

usage: argparse_metavar_type_help_formatter.py [-h] [-i int] [-f
 float]

optional arguments:
  -h, --help  show this help message and exit
  -i int
  -f float
Parser Organization
argparse包含几个用于组织参数解析器的功能,使实现更容易或提高帮助输出的可用性。
Sharing Parser Rules
程序员通常需要实现一套命令行工具,这些工具都采用一组参数,然后以某种方式特殊化。 例如,如果程序在采取任何实际操作之前都需要对用户进行身份验证,那么他们都需要支持--user和--password选项。 不是将选项显式添加到每个ArgumentParser,而是可以使用共享选项定义父解析器,然后让各个程序的解析器继承它的选项。
第一步是使用“共享参数定义”设置解析器。由于父解析器的每个后续用户将尝试添加相同的帮助选项,从而导致异常,因此在父解析器中关闭自动帮助生成。
#argparse_parent_base.py
import argparse

parser = argparse.ArgumentParser(add_help=False)

parser.add_argument('--user', action="store")
parser.add_argument('--password', action="store")
接下来,创建另一个带有parents 设置的解析器:
#argparse_uses_parent.py
import argparse
import argparse_parent_base

parser = argparse.ArgumentParser(
    parents=[argparse_parent_base.parser],
)

parser.add_argument('--local-arg',
                    action="store_true",
                    default=False)

print(parser.parse_args())
结果程序采用以下三个选项:
$ python3 argparse_uses_parent.py -h

usage: argparse_uses_parent.py [-h] [--user USER]
                               [--password PASSWORD]
                               [--local-arg]

optional arguments:
  -h, --help           show this help message and exit
  --user USER
  --password PASSWORD
  --local-arg
Conflicting Options
前面的示例指出,使用相同的参数名称向解析器添加两个参数处理程序会导致异常。可以通过传递conflict_handler来更改冲突解决行为。 两个内置处理程序是error(默认)和resolve,它根据添加的顺序选择处理程序。
#argparse_conflict_handler_resolve.py
import argparse

parser = argparse.ArgumentParser(conflict_handler='resolve')

parser.add_argument('-a', action="store")
parser.add_argument('-b', action="store", help='Short alone')
parser.add_argument('--long-b', '-b',
                    action="store",
                    help='Long and short together')

print(parser.parse_args(['-h']))
由于具有给定参数名称的最后一个处理程序被使用,因此在此示例中,独立选项-b被--long-b的别名屏蔽。
$ python3 argparse_conflict_handler_resolve.py

usage: argparse_conflict_handler_resolve.py [-h] [-a A]
[--long-b LONG_B]

optional arguments:
  -h, --help            show this help message and exit
  -a A
  --long-b LONG_B, -b LONG_B Long and short together
转换add_argument()的调用顺序会取消屏蔽独立选项:
#argparse_conflict_handler_resolve2.py
import argparse

parser = argparse.ArgumentParser(conflict_handler='resolve')

parser.add_argument('-a', action="store")
parser.add_argument('--long-b', '-b',
                    action="store",
                    help='Long and short together')
parser.add_argument('-b', action="store", help='Short alone')

print(parser.parse_args(['-h']))
现在两个选项可以一起使用。
$ python3 argparse_conflict_handler_resolve2.py

usage: argparse_conflict_handler_resolve2.py [-h] [-a A]
                                             [--long-b LONG_B]
                                             [-b B]

optional arguments:
  -h, --help       show this help message and exit
  -a A
  --long-b LONG_B  Long and short together
  -b B             Short alone
Argument Groups
argparse将参数定义组合成“组(groups)”。默认情况下,它使用两个组,一个用于选项,另一个用于必须的基于位置的参数。
#argparse_default_grouping.py
import argparse

parser = argparse.ArgumentParser(description='Short sample app')

parser.add_argument('--optional', action="store_true", default=False)
parser.add_argument('positional', action="store")

print(parser.parse_args())
分组反映在帮助输出中独立的“位置参数”和“可选参数”两部分中。
$ python3 argparse_default_grouping.py -h

usage: argparse_default_grouping.py [-h] [--optional] positional

Short sample app

positional arguments:
  positional

optional arguments:
  -h, --help  show this help message and exit
  --optional
可以调整分组以使其在帮助中更合乎逻辑,以便将相关选项或值被记录在一起。可以使用自定义分组编写前面的共享选项示例,以便在帮助中一起显示身份验证选项。
使用add_argument_group()创建“authentication”组,然后将每个与身份验证相关的选项添加到该组,代替父解析器。
#argparse_parent_with_group.py
import argparse

parser = argparse.ArgumentParser(add_help=False)

group = parser.add_argument_group('authentication')

group.add_argument('--user', action="store")
group.add_argument('--password', action="store")
使用基于组的父级的程序将其列在parents中,就像之前一样。
#argparse_uses_parent_with_group.py
import argparse
import argparse_parent_with_group

parser = argparse.ArgumentParser(
    parents=[argparse_parent_with_group.parser],
)

parser.add_argument('--local-arg',
                    action="store_true",
                    default=False)

print(parser.parse_args())
帮助输出现在一起显示身份验证选项。
$ python3 argparse_uses_parent_with_group.py -h

usage: argparse_uses_parent_with_group.py [-h] [--user USER]
                                          [--password PASSWORD]
                                          [--local-arg]

optional arguments:
  -h, --help           show this help message and exit
  --local-arg

authentication:
  --user USER
  --password PASSWORD
Mutually Exclusive Options
定义互斥选项是选项分组功能的一个特例,它使用add_mutually_exclusive_group()而不是add_argument_group()。
#argparse_mutually_exclusive.py
import argparse

parser = argparse.ArgumentParser()

group = parser.add_mutually_exclusive_group()
group.add_argument('-a', action='store_true')
group.add_argument('-b', action='store_true')

print(parser.parse_args())
argparse强制执行互斥,因此只能给出该组中的一个选项。
$ python3 argparse_mutually_exclusive.py -h

usage: argparse_mutually_exclusive.py [-h] [-a | -b]

optional arguments:
  -h, --help  show this help message and exit
  -a
  -b

$ python3 argparse_mutually_exclusive.py -a

Namespace(a=True, b=False)

$ python3 argparse_mutually_exclusive.py -b

Namespace(a=False, b=True)

$ python3 argparse_mutually_exclusive.py -a -b

usage: argparse_mutually_exclusive.py [-h] [-a | -b]
argparse_mutually_exclusive.py: error: argument -b: not allowed
with argument -a
Nesting Parsers
前面描述的父解析器方法是在相关命令之间共享选项的一种方法。 另一种方法是将命令组合到单个程序中,并使用子解析器来处理命令行的每个部分。 结果以svn,hg和其他具有多个命令行操作或子命令的程序的方式工作。
处理文件系统上的目录的程序可以定义用于创建,删除和列出目录内容的命令。
#argparse_subparsers.py
import argparse

parser = argparse.ArgumentParser()

subparsers = parser.add_subparsers(help='commands')

# A list command
list_parser = subparsers.add_parser(
    'list', help='List contents')
list_parser.add_argument(
    'dirname', action='store',
    help='Directory to list')

# A create command
create_parser = subparsers.add_parser(
    'create', help='Create a directory')
create_parser.add_argument(
    'dirname', action='store',
    help='New directory to create')
create_parser.add_argument(
    '--read-only', default=False, action='store_true',
    help='Set permissions to prevent writing to the directory',
)

# A delete command
delete_parser = subparsers.add_parser(
    'delete', help='Remove a directory')
delete_parser.add_argument(
    'dirname', action='store', help='The directory to remove')
delete_parser.add_argument(
    '--recursive', '-r', default=False, action='store_true',
    help='Remove the contents of the directory, too',
)

print(parser.parse_args())
帮助输出将命名的子解析器显示为“命令”,可以在命令行中将其指定为位置参数。
$ python3 argparse_subparsers.py -h

usage: argparse_subparsers.py [-h] {list,create,delete} ...

positional arguments:
  {list,create,delete}  commands
    list                List contents
    create              Create a directory
    delete              Remove a directory

optional arguments:
  -h, --help            show this help message and exit
每个子解析器也有自己的帮助,描述该命令的参数和选项。
$ python3 argparse_subparsers.py create -h

usage: argparse_subparsers.py create [-h] [--read-only] dirname

positional arguments:
  dirname      New directory to create

optional arguments:
  -h, --help   show this help message and exit
  --read-only  Set permissions to prevent writing to the directo
ry
解析参数时,parse_args()返回的Namespace对象仅包含与指定命令相关的值。
$ python3 argparse_subparsers.py delete -r foo

Namespace(dirname='foo', recursive=True)
Advanced Argument Processing
到目前为止的示例显示了简单的布尔标志,带有字符串或数字参数的选项以及位置参数。 argparse还支持可变长度参数列表,枚举和常量值的复杂参数规范。
Variable Argument Lists
可以将单个参数定义配置为在要解析的命令行上使用多个参数。 根据所需或预期参数的数量,将nargs设置为下表中的一个标志值。
Flags for Variable Argument Definitions in argparse
| Value | Meaning |
|---|---|
| N | The absolute number of arguments (e.g., 3). |
| ? | 0 or 1 arguments |
| * | 0 or all arguments |
| + | All, and at least one, argument |
#argparse_nargs.py
import argparse

parser = argparse.ArgumentParser()

parser.add_argument('--three', nargs=3)
parser.add_argument('--optional', nargs='?')
parser.add_argument('--all', nargs='*', dest='all')
parser.add_argument('--one-or-more', nargs='+')

print(parser.parse_args())
解析器强制执行参数计数指令,并生成准确的语法图,作为命令帮助文本的一部分。
$ python3 argparse_nargs.py -h

usage: argparse_nargs.py [-h] [--three THREE THREE THREE]
                [--optional [OPTIONAL]]
                [--all [ALL [ALL ...]]]
                [--one-or-more ONE_OR_MORE [ONE_OR_MORE ...]]

optional arguments:
  -h, --help            show this help message and exit
  --three THREE THREE THREE
  --optional [OPTIONAL]
  --all [ALL [ALL ...]]
  --one-or-more ONE_OR_MORE [ONE_OR_MORE ...]

$ python3 argparse_nargs.py

Namespace(all=None, one_or_more=None, optional=None, three=None)

$ python3 argparse_nargs.py --three

usage: argparse_nargs.py [-h] [--three THREE THREE THREE]
                [--optional [OPTIONAL]]
                [--all [ALL [ALL ...]]]
                [--one-or-more ONE_OR_MORE [ONE_OR_MORE ...]]
argparse_nargs.py: error: argument --three: expected 3 argument(s)

$ python3 argparse_nargs.py --three a b c

Namespace(all=None, one_or_more=None, optional=None, three=['a', 'b', 'c'])

$ python3 argparse_nargs.py --optional

Namespace(all=None, one_or_more=None, optional=None, three=None)

$ python3 argparse_nargs.py --optional with_value

Namespace(all=None, one_or_more=None, optional='with_value', three=None)

$ python3 argparse_nargs.py --all with multiple values

Namespace(all=['with', 'multiple', 'values'], one_or_more=None, optional=None, three=None)

$ python3 argparse_nargs.py --one-or-more with_value

Namespace(all=None, one_or_more=['with_value'], optional=None, three=None)

$ python3 argparse_nargs.py --one-or-more with multiple values

Namespace(all=None, one_or_more=['with', 'multiple', 'values'], optional=None, three=None)

$ python3 argparse_nargs.py --one-or-more

usage: argparse_nargs.py [-h] [--three THREE THREE THREE]
                [--optional [OPTIONAL]]
                [--all [ALL [ALL ...]]]
                [--one-or-more ONE_OR_MORE [ONE_OR_MORE ...]]
argparse_nargs.py: error: argument --one-or-more: expected at least one argument
Argument Types
argparse将所有参数值视为字符串,除非它被告知将字符串转换为另一种类型。 add_argument()的type参数定义了一个转换器函数,ArgumentParser使用该函数将参数值从字符串转换为其他类型。
#argparse_type.py
import argparse

parser = argparse.ArgumentParser()

parser.add_argument('-i', type=int)
parser.add_argument('-f', type=float)
parser.add_argument('--file', type=open)

try:
    print(parser.parse_args())
except IOError as msg:
    parser.error(str(msg))
任何带有单个字符串参数的可调用对象都可以作为type传递,包括内置类型,如int和float,甚至是open()。
$ python3 argparse_type.py -i 1

Namespace(f=None, file=None, i=1)

$ python3 argparse_type.py -f 3.14

Namespace(f=3.14, file=None, i=None)

$ python3 argparse_type.py --file argparse_type.py

Namespace(f=None, file=<_io.TextIOWrapper
name='argparse_type.py' mode='r' encoding='UTF-8'>, i=None)
如果类型转换失败,argparse会引发异常。 TypeError和ValueError异常会被自动捕获并转换为“用户易读的”简单错误消息。 其他异常(例如下一个输入文件不存在的示例中的IOError)必须由调用者处理。
$ python3 argparse_type.py -i a

usage: argparse_type.py [-h] [-i I] [-f F] [--file FILE]
argparse_type.py: error: argument -i: invalid int value: 'a'

$ python3 argparse_type.py -f 3.14.15

usage: argparse_type.py [-h] [-i I] [-f F] [--file FILE]
argparse_type.py: error: argument -f: invalid float value: '3.14.15'

$ python3 argparse_type.py --file does_not_exist.txt

usage: argparse_type.py [-h] [-i I] [-f F] [--file FILE]
argparse_type.py: error: [Errno 2] No such file or directory: 'does_not_exist.txt'
要将输入参数限制为预定义集合中的值,请使用choices参数。
#argparse_choices.py
import argparse

parser = argparse.ArgumentParser()

parser.add_argument(
    '--mode',
    choices=('read-only', 'read-write'),
)

print(parser.parse_args())
如果--mode的参数不是允许值之一,则会生成错误并停止处理。
$ python3 argparse_choices.py -h

usage: argparse_choices.py [-h] [--mode {read-only,read-write}]

optional arguments:
  -h, --help            show this help message and exit
  --mode {read-only,read-write}

$ python3 argparse_choices.py --mode read-only

Namespace(mode='read-only')

$ python3 argparse_choices.py --mode invalid

usage: argparse_choices.py [-h] [--mode {read-only,read-write}]
argparse_choices.py: error: argument --mode: invalid choice:
'invalid' (choose from 'read-only', 'read-write')
File Arguments
虽然file对象可以使用单个字符串参数进行实例化,但不包括访问模式参数。 FileType提供了一种更灵活的方式来指定参数应该是一个文件,包括模式和缓冲区大小。
#argparse_FileType.py
import argparse

parser = argparse.ArgumentParser()

parser.add_argument('-i', metavar='in-file',
                    type=argparse.FileType('rt'))
parser.add_argument('-o', metavar='out-file',
                    type=argparse.FileType('wt'))

try:
    results = parser.parse_args()
    print('Input file:', results.i)
    print('Output file:', results.o)
except IOError as msg:
    parser.error(str(msg))
与参数名称关联的值是打开的文件句柄。 应用程序负责在不再使用文件时关闭该文件。
$ python3 argparse_FileType.py -h

usage: argparse_FileType.py [-h] [-i in-file] [-o out-file]

optional arguments:
  -h, --help   show this help message and exit
  -i in-file
  -o out-file

$ python3 argparse_FileType.py -i argparse_FileType.py -o tmp_file.txt

Input file: <_io.TextIOWrapper name='argparse_FileType.py' mode='rt' encoding='UTF-8'>
Output file: <_io.TextIOWrapper name='tmp_file.txt' mode='wt' encoding='UTF-8'>

$ python3 argparse_FileType.py -i no_such_file.txt

usage: argparse_FileType.py [-h] [-i in-file] [-o out-file]
argparse_FileType.py: error: argument -i: can't open
'no_such_file.txt': [Errno 2] No such file or directory: 'no_such_file.txt'
Custom Actions
除了前面描述的内置操作之外,还可以通过提供实现Action API的对象来定义自定义操作。传递给add_argument()作为action的对象应该采用“描述被定义的参数的”参数(add_argument()的所有相同的参数)并返回一个可调用的对象,该对象将“处理参数的parser”,包含解析结果的namespace,被处理的参数的value,以及触发该操作的option_string 作为参数。
提供了一个Action类作为定义新操作的便捷起点。 构造函数处理参数定义,因此只需要在子类中重写__call __()。
#argparse_custom_action.py
import argparse

class CustomAction(argparse.Action):
    def __init__(self,
                 option_strings,
                 dest,
                 nargs=None,
                 const=None,
                 default=None,
                 type=None,
                 choices=None,
                 required=False,
                 help=None,
                 metavar=None):
        argparse.Action.__init__(self,
                                 option_strings=option_strings,
                                 dest=dest,
                                 nargs=nargs,
                                 const=const,
                                 default=default,
                                 type=type,
                                 choices=choices,
                                 required=required,
                                 help=help,
                                 metavar=metavar,
                                 )
        print('Initializing CustomAction')
        for name, value in sorted(locals().items()):
            if name == 'self' or value is None:
                continue
            print('  {} = {!r}'.format(name, value))
        print()
        return

    def __call__(self, parser, namespace, values, option_string=None):
        print('Processing CustomAction for {}'.format(self.dest))
        print('  parser = {}'.format(id(parser)))
        print('  values = {!r}'.format(values))
        print('  option_string = {!r}'.format(option_string))

        # Do some arbitrary processing of the input values
        if isinstance(values, list):
            values = [v.upper() for v in values]
        else:
            values = values.upper()
        # Save the results in the namespace using the destination
        # variable given to our constructor.
        setattr(namespace, self.dest, values)
        print()

parser = argparse.ArgumentParser()

parser.add_argument('-a', action=CustomAction)
parser.add_argument('-m', nargs='*', action=CustomAction)

results = parser.parse_args(['-a', 'value',
                             '-m', 'multivalue',
                             'second'])
print(results)
values的类型取决于nargs的值。 如果参数允许多个值,则values将是一个列表,即使它只包含一个项。
option_string的值还取决于原始参数规范。 对于位置必需参数,option_string始终为None。
$ python3 argparse_custom_action.py

Initializing CustomAction
  dest = 'a'
  option_strings = ['-a']
  required = False

Initializing CustomAction
  dest = 'm'
  nargs = '*'
  option_strings = ['-m']
  required = False

Processing CustomAction for a
  parser = 4315836992
  values = 'value'
  option_string = '-a'

Processing CustomAction for m
  parser = 4315836992
  values = ['multivalue', 'second']
  option_string = '-m'

Namespace(a='VALUE', m=['MULTIVALUE', 'SECOND'])
getopt — Command Line Option Parsing
目的:命令行选项解析
getopt模块是原始的命令行选项解析器,它支持Unix函数getopt建立的约定。 它解析参数序列,例如sys.argv,并返回包含(选项,参数)对的元组序列和一系列“非选项”参数。
支持的选项语法包括短格式和长格式选项:
-a
-bval
-b val
--noarg
--witharg=val
--witharg val
注意
getopt没有被丢弃,但argparse被更积极地维护并且应该在新开发中使用。
Function Arguments
getopt()函数有三个参数:
- 第一个参数是要解析的参数序列。 这通常来自
sys.argv[1:](忽略sys.arg [0]中的程序名称)。 - 第二个参数是单个字符选项的选项定义字符串。 如果其中一个选项需要参数,则其字母后跟冒号。
- 第三个参数(如果使用)应该是长样式选项名称的序列。 长样式选项可以是多个字符,例如
--noarg或--witharg。 序列中的选项名称不应包含--前缀。 如果长选项需要参数,则其名称的后缀应为“=”。
短和长样式选项可以在一次调用中组合。
Short Form Options
此示例程序接受三个选项。 -a是一个简单的标志,而-b和-c需要一个参数。 选项定义字符串是ab:c:。
#getopt_short.py
import getopt

opts, args = getopt.getopt(['-a', '-bval', '-c', 'val'], 'ab:c:')

for opt in opts:
    print(opt)
程序将一个模拟的选项值列表传递给getopt()以显示它们的处理方式。
$ python3 getopt_short.py

('-a', '')
('-b', 'val')
('-c', 'val')
Long Form Options
对于一个带有两个选项的程序,--noarg和--witharg,长参数序列应该是['noarg','witharg=']。
#getopt_long.py
import getopt

opts, args = getopt.getopt(['--noarg', '--witharg', 'val', '--witharg2=another'],
	'',
    ['noarg', 'witharg=', 'witharg2='],
)
for opt in opts:
    print(opt)
由于此示例程序不采用任何短格式选项,因此getopt()的第二个参数是空字符串。
$ python3 getopt_long.py

('--noarg', '')
('--witharg', 'val')
('--witharg2', 'another')
A Complete Example
此示例是一个更完整的程序,它有五个选项:-o,-v, --output, --verbose和--version。 -o, --output和--version选项都需要一个参数。
#getopt_example.py
import getopt
import sys

version = '1.0'
verbose = False
output_filename = 'default.out'

print('ARGV      :', sys.argv[1:])

try:
    options, remainder = getopt.getopt(
        sys.argv[1:],
        'o:v',
        ['output=', 'verbose', 'version=', ])
except getopt.GetoptError as err:
    print('ERROR:', err)
    sys.exit(1)

print('OPTIONS   :', options)

for opt, arg in options:
    if opt in ('-o', '--output'):
        output_filename = arg
    elif opt in ('-v', '--verbose'):
        verbose = True
    elif opt == '--version':
        version = arg

print('VERSION   :', version)
print('VERBOSE   :', verbose)
print('OUTPUT    :', output_filename)
print('REMAINING :', remainder)
可以通过各种方式调用该程序。 在没有任何参数的情况下调用它时,将使用默认设置。
$ python3 getopt_example.py

ARGV      : []
OPTIONS   : []
VERSION   : 1.0
VERBOSE   : False
OUTPUT    : default.out
REMAINING : []
单个字母选项可以通过空格与其参数分隔。
$ python3 getopt_example.py -o foo

ARGV      : ['-o', 'foo']
OPTIONS   : [('-o', 'foo')]
VERSION   : 1.0
VERBOSE   : False
OUTPUT    : foo
REMAINING : []
或者可以将选项和值组合成单个参数。
$ python3 getopt_example.py -ofoo

ARGV      : ['-ofoo']
OPTIONS   : [('-o', 'foo')]
VERSION   : 1.0
VERBOSE   : False
OUTPUT    : foo
REMAINING : []
长格式选项可以类似地与值分开。
$ python3 getopt_example.py --output foo

ARGV      : ['--output', 'foo']
OPTIONS   : [('--output', 'foo')]
VERSION   : 1.0
VERBOSE   : False
OUTPUT    : foo
REMAINING : []
当long选项与其值组合时,选项名称和值应该用单个=分隔。
$ python3 getopt_example.py --output=foo

ARGV      : ['--output=foo']
OPTIONS   : [('--output', 'foo')]
VERSION   : 1.0
VERBOSE   : False
OUTPUT    : foo
REMAINING : []
Abbreviating Long Form Options
只要提供了唯一的前缀,就不必在命令行上完全拼写长格式选项。
$ python3 getopt_example.py --o foo

ARGV      : ['--o', 'foo']
OPTIONS   : [('--output', 'foo')]
VERSION   : 1.0
VERBOSE   : False
OUTPUT    : foo
REMAINING : []
如果未提供唯一前缀,则会引发异常。
$ python3 getopt_example.py --ver 2.0

ARGV      : ['--ver', '2.0']
ERROR: option --ver not a unique prefix
GNU-style Option Parsing
通常,只要遇到第一个非选项参数,选项处理就会停止。
$ python3 getopt_example.py -v not_an_option --output foo

ARGV      : ['-v', 'not_an_option', '--output', 'foo']
OPTIONS   : [('-v', '')]
VERSION   : 1.0
VERBOSE   : True
OUTPUT    : default.out
REMAINING : ['not_an_option', '--output', 'foo']
要以任何顺序在命令行上混合选项和非选项参数,请改用gnu_getopt()。
#getopt_gnu.py
import getopt
import sys

version = '1.0'
verbose = False
output_filename = 'default.out'

print('ARGV      :', sys.argv[1:])

try:
    options, remainder = getopt.gnu_getopt(
        sys.argv[1:],
        'o:v',
        ['output=', 'verbose', 'version=', ])
except getopt.GetoptError as err:
    print('ERROR:', err)
    sys.exit(1)

print('OPTIONS   :', options)

for opt, arg in options:
    if opt in ('-o', '--output'):
        output_filename = arg
    elif opt in ('-v', '--verbose'):
        verbose = True
    elif opt == '--version':
        version = arg

print('VERSION   :', version)
print('VERBOSE   :', verbose)
print('OUTPUT    :', output_filename)
print('REMAINING :', remainder)
在上一个示例中更改调用后,差异变得清晰。
$ python3 getopt_gnu.py -v not_an_option --output foo

ARGV      : ['-v', 'not_an_option', '--output', 'foo']
OPTIONS   : [('-v', ''), ('--output', 'foo')]
VERSION   : 1.0
VERBOSE   : True
OUTPUT    : foo
REMAINING : ['not_an_option']
Ending Argument Processing
如果getopt()在输入参数中遇到 -- ,它将停止将剩余的参数作为选项处理。 此功能可用于传递看起来像选项的参数值,例如以短划线(-)开头的文件名。
$ python3 getopt_example.py -v -- --output foo

ARGV      : ['-v', '--', '--output', 'foo']
OPTIONS   : [('-v', '')]
VERSION   : 1.0
VERBOSE   : True
OUTPUT    : default.out
REMAINING : ['--output', 'foo']
readline — The GNU readline Library
目的:提供GNU readline库的接口,以便在命令提示符下与用户交互。
readline模块可用于增强交互式命令行程序,使其更易于使用。它主要用于提供命令行文本完成(completion)或“tab 完成”。
注意
由于readline与控制台内容交互,因此打印调试消息使得很难看到“示例代码中发生的情况”与“readline正在免费执行的操作”之间的关系。以下示例使用日志记录模块将调试信息写入单独的文件。每个示例都显示了日志输出。
注意
默认情况下,readline所需的GNU库并非在所有平台上都可用。如果您的系统不包含它们,则可能需要在安装依赖项后重新编译Python解释器以启用该模块。该库的独立版本也是从Python包索引中以名称gnureadline分发的。本节中的示例首先尝试导入gnureadline,然后再回到readline。
特别感谢Jim Baker指出这个包。
Configuring
有两种方法可以配置基础readline库,使用配置文件或parse_and_bind()函数。 配置选项包括用于调用完成的键绑定,编辑模式(vi或emacs)以及许多其他值。 有关详细信息,请参阅GNU readline库的文档。
启用tab完成的最简单方法是调用parse_and_bind()。 其他选项可以同时设置。 此示例将编辑控件更改为使用“vi”模式而不是默认的“emacs”。 要编辑当前输入行,请按ESC然后使用常规vi导航键,例如j,k,l和h。
#readline_parse_and_bind.py
try:
    import gnureadline as readline
except ImportError:
    import readline

readline.parse_and_bind('tab: complete')
readline.parse_and_bind('set editing-mode vi')

while True:
    line = input('Prompt ("stop" to quit): ')
    if line == 'stop':
        break
    print('ENTERED: {!r}'.format(line))
可以将相同的配置存储为文件中的指令,库通过单个调用读取。 如果myreadline.rc包含
#myreadline.rc
# Turn on tab completion
tab: complete

# Use vi editing mode instead of emacs
set editing-mode vi
可以使用read_init_file()读取该文件
#readline_read_init_file.py
try:
    import gnureadline as readline
except ImportError:
    import readline

readline.read_init_file('myreadline.rc')

while True:
    line = input('Prompt ("stop" to quit): ')
    if line == 'stop':
        break
    print('ENTERED: {!r}'.format(line))
Completing Text
该程序具有一组内置的可能的命令,并在用户输入指令时使用tab完成。
#readline_completer.py
try:
    import gnureadline as readline
except ImportError:
    import readline
import logging

LOG_FILENAME = '/tmp/completer.log'
logging.basicConfig(format='%(message)s', filename=LOG_FILENAME, level=logging.DEBUG,)

class SimpleCompleter:

    def __init__(self, options):
        self.options = sorted(options)

    def complete(self, text, state):
        response = None
        if state == 0:
            # This is the first time for this text,
            # so build a match list.
            if text:
                self.matches = [
                    s for s in self.options
                    if s and s.startswith(text)
                ]
                logging.debug('%s matches: %s', repr(text), self.matches)
            else:
                self.matches = self.options[:]
                logging.debug('(empty input) matches: %s', self.matches)

        # Return the state'th item from the match list,
        # if we have that many.
        try:
            response = self.matches[state]
        except IndexError:
            response = None
        logging.debug('complete(%s, %s) => %s', repr(text), state, repr(response))
        return response

def input_loop():
    line = ''
    while line != 'stop':
        line = input('Prompt ("stop" to quit): ')
        print('Dispatch {}'.format(line))

# Register the completer function
OPTIONS = ['start', 'stop', 'list', 'print']
readline.set_completer(SimpleCompleter(OPTIONS).complete)

# Use the tab key for completion
readline.parse_and_bind('tab: complete')

# Prompt the user for text
input_loop()
input_loop()函数一行接一行读取,直到输入值为stop。 更复杂的程序实际上可以解析输入行并运行命令。
SimpleCompleter类保留一个“选项”列表,这些选项是自动完成的候选者。 实例的complete()方法用于使用readline注册为完成源。 参数是要完成的text字符串和state值,state表示使用相同文本调用函数的次数。 重复调用该函数,每次递增state。 如果有该state值的候选者,则应该返回一个字符串;如果没有更多的候选者,则返回None。 这里的complete()的实现在state为0时查找一组匹配,然后在后续调用中一次返回所有候选匹配。
运行时,初始输出为:
$ python3 readline_completer.py

Prompt ("stop" to quit):
按TAB两次会打印一个选项列表。
$ python3 readline_completer.py

Prompt ("stop" to quit):
list   print  start  stop
Prompt ("stop" to quit):
日志文件显示使用两个单独的状态值序列调用complete()。
$ tail -f /tmp/completer.log
(empty input) matches: [‘list’, ‘print’, ‘start’, ‘stop’] complete(‘’, 0) => ‘list’ complete(‘’, 1) => ‘print’ complete(‘’, 2) => ‘start’ complete(‘’, 3) => ‘stop’ complete(‘’, 4) => None (empty input) matches: [‘list’, ‘print’, ‘start’, ‘stop’] complete(‘’, 0) => ‘list’ complete(‘’, 1) => ‘print’ complete(‘’, 2) => ‘start’ complete(‘’, 3) => ‘stop’ complete(‘’, 4) => None
第一个序列来自第一个TAB key-press。 完成算法要求所有候选者但不扩展空输入行。 然后在第二个TAB上,重新计算候选列表,以便为用户打印。

如果下一个输入为“l”,后跟另一个TAB,则屏幕显示:
Prompt (“stop” to quit): list
并且日志反映了complete()的不同参数:
‘l’ matches: [‘list’] complete(‘l’, 0) => ‘list’ complete(‘l’, 1) => None
现在按RETURN会导致input()返回值,并且while loop会继续循环。
Dispatch list Prompt (“stop” to quit):
对于以“s”开头的命令,有两种可能的完成。 键入“s”,然后按TAB发现“start”和“stop”是候选,但通过添加“t”只部分完成屏幕上的文本。

日志文件显示:
’s’ matches: [‘start’, ‘stop’] complete(‘s’, 0) => ‘start’ complete(‘s’, 1) => ‘stop’ complete(‘s’, 2) => None
屏幕输出:
Prompt (“stop” to quit): st
>注意
如果完成函数引发异常,则会被安静的忽略,并且readline假定没有匹配的完成。

### Accessing the Completion Buffer

SimpleCompleter中的完成算法仅查看传递给函数的text参数,但不再使用readline的内部状态。 也可以使用readline函数来操作输入缓冲区的文本。

```python
#readline_buffer.py
try:
    import gnureadline as readline
except ImportError:
    import readline
import logging

LOG_FILENAME = '/tmp/completer.log'
logging.basicConfig(format='%(message)s', filename=LOG_FILENAME,level=logging.DEBUG,)

class BufferAwareCompleter:
    def __init__(self, options):
        self.options = options
        self.current_candidates = []

    def complete(self, text, state):
        response = None
        if state == 0:
            # This is the first time for this text,
            # so build a match list.

            origline = readline.get_line_buffer()
            begin = readline.get_begidx()
            end = readline.get_endidx()
            being_completed = origline[begin:end]
            words = origline.split()

            logging.debug('origline=%s', repr(origline))
            logging.debug('begin=%s', begin)
            logging.debug('end=%s', end)
            logging.debug('being_completed=%s', being_completed)
            logging.debug('words=%s', words)

            if not words:
                self.current_candidates = sorted(self.options.keys())
            else:
                try:
                    if begin == 0:
                        # first word
                        candidates = self.options.keys()
                    else:
                        # later word
                        first = words[0]
                        candidates = self.options[first]

                    if being_completed:
                        # match options with portion of input
                        # being completed
                        self.current_candidates = [ w for w in candidates
                        							if w.startswith(being_completed) ]
                    else:
                        # matching empty string,
                        # use all candidates
                        self.current_candidates = candidates

                    logging.debug('candidates=%s', self.current_candidates)

                except (KeyError, IndexError) as err:
                    logging.error('completion error: %s', err)
                    self.current_candidates = []

        try:
            response = self.current_candidates[state]
        except IndexError:
            response = None
        logging.debug('complete(%s, %s) => %s', repr(text), state, response)
        return response

def input_loop():
    line = ''
    while line != 'stop':
        line = input('Prompt ("stop" to quit): ')
        print('Dispatch {}'.format(line))

# Register our completer function
completer = BufferAwareCompleter({
    'list': ['files', 'directories'],
    'print': ['byname', 'bysize'],
    'stop': [],
})
readline.set_completer(completer.complete)

# Use the tab key for completion
readline.parse_and_bind('tab: complete')

# Prompt the user for text
input_loop()
在此示例中,具有子选项的命令被完成。complete()方法需要查看输入缓冲区内完成的位置,以确定它是第一个单词还是后一个单词的一部分。 如果目标是第一个单词,则选项字典的键用作候选。 如果它不是第一个单词,则第一个单词用于从选项词典中查找候选词。
有三个顶级命令,其中两个有子命令。
- list
- files
- directories
- print
- byname
- bysize
- stop
遵循与之前相同的操作顺序,按TAB两次给出三个顶级命令:
$ python3 readline_buffer.py

Prompt ("stop" to quit):
list   print  stop
Prompt ("stop" to quit):
日志显示:
origline=''
begin=0
end=0
being_completed=
words=[]
complete('', 0) => list
complete('', 1) => print
complete('', 2) => stop
complete('', 3) => None
origline=''
begin=0
end=0
being_completed=
words=[]
complete('', 0) => list
complete('', 1) => print
complete('', 2) => stop
complete('', 3) => None
如果第一个单词是“list”(单词后面有空格),则完成的候选项是不同的。
Prompt ("stop" to quit): list
directories  files
日志显示被完成的文本不是整行,而是list后面的部分。
origline='list '
begin=5
end=5
being_completed=
words=['list']
candidates=['files', 'directories']
complete('', 0) => files
complete('', 1) => directories
complete('', 2) => None
origline='list '
begin=5
end=5
being_completed=
words=['list']
candidates=['files', 'directories']
complete('', 0) => files
complete('', 1) => directories
complete('', 2) => None
Input History
readline自动跟踪输入历史记录。有两组不同的函数用于处理历史记录。 可以使用get_current_history_length()和get_history_item()访问当前会话的历史记录。 可以使用write_history_file()和read_history_file()将相同的历史记录保存到稍后要重新加载的文件中。 默认情况下会保存整个历史记录,但可以使用set_history_length()设置文件的最大长度。 长度为-1表示没有限制。
#readline_history.py
try:
    import gnureadline as readline
except ImportError:
    import readline
import logging
import os

LOG_FILENAME = '/tmp/completer.log'
HISTORY_FILENAME = '/tmp/completer.hist'

logging.basicConfig(format='%(message)s', filename=LOG_FILENAME,level=logging.DEBUG,)

def get_history_items():
    num_items = readline.get_current_history_length() + 1
    return [ readline.get_history_item(i)
        for i in range(1, num_items) ]

class HistoryCompleter:

    def __init__(self):
        self.matches = []

    def complete(self, text, state):
        response = None
        if state == 0:
            history_values = get_history_items()
            logging.debug('history: %s', history_values)
            if text:
                self.matches = sorted( h for h in history_values if h and h.startswith(text) )
            else:
                self.matches = []
            logging.debug('matches: %s', self.matches)
        try:
            response = self.matches[state]
        except IndexError:
            response = None
        logging.debug('complete(%s, %s) => %s', repr(text), state, repr(response))
        return response

def input_loop():
    if os.path.exists(HISTORY_FILENAME):
        readline.read_history_file(HISTORY_FILENAME)
    print('Max history file length:', readline.get_history_length())
    print('Startup history:', get_history_items())
    try:
        while True:
            line = input('Prompt ("stop" to quit): ')
            if line == 'stop':
                break
            if line:
                print('Adding {!r} to the history'.format(line))
    finally:
        print('Final history:', get_history_items())
        readline.write_history_file(HISTORY_FILENAME)

# Register our completer function
readline.set_completer(HistoryCompleter().complete)

# Use the tab key for completion
readline.parse_and_bind('tab: complete')

# Prompt the user for text
input_loop()
HistoryCompleter会记住键入的所有内容,并在完成后续输入时使用这些值。
$ python3 readline_history.py

Max history file length: -1
Startup history: []
Prompt ("stop" to quit): foo
Adding 'foo' to the history
Prompt ("stop" to quit): bar
Adding 'bar' to the history
Prompt ("stop" to quit): blah
Adding 'blah' to the history
Prompt ("stop" to quit): b
bar   blah
Prompt ("stop" to quit): b
Prompt ("stop" to quit): stop
Final history: ['foo', 'bar', 'blah', 'stop']
当“b”后跟两个TAB时,日志显示此输出。
history: ['foo', 'bar', 'blah']
matches: ['bar', 'blah']
complete('b', 0) => 'bar'
complete('b', 1) => 'blah'
complete('b', 2) => None
history: ['foo', 'bar', 'blah']
matches: ['bar', 'blah']
complete('b', 0) => 'bar'
complete('b', 1) => 'blah'
complete('b', 2) => None
第二次运行脚本时,将从文件中读取所有历史记录。
$ python3 readline_history.py

Max history file length: -1
Startup history: ['foo', 'bar', 'blah', 'stop']
Prompt ("stop" to quit):
还有用于删除单个历史记录项和清除整个历史记录的功能。
Hooks
作为交互序列的一部分,有几个hook可用于触发动作。在打印提示之前立即调用startup hook,并且在提示之后但在从用户读取文本之前运行pre-input hook。
#readline_hooks.py
try:
    import gnureadline as readline
except ImportError:
    import readline

def startup_hook():
    readline.insert_text('from startup_hook')

def pre_input_hook():
    readline.insert_text(' from pre_input_hook')
    readline.redisplay()

readline.set_startup_hook(startup_hook)
readline.set_pre_input_hook(pre_input_hook)
readline.parse_and_bind('tab: complete')

while True:
    line = input('Prompt ("stop" to quit): ')
    if line == 'stop':
        break
    print('ENTERED: {!r}'.format(line))
hook是使用insert_text()修改输入缓冲区的潜在好地方。
$ python3 readline_hooks.py

Prompt ("stop" to quit): from startup_hook from pre_input_hook
如果在pre-input hook内修改了缓冲区,则必须调用redisplay()来更新屏幕。
getpass — Secure Password Prompt
目的:提示用户输入值,通常是密码,而不会回显他们键入控制台的内容。
许多通过终端与用户交互的程序需要向用户询问密码值,而不显示用户在屏幕上键入的内容。 getpass模块提供了一种安全处理此类密码提示的便携方式。
Example
getpass()函数打印一个提示,然后从用户读取输入,直到他们按下return。 输入作为字符串返回给调用者。
#getpass_defaults.py
import getpass

try:
    p = getpass.getpass()
except Exception as err:
    print('ERROR:', err)
else:
    print('You entered:', p)
如果调用者没有指定,默认提示为 “Password:”。
$ python3 getpass_defaults.py

Password:
You entered: sekret
提示可以更改为任何所需的值。
#getpass_prompt.py
import getpass

p = getpass.getpass(prompt='What is your favorite color? ')
if p.lower() == 'blue':
    print('Right.  Off you go.')
else:
    print('Auuuuugh!')
有些程序要求使用一个密码短语而不是简单的密码,以提供更好的安全性。
$ python3 getpass_prompt.py

What is your favorite color?
Right.  Off you go.

$ python3 getpass_prompt.py

What is your favorite color?
Auuuuugh!
默认情况下,getpass()使用sys.stdout打印提示字符串。对于可能在sys.stdout上生成有用输出的程序,通常最好将提示发送到另一个流,例如sys.stderr。
#getpass_stream.py
import getpass
import sys

p = getpass.getpass(stream=sys.stderr)
print('You entered:', p)
使用sys.stderr进行提示意味着可以将标准输出重定向(到管道或文件),而不会看到password提示。 用户输入的值仍未回显到屏幕。
$ python3 getpass_stream.py >/dev/null

Password:
Using getpass Without a Terminal
在Unix下,getpass()总是需要一个可以通过termios控制的tty,因此可以禁用输入回显。 这意味着不会从重定向到标准输入的非终端流中读取值。 相反,getpass尝试获取进程的tty,如果他们可以访问它,则不会引发错误。
$ echo "not sekret" | python3 getpass_defaults.py

Password:
You entered: sekret
调用者可以检测输入流何时不是tty,并在这种情况下使用备用方法进行读取。
#getpass_noterminal.py
import getpass
import sys

if sys.stdin.isatty():
    p = getpass.getpass('Using getpass: ')
else:
    print('Using readline')
    p = sys.stdin.readline().rstrip()

print('Read: ', p)
使用tty:
$ python3 ./getpass_noterminal.py

Using getpass:
Read:  sekret
不使用tty:
$ echo "sekret" | python3 ./getpass_noterminal.py

Using readline
Read:  sekret
cmd — Line-oriented Command Processors
目的:创建面向行的命令处理器。
cmd模块包含一个公共类Cmd,旨在用作交互式shell和其他命令解释器的基类。 默认情况下,它使用readline进行交互式提示处理,命令行编辑和命令完成。
Processing Commands
使用cmd创建的命令解释器使用循环从其输入读取所有行,解析它们,然后将命令分派给适当的命令处理程序。输入行分为两部分:命令和行上的任何其他文本。如果用户输入foo bar,并且解释器类包含名为do_foo()的方法,则以“bar”作为唯一参数调用它。
文件结束标记被分派到do_EOF()。 如果命令处理程序返回true值,程序将干净地退出。
因此,为了给出一个干净的方法来退出解释器,请确保实现do_EOF()并让它返回True。
这个简单的示例程序支持“greet”命令:
#cmd_simple.py
import cmd

class HelloWorld(cmd.Cmd):

    def do_greet(self, line):
        print("hello")

    def do_EOF(self, line):
        return True

if __name__ == '__main__':
    HelloWorld().cmdloop()
以交互方式运行它演示了如何调度命令以及显示Cmd中包含的一些功能。
$ python3 cmd_simple.py

(Cmd)
首先要注意的是命令提示符(Cmd)。可以通过prompt属性配置提示。提示值是动态的,如果命令处理程序更改了提示属性,则新值将用于查询下一个命令。
Documented commands (type help <topic>):
========================================
help

Undocumented commands:
======================
EOF  greet
help命令内置于Cmd中。如果没有参数,help会显示可用命令列表。如果输入包含命令名称,则输出更详细,并在可用时限制为该命令的详细信息。 如果命令是greet,则调用do_greet()来处理它:
(Cmd) greet
hello
如果类不包含命令的特定处理程序,则调用方法default(),并将整个输入行作为参数。default()的内置实现报告错误。
(Cmd) foo
*** Unknown syntax: foo
由于do_EOF()返回True,因此键入Ctrl-D会导致解释器退出。
(Cmd) ^D$
退出时不会打印换行符,因此结果有点混乱。
Command Arguments
此示例包含一些增强功能,可消除一些烦恼并为greet命令添加帮助。
#cmd_arguments.py
import cmd

class HelloWorld(cmd.Cmd):

    def do_greet(self, person):
        """greet [person]
        Greet the named person"""
        if person:
            print("hi,", person)
        else:
            print('hi')

    def do_EOF(self, line):
        return True

    def postloop(self):
        print()

if __name__ == '__main__':
    HelloWorld().cmdloop()
添加到do_greet()的docstring成为命令的帮助文本:
$ python3 cmd_arguments.py

(Cmd) help

Documented commands (type help <topic>):
========================================
greet  help

Undocumented commands:
======================
EOF

(Cmd) help greet
greet [person]
        Greet the named person
输出显示greet有一个可选参数,person。尽管参数对于命令是可选的,但命令和回调方法之间存在区别。该方法始终采用参数,但有时值为空字符串。 由命令处理程序决定空参数是否有效,或者进一步解析和处理命令。在此示例中,如果提供了人名,则会对问候语进行个性化。
(Cmd) greet Alice
hi, Alice
(Cmd) greet
hi
无论参数是否由用户给出,传递给命令处理程序的值都不包括命令本身。这简化了命令处理程序中的解析,尤其是在需要多个参数的情况下。
Live Help
在前面的示例中,帮助文本的格式保留了一些不想要的东西。由于它来自docstring,因此它保留了源文件的缩进。可以更改源码以删除额外的空白区域,但这会使应用程序代码看起来格式不佳。更好的解决方案是为greet命令实现一个名为help_greet()的帮助处理程序。调用帮助处理程序以生成命名命令的帮助文本。
#cmd_do_help.py
# Set up gnureadline as readline if installed.
try:
    import gnureadline
    import sys
    sys.modules['readline'] = gnureadline
except ImportError:
    pass

import cmd

class HelloWorld(cmd.Cmd):

    def do_greet(self, person):
        if person:
            print("hi,", person)
        else:
            print('hi')

    def help_greet(self):
        print('\n'.join([
            'greet [person]',
            'Greet the named person',
        ]))

    def do_EOF(self, line):
        return True

if __name__ == '__main__':
    HelloWorld().cmdloop()
在此示例中,文本是静态的,但格式更好。还可以使用先前的命令状态来定制帮助文本的内容到当前上下文。
$ python3 cmd_do_help.py

(Cmd) help greet
greet [person]
Greet the named person
由帮助处理程序实际输出帮助消息,而不是简单地返回帮助文本以在其他地方处理。
Auto-Completion
Cmd支持基于处理程器方法所含的命令名称对命令自动补全。用户通过在输入提示符处按Tab键来触发补全。当有多个可补全的候选命令时,按两次Tab键会打印一个选项列表。
注意
默认情况下,readline所需的GNU库并非在所有平台上都可用。在这些情况下,tab完成可能无效。如果您的Python安装没有安装所需库,请参阅readline的提示。
$ python3 cmd_do_help.py

(Cmd) <tab><tab>
EOF    greet  help
(Cmd) h<tab>
(Cmd) help
一旦命令已知,参数完成(补全)由前缀为complete_的方法处理。这允许新的完成处理程序使用任意标准(即,查询数据库或查看文件系统上的文件或目录)来组装可能的完成候选列表。在此例中,该程序有一组硬编码的“friends”,他们收到的问候比命名或匿名的陌生人更不正式。一个真正的程序可能会将列表保存在某处,然后读取一次,并根据需要扫描缓存的内容。
#cmd_arg_completion.py
# Set up gnureadline as readline if installed.
try:
    import gnureadline
    import sys
    sys.modules['readline'] = gnureadline
except ImportError:
    pass

import cmd

class HelloWorld(cmd.Cmd):

    FRIENDS = ['Alice', 'Adam', 'Barbara', 'Bob']

    def do_greet(self, person):
        "Greet the person"
        if person and person in self.FRIENDS:
            greeting = 'hi, {}!'.format(person)
        elif person:
            greeting = 'hello, {}'.format(person)
        else:
            greeting = 'hello'
        print(greeting)

    def complete_greet(self, text, line, begidx, endidx):
        if not text:
            completions = self.FRIENDS[:]
        else:
            completions = [
                f
                for f in self.FRIENDS
                if f.startswith(text)
            ]
        return completions

    def do_EOF(self, line):
        return True

if __name__ == '__main__':
    HelloWorld().cmdloop()
当有输入文本时,complete_greet()返回匹配的朋友列表。 否则,将返回完整的好友列表。
$ python3 cmd_arg_completion.py

(Cmd) greet <tab><tab>
Adam     Alice    Barbara  Bob
(Cmd) greet A<tab><tab>
Adam   Alice
(Cmd) greet Ad<tab>
(Cmd) greet Adam
hi, Adam!
如果给出的姓名不在朋友列表中,则会给出正式的问候语。
(Cmd) greet Joe
hello, Joe
Overriding Base Class Methods
Cmd包含几个方法,可以将这些方法重写为用于执行操作或更改基类行为的挂钩。此示例并非详尽无遗,但包含许多常用的方法。
#cmd_illustrate_methods.py
# Set up gnureadline as readline if installed.
try:
    import gnureadline
    import sys
    sys.modules['readline'] = gnureadline
except ImportError:
    pass

import cmd

class Illustrate(cmd.Cmd):
    "Illustrate the base class method use."

    def cmdloop(self, intro=None):
        print('cmdloop({})'.format(intro))
        return cmd.Cmd.cmdloop(self, intro)

    def preloop(self):
        print('preloop()')

    def postloop(self):
        print('postloop()')

    def parseline(self, line):
        print('parseline({!r}) =>'.format(line), end='')
        ret = cmd.Cmd.parseline(self, line)
        print(ret)
        return ret

    def onecmd(self, s):
        print('onecmd({})'.format(s))
        return cmd.Cmd.onecmd(self, s)

    def emptyline(self):
        print('emptyline()')
        return cmd.Cmd.emptyline(self)

    def default(self, line):
        print('default({})'.format(line))
        return cmd.Cmd.default(self, line)

    def precmd(self, line):
        print('precmd({})'.format(line))
        return cmd.Cmd.precmd(self, line)

    def postcmd(self, stop, line):
        print('postcmd({}, {})'.format(stop, line))
        return cmd.Cmd.postcmd(self, stop, line)

    def do_greet(self, line):
        print('hello,', line)

    def do_EOF(self, line):
        "Exit"
        return True

if __name__ == '__main__':
    Illustrate().cmdloop('Illustrating the methods of cmd.Cmd')
cmdloop()是解释器的主要处理循环。通常没有必要覆盖它,因为preloop()和postloop()钩子可用。
通过cmdloop()的每次迭代都会调用onecmd()来将命令分派给它的处理程序。
使用parseline()解析实际输入行以创建包含该命令以及该行的剩余部分的元组。
如果该行为空,则调用emptyline()。默认实现是再次运行上一个命令。如果该行包含一个命令,则首先调用precmd(),然后查找并调用该处理程序。如果未找到,则调用default()。最后调用postcmd()。
以下是添加了print语句的示例会话:
$ python3 cmd_illustrate_methods.py

cmdloop(Illustrating the methods of cmd.Cmd)
preloop()
Illustrating the methods of cmd.Cmd
(Cmd) greet Bob
precmd(greet Bob)
onecmd(greet Bob)
parseline(greet Bob) => ('greet', 'Bob', 'greet Bob')
hello, Bob
postcmd(None, greet Bob)
(Cmd) ^Dprecmd(EOF)
onecmd(EOF)
parseline(EOF) => ('EOF', '', 'EOF')
postcmd(True, EOF)
postloop()
Configuring Cmd Through Attributes
除了前面描述的方法之外,还有几个用于控制命令解释器的属性。每次要求用户输入新命令时,可以将prompt设置为要打印的字符串。intro是在程序开始时打印的“欢迎”消息。cmdloop()接受此值的参数,或者可以直接在类上设置它。打印帮助时,doc_header,misc_header,undoc_header和ruler属性用于格式化输出。
#cmd_attributes.py
import cmd

class HelloWorld(cmd.Cmd):

    prompt = 'prompt: '
    intro = "Simple command processor example."

    doc_header = 'doc_header'
    misc_header = 'misc_header'
    undoc_header = 'undoc_header'

    ruler = '-'

    def do_prompt(self, line):
        "Change the interactive prompt"
        self.prompt = line + ': '

    def do_EOF(self, line):
        return True

if __name__ == '__main__':
    HelloWorld().cmdloop()
此示例类显示一个命令处理程序,以允许用户控制交互式会话的提示。
$ python3 cmd_attributes.py

Simple command processor example.
prompt: prompt hello
hello: help

doc_header
----------
help  prompt

undoc_header
------------
EOF

hello:
Running Shell Commands
为了补充标准命令处理,Cmd包括两个特殊命令前缀。问号(?)等同于内置help命令,可以以相同的方式使用。 感叹号(!)映射到do_shell(),用于“shelling out”以运行其他命令,如本例所示。
#cmd_do_shell.py
import cmd
import subprocess

class ShellEnabled(cmd.Cmd):

    last_output = ''

    def do_shell(self, line):
        "Run a shell command"
        print("running shell command:", line)
        sub_cmd = subprocess.Popen(line,
                                   shell=True,
                                   stdout=subprocess.PIPE)
        output = sub_cmd.communicate()[0].decode('utf-8')
        print(output)
        self.last_output = output

    def do_echo(self, line):
        """Print the input, replacing '$out' with
        the output of the last shell command.
        """
        # Obviously not robust
        print(line.replace('$out', self.last_output))

    def do_EOF(self, line):
        return True

if __name__ == '__main__':
    ShellEnabled().cmdloop()
此echo命令实现将其参数中的字符串$out替换为前一个shell命令的输出。
$ python3 cmd_do_shell.py

(Cmd) ?

Documented commands (type help <topic>):
========================================
echo  help  shell

Undocumented commands:
======================
EOF

(Cmd) ? shell
Run a shell command
(Cmd) ? echo
Print the input, replacing '$out' with
        the output of the last shell command
(Cmd) shell pwd
running shell command: pwd
.../pymotw-3/source/cmd

(Cmd) ! pwd
running shell command: pwd
.../pymotw-3/source/cmd

(Cmd) echo $out
.../pymotw-3/source/cmd
Alternative Inputs
虽然Cmd()的默认模式是通过readline库与用户交互,但也可以使用标准的Unix shell重定向将一系列命令传递给标准输入。
$ echo help | python3 cmd_do_help.py

(Cmd)
Documented commands (type help <topic>):
========================================
greet  help

Undocumented commands:
======================
EOF

(Cmd)
要让程序直接读取脚本文件,可能需要进行一些其他更改。由于readline与终端/tty设备交互,而不是标准输入流, 因此当脚本要从文件读取时,应禁用它。此外,为了避免打印多余的提示,可以将提示设置为空字符串。 此示例显示如何打开文件并将其作为输入传递给HelloWorld示例的修改版本。
#cmd_file.py
import cmd

class HelloWorld(cmd.Cmd):

    # Disable rawinput module use
    use_rawinput = False

    # Do not show a prompt after each command read
    prompt = ''

    def do_greet(self, line):
        print("hello,", line)

    def do_EOF(self, line):
        return True

if __name__ == '__main__':
    import sys
    with open(sys.argv[1], 'rt') as input:
        HelloWorld(stdin=input).cmdloop()
将use_rawinput设置为False并将提示设置为空字符串,可以在输入文件上调用脚本,每行都有一个命令。
#cmd_file.txt
greet
greet Alice and Bob
使用示例输入运行示例脚本将生成以下输出。
$ python3 cmd_file.py cmd_file.txt

hello,
hello, Alice and Bob
Commands from sys.argv
程序的命令行参数也可以作为解释器类的命令处理,而不是从控制台或文件中读取命令。要使用命令行参数,请直接调用onecmd(),如本例所示。
#cmd_argv.py
import cmd

class InteractiveOrCommandLine(cmd.Cmd):
    """Accepts commands via the normal interactive
    prompt or on the command line.
    """

    def do_greet(self, line):
        print('hello,', line)

    def do_EOF(self, line):
        return True

if __name__ == '__main__':
    import sys
    if len(sys.argv) > 1:
        InteractiveOrCommandLine().onecmd(' '.join(sys.argv[1:]))
    else:
        InteractiveOrCommandLine().cmdloop()
由于onecmd()接受单个字符串作为输入,因此程序的参数需要在传入之前连接在一起。
$ python3 cmd_argv.py greet Command-Line User

hello, Command-Line User

$ python3 cmd_argv.py

(Cmd) greet Interactive User
hello, Interactive User
(Cmd)
shlex — Parse Shell-style Syntaxes
目的:对shell样式语法进行词法分析。
shlex模块实现了一个用于解析简单的类shell(shell-like)语法的类。
它可用于编写特定于域的语言,或用于解析带引号的字符串(一种比表面上看起来更复杂的任务)。
Parsing Quoted Strings
使用输入文本时的一个常见问题是将引用的单词序列标识为单个实体。在引号上拆分文本并不总是按预期工作,特别是如果有嵌套的引号级别。 以下面的文字为例。
This string has embedded "double quotes" and
'single quotes' in it, and even "a 'nested example'".
一种幼稚的方法是构造一个正则表达式,以便找到文本在引号之外的部分,以将它们与引号内的文本分开,反之亦然。这导致了不必要的复杂,并且容易因撇号或甚至错别字等边缘情况而导致错误。更好的解决方案是使用真正的解析器,例如shlex模块提供的解析器。这是一个简单的示例,它使用shlex类打印输入文件中标识的标记。
#shlex_example.py
import shlex
import sys

if len(sys.argv) != 2:
    print('Please specify one filename on the command line.')
    sys.exit(1)

filename = sys.argv[1]
with open(filename, 'r') as f:
    body = f.read()
print('ORIGINAL: {!r}'.format(body))
print()

print('TOKENS:')
lexer = shlex.shlex(body)
for token in lexer:
    print('{!r}'.format(token))
在具有嵌入式引号的数据上运行时,解析器会生成预期标记列表。
$ python3 shlex_example.py quotes.txt

ORIGINAL: 'This string has embedded "double quotes" and\n\'singl
e quotes\' in it, and even "a \'nested example\'".\n'

TOKENS:
'This'
'string'
'has'
'embedded'
'"double quotes"'
'and'
"'single quotes'"
'in'
'it'
','
'and'
'even'
'"a \'nested example\'"'
'.'
还处理了诸如撇号的孤立引号。考虑这个输入文件。
This string has an embedded apostrophe, doesn't it?
嵌入撇号的token没有问题。
$ python3 shlex_example.py apostrophe.txt

ORIGINAL: "This string has an embedded apostrophe, doesn't it?"

TOKENS:
'This'
'string'
'has'
'an'
'embedded'
'apostrophe'
','
"doesn't"
'it'
'?'
Making Safe Strings for Shells
quote()函数执行逆操作,转义现有引号并为字符串添加缺少的引号,以使它们在shell命令中安全的使用。
#shlex_quote.py
import shlex

examples = [
    "Embedded'SingleQuote",
    'Embedded"DoubleQuote',
    'Embedded Space',
    '~SpecialCharacter',
    r'Back\slash',
]

for s in examples:
    print('ORIGINAL : {}'.format(s))
    print('QUOTED   : {}'.format(shlex.quote(s)))
    print()
使用subprocess.Popen时使用参数列表通常更安全,但在不可能的情况下,quote()通过确保正确引用特殊字符和空格来提供一些保护。
$ python3 shlex_quote.py

ORIGINAL : Embedded'SingleQuote
QUOTED   : 'Embedded'"'"'SingleQuote'

ORIGINAL : Embedded"DoubleQuote
QUOTED   : 'Embedded"DoubleQuote'

ORIGINAL : Embedded Space
QUOTED   : 'Embedded Space'

ORIGINAL : ~SpecialCharacter
QUOTED   : '~SpecialCharacter'

ORIGINAL : Back\slash
QUOTED   : 'Back\slash'
Embedded Comments
由于解析器旨在与命令语言一起使用,因此需要处理注释。默认情况下,#后面的任何文本都被视为注释的一部分并被忽略。 由于解析器的性质,仅支持单字符注释前缀。使用的注释字符集可以通过commenters属性进行配置。
$ python3 shlex_example.py comments.txt

ORIGINAL: 'This line is recognized.\n# But this line is ignored.
\nAnd this line is processed.'

TOKENS:
'This'
'line'
'is'
'recognized'
'.'
'And'
'this'
'line'
'is'
'processed'
'.'
Splitting Strings into Tokens
要将现有字符串拆分为tokens组件,便捷函数split()是解析器的简单包装器。
#shlex_split.py
import shlex

text = """This text has "quoted parts" inside it."""
print('ORIGINAL: {!r}'.format(text))
print()

print('TOKENS:')
print(shlex.split(text))
结果是一个列表:
$ python3 shlex_split.py

ORIGINAL: 'This text has "quoted parts" inside it.'

TOKENS:
['This', 'text', 'has', 'quoted parts', 'inside', 'it.']
Including Other Sources of Tokens
shlex类包括几个控制其行为的配置属性。source属性通过允许一个token流包含另一个token流来启用代码(或配置)重用的功能。这类似于Bourne shell的source操作符,因此是这个名称。
#shlex_source.py
import shlex

text = "This text says to source quotes.txt before continuing."
print('ORIGINAL: {!r}'.format(text))
print()

lexer = shlex.shlex(text)
lexer.wordchars += '.'
lexer.source = 'source'

print('TOKENS:')
for token in lexer:
    print('{!r}'.format(token))
原始文本中的字符串“source quotes.txt”被特殊处理。由于词法分析器的source属性设置为“source”,
因此当遇到此关键字时,将自动包含出现在下一行的文件名。为了使文件名显示为单个token, (.)字符需要添加到单词中包含的字符列表中(否则“quotes.txt”变为三个标记,“引号”,“.”,“txt”)。 以下是输出的样子。
$ python3 shlex_source.py

ORIGINAL: 'This text says to source quotes.txt before
continuing.'

TOKENS:
'This'
'text'
'says'
'to'
'This'
'string'
'has'
'embedded'
'"double quotes"'
'and'
"'single quotes'"
'in'
'it'
','
'and'
'even'
'"a \'nested example\'"'
'.'
'before'
'continuing.'
source功能使用名为sourcehook()的方法来加载其他输入源,因此shlex的子类可以提供从文件以外的位置加载数据的替代实现。
Controlling the Parser
前面的示例演示了如何更改wordchars值以控制哪些字符可以包含在单词中。也可以设置quotes字符以使用其他或替代引号。 每个引号必须是单个字符,因此不可能有不同的打开和关闭引号(例如,不能解析括号)。
#shlex_table.py
import shlex

text = """|Col 1||Col 2||Col 3|"""
print('ORIGINAL: {!r}'.format(text))
print()

lexer = shlex.shlex(text)
lexer.quotes = '|'

print('TOKENS:')
for token in lexer:
    print('{!r}'.format(token))
在此示例中,每个表格单元格都包含在垂直条中。
$ python3 shlex_table.py

ORIGINAL: '|Col 1||Col 2||Col 3|'

TOKENS:
'|Col 1|'
'|Col 2|'
'|Col 3|'
还可以控制用于分割单词的空白字符。
#shlex_whitespace.py
import shlex
import sys

if len(sys.argv) != 2:
    print('Please specify one filename on the command line.')
    sys.exit(1)

filename = sys.argv[1]
with open(filename, 'r') as f:
    body = f.read()
print('ORIGINAL: {!r}'.format(body))
print()

print('TOKENS:')
lexer = shlex.shlex(body)
lexer.whitespace += '.,'
for token in lexer:
    print('{!r}'.format(token))
如果将shlex_example.py中的示例修改为包含句点和逗号,则结果会更改。
$ python3 shlex_whitespace.py quotes.txt

ORIGINAL: 'This string has embedded "double quotes" and\n\'singl
e quotes\' in it, and even "a \'nested example\'".\n'

TOKENS:
'This'
'string'
'has'
'embedded'
'"double quotes"'
'and'
"'single quotes'"
'in'
'it'
'and'
'even'
'"a \'nested example\'"'
Error Handling
当解析器在所有引号字符串关闭之前遇到其输入的结尾时,它会引发ValueError。当发生这种情况时,检查解析器在处理输入时维护的一些属性是很有用的。例如,infile是指正在处理的文件的名称(如果一个文件source另一个文件,则可能与原始文件不同)。lineno报告错误发生的行。lineno通常是文件的末尾,可能远离第一个引号。token属性包含尚未包含在有效token中的文本缓冲区。error_leader()方法以类似于Unix编译器的样式生成消息前缀,这使得诸如emacs之类的编辑器能够解析错误并将用户直接带到无效行。
#shlex_errors.py
import shlex

text = """This line is ok.
This line has an "unfinished quote.
This line is ok, too.
"""

print('ORIGINAL: {!r}'.format(text))
print()

lexer = shlex.shlex(text)

print('TOKENS:')
try:
    for token in lexer:
        print('{!r}'.format(token))
except ValueError as err:
    first_line_of_error = lexer.token.splitlines()[0]
    print('ERROR: {} {}'.format(lexer.error_leader(), err))
    print('following {!r}'.format(first_line_of_error))
该示例生成此输出。
$ python3 shlex_errors.py

ORIGINAL: 'This line is ok.\nThis line has an "unfinished quote.
\nThis line is ok, too.\n'

TOKENS:
'This'
'line'
'is'
'ok'
'.'
'This'
'line'
'has'
'an'
ERROR: "None", line 4:  No closing quotation
following '"unfinished quote.'
POSIX vs. Non-POSIX Parsing
解析器的默认行为是使用不符合POSIX的向后兼容样式。对于POSIX行为,在构造解析器时设置posix参数。
#shlex_posix.py
import shlex

examples = [
    'Do"Not"Separate',
    '"Do"Separate',
    'Escaped \e Character not in quotes',
    'Escaped "\e" Character in double quotes',
    "Escaped '\e' Character in single quotes",
    r"Escaped '\'' \"\'\" single quote",
    r'Escaped "\"" \'\"\' double quote',
    "\"'Strip extra layer of quotes'\"",
]

for s in examples:
    print('ORIGINAL : {!r}'.format(s))
    print('non-POSIX: ', end='')

    non_posix_lexer = shlex.shlex(s, posix=False)
    try:
        print('{!r}'.format(list(non_posix_lexer)))
    except ValueError as err:
        print('error({})'.format(err))

    print('POSIX    : ', end='')
    posix_lexer = shlex.shlex(s, posix=True)
    try:
        print('{!r}'.format(list(posix_lexer)))
    except ValueError as err:
        print('error({})'.format(err))

    print()
以下是解析行为差异的几个示例。
$ python3 shlex_posix.py

ORIGINAL : 'Do"Not"Separate'
non-POSIX: ['Do"Not"Separate']
POSIX    : ['DoNotSeparate']

ORIGINAL : '"Do"Separate'
non-POSIX: ['"Do"', 'Separate']
POSIX    : ['DoSeparate']

ORIGINAL : 'Escaped \\e Character not in quotes'
non-POSIX: ['Escaped', '\\', 'e', 'Character', 'not', 'in', 'quotes']
POSIX    : ['Escaped', 'e', 'Character', 'not', 'in', 'quotes']

ORIGINAL : 'Escaped "\\e" Character in double quotes'
non-POSIX: ['Escaped', '"\\e"', 'Character', 'in', 'double', 'quotes']
POSIX    : ['Escaped', '\\e', 'Character', 'in', 'double', 'quotes']

ORIGINAL : "Escaped '\\e' Character in single quotes"
non-POSIX: ['Escaped', "'\\e'", 'Character', 'in', 'single', 'quotes']
POSIX    : ['Escaped', '\\e', 'Character', 'in', 'single', 'quotes']

ORIGINAL : 'Escaped \'\\\'\' \\"\\\'\\" single quote'
non-POSIX: error(No closing quotation)
POSIX    : ['Escaped', '\\ \\"\\"', 'single', 'quote']

ORIGINAL : 'Escaped "\\"" \\\'\\"\\\' double quote'
non-POSIX: error(No closing quotation)
POSIX    : ['Escaped', '"', '\'"\'', 'double', 'quote']

ORIGINAL : '"\'Strip extra layer of quotes\'"'
non-POSIX: ['"\'Strip extra layer of quotes\'"']
POSIX    : ["'Strip extra layer of quotes'"]
configparser — Work with Configuration Files
目的:读/写类似于Windows INI文件的配置文件
使用configparser模块管理应用程序的用户可编辑配置文件。配置文件的内容可以组织成组,并支持多种选项值类型,包括整数,浮点值和布尔值。 可以使用Python格式化字符串组合选项值,以便从较短的值(如主机名和端口号)构建更长的值,例如URL。
Configuration File Format
configparser使用的文件格式类似于旧版Microsoft Windows使用的格式。
它由一个或多个命名section组成,每个section可以包含具有名称和值的各个option。
通过查找以[开始并以]结尾的行来标识配置文件的section。方括号之间的值是section名称,可以包含除方括号之外的任何字符。
选项在section中一行一个列出。该行以选项的名称开头,该名称通过冒号(:)或等号(=)与值分隔。解析文件时,将忽略分隔符周围的空格。
以(;)或(#)开头的行被视为注释,并且在以编程方式访问配置文件的内容时不可见。
此示例配置文件有一个名为bug_tracker的section,包含三个选项:url,username和password。
# This is a simple example with comments.
[bug_tracker]
url = http://localhost:8080/bugs/
username = dhellmann
; You should not store passwords in plain text
; configuration files.
password = SECRET
Reading Configuration Files
配置文件的最常见用途是让用户或系统管理员使用常规文本编辑器编辑文件以设置应用程序行为默认值,然后让应用程序读取文件,解析文件并根据其内容执行操作。使用ConfigParser的read()方法读取配置文件。
#configparser_read.py
from configparser import ConfigParser

parser = ConfigParser()
parser.read('simple.ini')

print(parser.get('bug_tracker', 'url'))
该程序读取上一节中的simple.ini文件,并打印bug_tracker section 中的url选项的值。
$ python3 configparser_read.py

http://localhost:8080/bugs/
read()方法也接受文件名列表。依次扫描每个名称,如果文件存在则打开并读取。
#configparser_read_many.py
from configparser import ConfigParser
import glob

parser = ConfigParser()

candidates = ['does_not_exist.ini', 'also-does-not-exist.ini',
              'simple.ini', 'multisection.ini']

found = parser.read(candidates)

missing = set(candidates) - set(found)

print('Found config files:', sorted(found))
print('Missing files     :', sorted(missing))
read()返回一个列表,其中包含成功加载的文件的名称,因此程序可以发现缺少哪些配置文件,并决定是忽略它们还是将其视为错误。
$ python3 configparser_read_many.py

Found config files: ['multisection.ini', 'simple.ini']
Missing files     : ['also-does-not-exist.ini', 'does_not_exist.ini']
Unicode Configuration Data
应使用正确的编码值读取包含Unicode数据的配置文件。以下示例文件更改原始输入的密码值以包含Unicode字符,并使用UTF-8进行编码。
#unicode.ini
[bug_tracker]
url = http://localhost:8080/bugs/
username = dhellmann
password = ßéç®é†
使用适当的解码器打开该文件,将UTF-8数据转换为原生Unicode字符串。
#configparser_unicode.py
from configparser import ConfigParser
import codecs

parser = ConfigParser()
# Open the file with the correct encoding
parser.read('unicode.ini', encoding='utf-8')

password = parser.get('bug_tracker', 'password')

print('Password:', password.encode('utf-8'))
print('Type    :', type(password))
print('repr()  :', repr(password))
get()返回的值是一个Unicode字符串,因此为了安全地打印它,必须将其重新编码为UTF-8。
$ python3 configparser_unicode.py

Password: b'\xc3\x9f\xc3\xa9\xc3\xa7\xc2\xae\xc3\xa9\xe2\x80\xa0'
Type    : <class 'str'>
repr()  : 'ßéç®é†'
Accessing Configuration Settings
ConfigParser包括检查已解析配置的结构的方法,包括列出sections和options以及获取它们的值。此配置文件包括两个section用于单独的Web服务。
[bug_tracker]
url = http://localhost:8080/bugs/
username = dhellmann
password = SECRET

[wiki]
url = http://localhost:8080/wiki/
username = dhellmann
password = SECRET
此示例程序执行一些查看配置数据的方法,包括sections(),options()和items()。
#configparser_structure.py
from configparser import ConfigParser

parser = ConfigParser()
parser.read('multisection.ini')

for section_name in parser.sections():
    print('Section:', section_name)
    print('  Options:', parser.options(section_name))
    for name, value in parser.items(section_name):
        print('  {} = {}'.format(name, value))
    print()
sections()和options()都返回字符串列表,而items()返回包含名称-值对的元组列表。
$ python3 configparser_structure.py

Section: bug_tracker
  Options: ['url', 'username', 'password']
  url = http://localhost:8080/bugs/
  username = dhellmann
  password = SECRET

Section: wiki
  Options: ['url', 'username', 'password']
  url = http://localhost:8080/wiki/
  username = dhellmann
  password = SECRET
ConfigParser还支持与dict相同的映射API,ConfigParser充当一个字典,为每个section保存一个单独的字典。
#configparser_structure_dict.py
from configparser import ConfigParser

parser = ConfigParser()
parser.read('multisection.ini')

for section_name in parser:
    print('Section:', section_name)
    section = parser[section_name]
    print('  Options:', list(section.keys()))
    for name in section:
        print('  {} = {}'.format(name, section[name]))
    print()
使用映射API访问同一配置文件会产生相同的输出。
$ python3 configparser_structure_dict.py

Section: DEFAULT
  Options: []

Section: bug_tracker
  Options: ['url', 'username', 'password']
  url = http://localhost:8080/bugs/
  username = dhellmann
  password = SECRET

Section: wiki
  Options: ['url', 'username', 'password']
  url = http://localhost:8080/wiki/
  username = dhellmann
  password = SECRET
Testing Whether Values Are Present
要测试某个section是否存在,请使用has_section(),传递section名称。
#configparser_has_section.py
from configparser import ConfigParser

parser = ConfigParser()
parser.read('multisection.ini')

for candidate in ['wiki', 'bug_tracker', 'dvcs']:
    print('{:<12}: {}'.format(
        candidate, parser.has_section(candidate)))
在调用get()之前测试section是否存在可以避免丢失数据的异常。
$ python3 configparser_has_section.py

wiki        : True
bug_tracker : True
dvcs        : False
使用has_option()来测试section中是否存在某个选项。
#configparser_has_option.py
from configparser import ConfigParser

parser = ConfigParser()
parser.read('multisection.ini')

SECTIONS = ['wiki', 'none']
OPTIONS = ['username', 'password', 'url', 'description']

for section in SECTIONS:
    has_section = parser.has_section(section)
    print('{} section exists: {}'.format(section, has_section))
    for candidate in OPTIONS:
        has_option = parser.has_option(section, candidate)
        print('{}.{:<12}  : {}'.format(section, candidate, has_option))
    print()
如果section不存在,则has_option()返回False。
$ python3 configparser_has_option.py

wiki section exists: True
wiki.username      : True
wiki.password      : True
wiki.url           : True
wiki.description   : False

none section exists: False
none.username      : False
none.password      : False
none.url           : False
none.description   : False
Value Types
所有section和option名称都被视为字符串,但选项值可以是字符串,整数,浮点数或布尔值。有一系列可能的布尔值被转换为true或false。以下示例文件包含每个一个。
#types.ini
[ints]
positive = 1
negative = -5

[floats]
positive = 0.2
negative = -3.14

[booleans]
number_true = 1
number_false = 0
yn_true = yes
yn_false = no
tf_true = true
tf_false = false
onoff_true = on
onoff_false = false
ConfigParser不会尝试理解选项类型。应用程序应使用正确的方法来获取所需类型的值。get()总是返回一个字符串。对整数使用getint(),对浮点数使用getfloat(),对布尔值使用getboolean()。
#configparser_value_types.py
from configparser import ConfigParser

parser = ConfigParser()
parser.read('types.ini')

print('Integers:')
for name in parser.options('ints'):
    string_value = parser.get('ints', name)
    value = parser.getint('ints', name)
    print('  {:<12} : {!r:<7} -> {}'.format(name, string_value, value))

print('\nFloats:')
for name in parser.options('floats'):
    string_value = parser.get('floats', name)
    value = parser.getfloat('floats', name)
    print('  {:<12} : {!r:<7} -> {:0.2f}'.format(name, string_value, value))

print('\nBooleans:')
for name in parser.options('booleans'):
    string_value = parser.get('booleans', name)
    value = parser.getboolean('booleans', name)
    print('  {:<12} : {!r:<7} -> {}'.format(name, string_value, value))
使用示例输入运行此程序将生成以下输出。
$ python3 configparser_value_types.py

Integers:
  positive     : '1'     -> 1
  negative     : '-5'    -> -5

Floats:
  positive     : '0.2'   -> 0.20
  negative     : '-3.14' -> -3.14

Booleans:
  number_true  : '1'     -> True
  number_false : '0'     -> False
  yn_true      : 'yes'   -> True
  yn_false     : 'no'    -> False
  tf_true      : 'true'  -> True
  tf_false     : 'false' -> False
  onoff_true   : 'on'    -> True
  onoff_false  : 'false' -> False
可以通过将转换函数传递给ConfigParser的converters参数来添加自定义类型转换器。每个转换器都接收一个输入值,并应将该值转换为适当的返回类型。
#configparser_custom_types.py
from configparser import ConfigParser
import datetime

def parse_iso_datetime(s):
    print('parse_iso_datetime({!r})'.format(s))
    return datetime.datetime.strptime(s, '%Y-%m-%dT%H:%M:%S.%f')

parser = ConfigParser(
    converters={
        'datetime': parse_iso_datetime,
    }
)
parser.read('custom_types.ini')

string_value = parser['datetimes']['due_date']
value = parser.getdatetime('datetimes', 'due_date')
print('due_date : {!r} -> {!r}'.format(string_value, value))
添加转换器会导致ConfigParser使用converters中指定的类型名称自动为该类型创建检索方法。 在此示例中,’datetime’转换器会导致添加新的getdatetime()方法。
$ python3 configparser_custom_types.py

parse_iso_datetime('2015-11-08T11:30:05.905898')
due_date : '2015-11-08T11:30:05.905898' ->
datetime.datetime(2015, 11, 8, 11, 30, 5, 905898)
也可以将转换器方法直接添加到ConfigParser的子类中。
Options as Flags
通常,解析器需要每个选项都有一个显式的值,但是将ConfigParser参数allow_no_value设置为True时,选项可以单独出现在输入文件的一行中,并用作标志。
#configparser_allow_no_value.py
import configparser

# Require values
try:
    parser = configparser.ConfigParser()
    parser.read('allow_no_value.ini')
except configparser.ParsingError as err:
    print('Could not parse:', err)

# Allow stand-alone option names
print('\nTrying again with allow_no_value=True')
parser = configparser.ConfigParser(allow_no_value=True)
parser.read('allow_no_value.ini')
for flag in ['turn_feature_on', 'turn_other_feature_on']:
    print('\n', flag)
    exists = parser.has_option('flags', flag)
    print('  has_option:', exists)
    if exists:
        print('         get:', parser.get('flags', flag))
当一个选项没有显式值时,has_option()会报告该选项存在且get()返回None。
$ python3 configparser_allow_no_value.py

Could not parse: Source contains parsing errors:
'allow_no_value.ini'
        [line  2]: 'turn_feature_on\n'

Trying again with allow_no_value=True

 turn_feature_on
  has_option: True
         get: None

 turn_other_feature_on
  has_option: False
Multi-line Strings
如果后续行缩进,则字符串值可以跨越多行。
[example]
message = This is a multi-line string.
  With two paragraphs.

  They are separated by a completely empty line.
在缩进的多行值中,空行被视为值的一部分并被保留。
$ python3 configparser_multiline.py

This is a multi-line string.
With two paragraphs.

They are separated by a completely empty line.
Modifying Settings
虽然ConfigParser主要用于通过读取文件中的设置进行配置,但也可以通过调用add_section()来创建新section来填充设置,并使用set()来添加或更改选项。
#configparser_populate.py
import configparser

parser = configparser.SafeConfigParser()

parser.add_section('bug_tracker')
parser.set('bug_tracker', 'url', 'http://localhost:8080/bugs')
parser.set('bug_tracker', 'username', 'dhellmann')
parser.set('bug_tracker', 'password', 'secret')

for section in parser.sections():
    print(section)
    for name, value in parser.items(section):
        print('  {} = {!r}'.format(name, value))
所有选项都必须设置为字符串,即使它们将作为整数,浮点值或布尔值检索。
$ python3 configparser_populate.py

bug_tracker
  url = 'http://localhost:8080/bugs'
  username = 'dhellmann'
  password = 'secret'
可以使用remove_section()和remove_option()从ConfigParser中删除section和选项。
#configparser_remove.py
from configparser import ConfigParser

parser = ConfigParser()
parser.read('multisection.ini')

print('Read values:\n')
for section in parser.sections():
    print(section)
    for name, value in parser.items(section):
        print('  {} = {!r}'.format(name, value))

parser.remove_option('bug_tracker', 'password')
parser.remove_section('wiki')

print('\nModified values:\n')
for section in parser.sections():
    print(section)
    for name, value in parser.items(section):
        print('  {} = {!r}'.format(name, value))
删除section会删除它包含的任何选项。
$ python3 configparser_remove.py

Read values:

bug_tracker
  url = 'http://localhost:8080/bugs/'
  username = 'dhellmann'
  password = 'SECRET'
wiki
  url = 'http://localhost:8080/wiki/'
  username = 'dhellmann'
  password = 'SECRET'

Modified values:

bug_tracker
  url = 'http://localhost:8080/bugs/'
  username = 'dhellmann'
Saving Configuration Files
一旦ConfigParser填充了所需的数据,就可以通过调用write()方法将其保存到文件中。 这使得可以提供用于编辑配置设置的用户接口,而无需编写任何代码来管理文件。
#configparser_write.py
import configparser
import sys

parser = configparser.ConfigParser()

parser.add_section('bug_tracker')
parser.set('bug_tracker', 'url', 'http://localhost:8080/bugs')
parser.set('bug_tracker', 'username', 'dhellmann')
parser.set('bug_tracker', 'password', 'secret')

parser.write(sys.stdout)
write()方法将类文件对象作为参数。它以INI格式写出数据,因此可以通过ConfigParser再次解析。
$ python3 configparser_write.py

[bug_tracker]
url = http://localhost:8080/bugs
username = dhellmann
password = secret
警告
读取,修改和重写配置文件时,不保留原始配置文件中的注释。
Option Search Path
在查找选项时,ConfigParser使用多步搜索过程。
在开始搜索选项之前,将测试section名称。如果该section不存在,并且名称不是特殊值DEFAULT,则引发NoSectionError。
- 如果选项名称出现在传递给get()的vars字典中,则返回vars中的值。
- 如果选项名称出现在指定的section中,则返回该section中的值。
- 如果选项名称出现在DEFAULT section中,则返回该值。
- 如果选项名称出现在传递给构造函数的defaults字典中,则返回该值。
如果在任何这些位置找不到该名称,则引发NoOptionError。
可以使用此配置文件演示搜索路径行为。
[DEFAULT]
file-only = value from DEFAULT section
init-and-file = value from DEFAULT section
from-section = value from DEFAULT section
from-vars = value from DEFAULT section

[sect]
section-only = value from section in file
from-section = value from section in file
from-vars = value from section in file
此测试程序包括未在配置文件中指定的选项的默认设置,并覆盖文件中定义的某些值。
#configparser_defaults.py
import configparser

# Define the names of the options
option_names = [
    'from-default',
    'from-section', 'section-only',
    'file-only', 'init-only', 'init-and-file',
    'from-vars',
]

# Initialize the parser with some defaults
DEFAULTS = {
    'from-default': 'value from defaults passed to init',
    'init-only': 'value from defaults passed to init',
    'init-and-file': 'value from defaults passed to init',
    'from-section': 'value from defaults passed to init',
    'from-vars': 'value from defaults passed to init',
}
parser = configparser.ConfigParser(defaults=DEFAULTS)

print('Defaults before loading file:')
defaults = parser.defaults()
for name in option_names:
    if name in defaults:
        print('  {:<15} = {!r}'.format(name, defaults[name]))

# Load the configuration file
parser.read('with-defaults.ini')

print('\nDefaults after loading file:')
defaults = parser.defaults()
for name in option_names:
    if name in defaults:
        print('  {:<15} = {!r}'.format(name, defaults[name]))

# Define some local overrides
vars = {'from-vars': 'value from vars'}

# Show the values of all the options
print('\nOption lookup:')
for name in option_names:
    value = parser.get('sect', name, vars=vars)
    print('  {:<15} = {!r}'.format(name, value))

# Show error messages for options that do not exist
print('\nError cases:')
try:
    print('No such option :', parser.get('sect', 'no-option'))
except configparser.NoOptionError as err:
    print(err)

try:
    print('No such section:', parser.get('no-sect', 'no-option'))
except configparser.NoSectionError as err:
    print(err)
输出显示每个选项的值从哪里获取,并说明来自不同源的默认值覆盖现有值的方式。
$ python3 configparser_defaults.py

Defaults before loading file:
  from-default    = 'value from defaults passed to init'
  from-section    = 'value from defaults passed to init'
  init-only       = 'value from defaults passed to init'
  init-and-file   = 'value from defaults passed to init'
  from-vars       = 'value from defaults passed to init'

Defaults after loading file:
  from-default    = 'value from defaults passed to init'
  from-section    = 'value from DEFAULT section'
  file-only       = 'value from DEFAULT section'
  init-only       = 'value from defaults passed to init'
  init-and-file   = 'value from DEFAULT section'
  from-vars       = 'value from DEFAULT section'

Option lookup:
  from-default    = 'value from defaults passed to init'
  from-section    = 'value from section in file'
  section-only    = 'value from section in file'
  file-only       = 'value from DEFAULT section'
  init-only       = 'value from defaults passed to init'
  init-and-file   = 'value from DEFAULT section'
  from-vars       = 'value from vars'

Error cases:
No option 'no-option' in section: 'sect'
No section: 'no-sect'
Combining Values with Interpolation
ConfigParser提供了一种称为插值(Interpolation: 篡改,插补)的功能,可用于将值组合在一起。 包含标准Python格式字符串的值在检索时会触发插值功能。在被提取的值中命名的选项将依次替换为它们的值,直到不再需要替换为止。
可以重写本节前面的URL示例以使用插值,以便仅更改部分值。例如,此配置文件将URL的协议,主机名和端口分隔为单独的选项。
[bug_tracker]
protocol = http
server = localhost
port = 8080
url = %(protocol)s://%(server)s:%(port)s/bugs/
username = dhellmann
password = SECRET
每次调用get()时默认执行插值。在raw参数中传递true值以检索原始值,而不进行插值。
#configparser_interpolation.py
from configparser import ConfigParser

parser = ConfigParser()
parser.read('interpolation.ini')
print('Original value       :', parser.get('bug_tracker', 'url'))
parser.set('bug_tracker', 'port', '9090')
print('Altered port value   :', parser.get('bug_tracker', 'url'))
print('Without interpolation:', parser.get('bug_tracker', 'url', raw=True))
因为该值是由get()计算的,所以更改url值使用的其中一个设置会更改返回值。
$ python3 configparser_interpolation.py

Original value       : http://localhost:8080/bugs/
Altered port value   : http://localhost:9090/bugs/
Without interpolation: %(protocol)s://%(server)s:%(port)s/bugs/
Using Defaults
插值的值不需要与原始选项出现在同一section中。默认值可以与覆盖值混合使用。
[DEFAULT]
url = %(protocol)s://%(server)s:%(port)s/bugs/
protocol = http
server = bugs.example.com
port = 80

[bug_tracker]
server = localhost
port = 8080
username = dhellmann
password = SECRET
使用此配置,url的值来自DEFAULT section,并且替换会首先查看bug_tracker,然后返回DEFAULT以查找未找到的部分。
#configparser_interpolation_defaults.py
from configparser import ConfigParser

parser = ConfigParser()
parser.read('interpolation_defaults.ini')

print('URL:', parser.get('bug_tracker', 'url'))
主机名和端口值来自bug_tracker部分,但协议来自DEFAULT。
$ python3 configparser_interpolation_defaults.py

URL: http://localhost:8080/bugs/
Substitution Errors
(插值深度)MAX_INTERPOLATION_DEPTH步骤后,替换停止,以避免由于递归引用而导致的问题。
#configparser_interpolation_recursion.py
import configparser

parser = configparser.ConfigParser()

parser.add_section('sect')
parser.set('sect', 'opt', '%(opt)s')

try:
    print(parser.get('sect', 'opt'))
except configparser.InterpolationDepthError as err:
    print('ERROR:', err)
如果替换步骤太多,则会引发InterpolationDepthError异常。
$ python3 configparser_interpolation_recursion.py

ERROR: Recursion limit exceeded in value substitution: option 'opt' in
section 'sect' contains an interpolation key which cannot be substituted
in 10 steps. Raw value: '%(opt)s'
缺少值会导致InterpolationMissingOptionError异常。
#configparser_interpolation_error.py
import configparser

parser = configparser.ConfigParser()

parser.add_section('bug_tracker')
parser.set('bug_tracker', 'url', 'http://%(server)s:%(port)s/bugs')

try:
    print(parser.get('bug_tracker', 'url'))
except configparser.InterpolationMissingOptionError as err:
    print('ERROR:', err)
由于未定义服务器值,因此无法构造URL。
$ python3 configparser_interpolation_error.py

ERROR: Bad value substitution: option 'url' in section
'bug_tracker' contains an interpolation key 'server' which is
not a valid option name. Raw value:
'http://%(server)s:%(port)s/bugs'
Escaping Special Characters
由于%启动插值指令,因此必须将值中的文字%转义为%%。
[escape]
value = a literal %% must be escaped
读取该值不需要任何特殊考虑。
#configparser_escape.py
from configparser import ConfigParser
import os

filename = 'escape.ini'
config = ConfigParser()
config.read([filename])

value = config.get('escape', 'value')
print(value)
读取值时,%%将自动转换为%。
$ python3 configparser_escape.py

a literal % must be escaped
Extended Interpolation
ConfigParser支持替换插值实现,将支持Interpolation定义的API的对象传递给interpolation参数。例如,使用ExtendedInterpolation而不是默认的BasicInterpolation,可以启用不同的语法以使用${}来指示变量。
#configparser_extendedinterpolation.py
from configparser import ConfigParser, ExtendedInterpolation

parser = ConfigParser(interpolation=ExtendedInterpolation())
parser.read('extended_interpolation.ini')

print('Original value       :', parser.get('bug_tracker', 'url'))
parser.set('intranet', 'port', '9090')
print('Altered port value   :', parser.get('bug_tracker', 'url'))
print('Without interpolation:', parser.get('bug_tracker', 'url', raw=True))
扩展插值支持通过在变量名前加上section名称和冒号(:)来访问配置文件中其他section的值。
[intranet]
server = localhost
port = 8080

[bug_tracker]
url = http://${intranet:server}:${intranet:port}/bugs/
username = dhellmann
password = SECRET
引用文件中其他section的值可以共享值的层次结构,而无需将所有默认值放在DEFAULTS中。
$ python3 configparser_extendedinterpolation.py

Original value       : http://localhost:8080/bugs/
Altered port value   : http://localhost:9090/bugs/
Without interpolation: http://${intranet:server}:${intranet:port}/bugs/
Disabling Interpolation
要禁用插值,请传递None代替Interpolation对象。
#configparser_nointerpolation.py
from configparser import ConfigParser

parser = ConfigParser(interpolation=None)
parser.read('interpolation.ini')
print('Without interpolation:', parser.get('bug_tracker', 'url'))
这使得可以安全地忽略可能由插值对象处理的任何语法。
$ python3 configparser_nointerpolation.py
Without interpolation: %(protocol)s://%(server)s:%(port)s/bugs/
logging — Report Status, Error, and Informational Messages
目的:报告状态,错误和信息性消息。
logging模块定义了一个标准API,用于报告来自应用程序和库的错误和状态信息。 使用标准库模块提供的日志记录API的主要好处是所有Python模块都可以参与日志记录,因此应用程序的日志可以包含来自第三方模块的消息。
Logging Components
日志系统由四种交互类型的对象组成。要记录的每个模块或应用程序都使用Logger实例向日志添加信息。调用记录器会创建一个LogRecord,用于将信息保存在内存中,直到处理完毕。Logger可能有许多Handler对象,用于接收和处理日志记录。Handler使用Formatter将日志记录转换为输出消息。
Logging in Applications vs. Libraries
应用程序开发人员和库作者都可以使用logging,但每个受众都需要考虑不同的注意事项。
应用程序开发人员配置logging模块,将消息定向到适当的输出通道。可以记录具有不同详细级别或不同目的地的消息。用于将日志消息写入文件,HTTP GET / POST位置,通过SMTP发送电子邮件,通用套接字或特定于操作系统的日志记录机制的处理程序都包含在内,并且可以为所有内置类未处理的特殊要求创建自定义日志目标类。
库的开发人员也可以使用logging,甚至可以做更少的工作。只需使用适当的名称为每个上下文创建一个记录器实例,然后使用标准级别记录消息。 只要库使用具有一致命名和级别选择的日志记录API,就可以将应用程序配置为根据需要显示或隐藏来自库的消息。
Logging to a File
大多数应用程序都配置为记录到文件。 使用basicConfig()函数设置默认处理程序,以便将调试消息写入文件。
#logging_file_example.py
import logging
LOG_FILENAME = 'logging_example.out'
logging.basicConfig(
filename=LOG_FILENAME,
level=logging.DEBUG,
)
logging.debug('This message should go to the log file')
with open(LOG_FILENAME, 'rt') as f:
body = f.read()
print('FILE:')
print(body)
运行脚本后,日志消息将写入logging_example.out:
$ python3 logging_file_example.py
FILE:
DEBUG:root:This message should go to the log file
Rotating Log Files
重复运行脚本会导致更多消息附加到文件。 要在每次程序运行时创建新文件,请将filemode参数传递给basicConfig(),其值为“w”。 但是,比这种方式管理文件的创建更好的是使用RotatingFileHandler,它可以自动创建新文件并同时保留旧的日志文件。
#logging_rotatingfile_example.py
import glob
import logging
import logging.handlers
LOG_FILENAME = 'logging_rotatingfile_example.out'
# Set up a specific logger with our desired output level
my_logger = logging.getLogger('MyLogger')
my_logger.setLevel(logging.DEBUG)
# Add the log message handler to the logger
handler = logging.handlers.RotatingFileHandler(
LOG_FILENAME,
maxBytes=20,
backupCount=5,
)
my_logger.addHandler(handler)
# Log some messages
for i in range(20):
my_logger.debug('i = %d' % i)
# See what files are created
logfiles = glob.glob('%s*' % LOG_FILENAME)
for filename in sorted(logfiles):
print(filename)
结果是六个单独的文件,每个文件都包含应用程序的部分日志历史记录。
$ python3 logging_rotatingfile_example.py
logging_rotatingfile_example.out
logging_rotatingfile_example.out.1
logging_rotatingfile_example.out.2
logging_rotatingfile_example.out.3
logging_rotatingfile_example.out.4
logging_rotatingfile_example.out.5
最新文件始终是logging_rotatingfile_example.out,每次达到大小限制时,都会使用后缀.1重命名。 重命名每个现有备份文件以增加后缀(.1变为.2等)并删除.5文件。
注意
显然,这个例子将日志长度设置得太小,这是一个极端的例子。 在实际程序中将maxBytes设置为更合适的值。
Verbosity Levels
logging API的另一个有用功能是能够在不同的日志级别生成不同的消息。这意味着代码可以使用调试消息进行检测,例如,可以设置日志级别,以便不在生产系统上写入这些调试消息。 下表列出了logging定义的日志记录级别。
Logging Levels
| Level | Value |
|---|---|
| CRITICAL | 50 |
| ERROR | 40 |
| WARNING | 30 |
| INFO | 20 |
| DEBUG | 10 |
| UNSET | 0 |
仅当handler和logger配置为发出该级别或更高级别的消息时,才会发出日志消息。例如,如果消息为CRITICAL,并且记录器设置为ERROR,则会发出消息(50> 40)。 如果消息是WARNING,并且记录器设置为仅生成设置为ERROR的消息,则不会发出消息(30 <40)。
#logging_level_example.py
import logging
import sys
LEVELS = {
'debug': logging.DEBUG,
'info': logging.INFO,
'warning': logging.WARNING,
'error': logging.ERROR,
'critical': logging.CRITICAL,
}
if len(sys.argv) > 1:
level_name = sys.argv[1]
level = LEVELS.get(level_name, logging.NOTSET)
logging.basicConfig(level=level)
logging.debug('This is a debug message')
logging.info('This is an info message')
logging.warning('This is a warning message')
logging.error('This is an error message')
logging.critical('This is a critical error message')
使用“debug”或“warning”之类的参数运行脚本,以查看哪些消息显示在不同级别:
$ python3 logging_level_example.py debug
DEBUG:root:This is a debug message
INFO:root:This is an info message
WARNING:root:This is a warning message
ERROR:root:This is an error message
CRITICAL:root:This is a critical error message
$ python3 logging_level_example.py info
INFO:root:This is an info message
WARNING:root:This is a warning message
ERROR:root:This is an error message
CRITICAL:root:This is a critical error message
Naming Logger Instances
所有以前的日志消息都嵌入了“root”,因为代码使用了根记录器。告诉特定日志消息来自何处的简单方法是为每个模块使用单独的记录器对象。 发送到记录器(logger)的日志消息包括该记录器的名称。 以下是如何从不同模块进行日志记录的示例,以便于跟踪消息的来源。
#logging_modules_example.py
import logging
logging.basicConfig(level=logging.WARNING)
logger1 = logging.getLogger('package1.module1')
logger2 = logging.getLogger('package2.module2')
logger1.warning('This message comes from one module')
logger2.warning('This comes from another module')
输出显示每个输出行的不同模块名称。
$ python3 logging_modules_example.py
WARNING:package1.module1:This message comes from one module
WARNING:package2.module2:This comes from another module
The Logging Tree
Logger实例根据其名称以树结构配置,如图所示。 通常,每个应用程序或库都定义一个基本名称,其中各个模块的记录器设置为子项。 根记录器没有名称。
Example Logger Tree:
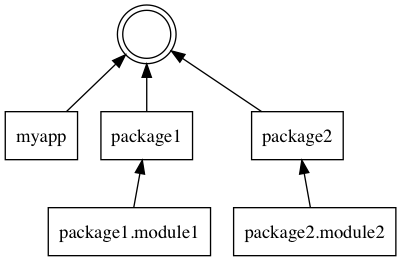
树结构对于配置日志记录很有用,因为这意味着每个记录器不需要自己的一组处理器。如果记录器没有任何处理器,则将消息传递给其父记录器进行处理。这意味着对于大多数应用程序,只需要在根记录器上配置处理器,这样将收集所有日志信息并将其发送到同一位置,如图所示。
One Logging Handler
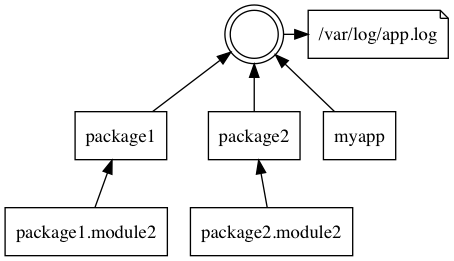
树结构还允许为应用程序或库的不同部分设置不同的日志级别,处理器和格式化器,以控制记录哪些消息以及它们的去向,如图所示。
Different Levels and Handlers
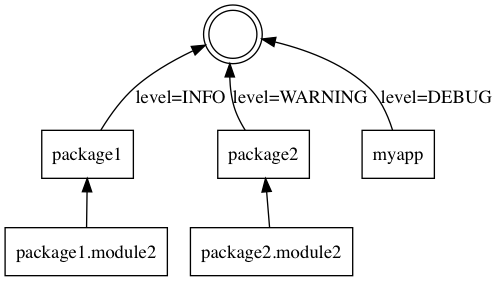
Integration with the warnings Module
logging模块通过captureWarnings()集成warnings,captureWarnings()配置warnings以通过日志记录系统发送消息,而不是直接输出消息。
#logging_capture_warnings.py
import logging
import warnings
logging.basicConfig(level=logging.INFO,)
warnings.warn('This warning is not sent to the logs')
logging.captureWarnings(True)
warnings.warn('This warning is sent to the logs')
警告消息使用WARNING级别发送到名为py.warnings的记录器。
$ python3 logging_capture_warnings.py
logging_capture_warnings.py:13: UserWarning: This warning is not
sent to the logs
warnings.warn('This warning is not sent to the logs')
WARNING:py.warnings:logging_capture_warnings.py:17: UserWarning:
This warning is sent to the logs
warnings.warn('This warning is sent to the logs')
fileinput — Command-Line Filter Framework
目的:创建命令行过滤程序以处理来自输入流的行。
fileinput模块是一个框架,用于创建处理文本文件的命令行程序,相当于过滤器。
Converting M3U files to RSS
过滤器的一个示例是m3utorss,一个将一组MP3文件转换为可以作为播客共享的RSS源的程序。程序的输入是一个或多个列出要分发的MP3文件的m3u文件。输出是打印到控制台的RSS源。要处理输入,程序需要迭代文件名列表并且:
- 打开每个文件。
- 阅读文件的每一行。
- 弄清楚该行是否指向一个mp3文件。
- 如果是,添加一个新项到RSS源。
- 打印输出。
所有这些文件处理都可以手工编码。它并不复杂,通过一些测试,即使错误处理也是正确的。但fileinput处理所有细节,因此简化了程序。
for line in fileinput.input(sys.argv[1:]):
mp3filename = line.strip()
if not mp3filename or mp3filename.startswith('#'):
continue
item = SubElement(rss, 'item')
title = SubElement(item, 'title')
title.text = mp3filename
encl = SubElement(item, 'enclosure', {'type': 'audio/mpeg', 'url': mp3filename})
input()函数将要检查的文件名列表作为参数。如果列表为空,则模块从标准输入读取数据。该函数返回一个迭代器,该迭代器从正在处理的文本文件中生成单独的行。调用者只需要遍历每一行,跳过空行和注释,找到对MP3文件的引用。
这是完整的程序:
#fileinput_example.py
import fileinput
import sys
import time
from xml.etree.ElementTree import Element, SubElement, tostring
from xml.dom import minidom
# Establish the RSS and channel nodes
rss = Element('rss',
{'xmlns:dc': "http://purl.org/dc/elements/1.1/",
'version': '2.0'})
channel = SubElement(rss, 'channel')
title = SubElement(channel, 'title')
title.text = 'Sample podcast feed'
desc = SubElement(channel, 'description')
desc.text = 'Generated for PyMOTW'
pubdate = SubElement(channel, 'pubDate')
pubdate.text = time.asctime()
gen = SubElement(channel, 'generator')
gen.text = 'https://pymotw.com/'
for line in fileinput.input(sys.argv[1:]):
mp3filename = line.strip()
if not mp3filename or mp3filename.startswith('#'):
continue
item = SubElement(rss, 'item')
title = SubElement(item, 'title')
title.text = mp3filename
encl = SubElement(item, 'enclosure',
{'type': 'audio/mpeg',
'url': mp3filename})
rough_string = tostring(rss)
reparsed = minidom.parseString(rough_string)
print(reparsed.toprettyxml(indent=" "))
此示例输入文件包含多个MP3文件的名称。
#sample_data.m3u
#This is a sample m3u file
episode-one.mp3
episode-two.mp3
使用示例输入运行fileinput_example.py会使用RSS格式生成XML数据。
$ python3 fileinput_example.py sample_data.m3u
<?xml version="1.0" ?>
<rss version="2.0" xmlns:dc="http://purl.org/dc/elements/1.1/">
<channel>
<title>Sample podcast feed</title>
<description>Generated for PyMOTW</description>
<pubDate>Sun Mar 18 16:20:44 2018</pubDate>
<generator>https://pymotw.com/</generator>
</channel>
<item>
<title>episode-one.mp3</title>
<enclosure type="audio/mpeg" url="episode-one.mp3"/>
</item>
<item>
<title>episode-two.mp3</title>
<enclosure type="audio/mpeg" url="episode-two.mp3"/>
</item>
</rss>
Progress Metadata
在前面的示例中,正在处理的文件名和行号并不重要。其他工具(如类似grep的搜索)可能需要该信息。 fileinput包括用于访问有关当前行(filename(),filelineno()和lineno())的所有元数据的函数。
#fileinput_grep.py
import fileinput
import re
import sys
pattern = re.compile(sys.argv[1])
for line in fileinput.input(sys.argv[2:]):
if pattern.search(line):
if fileinput.isstdin():
fmt = '{lineno}:{line}'
else:
fmt = '{filename}:{lineno}:{line}'
print(fmt.format(filename=fileinput.filename(),
lineno=fileinput.filelineno(),
line=line.rstrip()))
可以使用基本模式匹配循环来查找这些示例的源中字符串“fileinput”的出现。
$ python3 fileinput_grep.py fileinput *.py
fileinput_change_subnet.py:10:import fileinput
fileinput_change_subnet.py:17:for line in fileinput.input(files, inplace=True):
fileinput_change_subnet_noisy.py:10:import fileinput
fileinput_change_subnet_noisy.py:18:for line in fileinput.input(files, inplace=True):
fileinput_change_subnet_noisy.py:19: if fileinput.isfirstline():
fileinput_change_subnet_noisy.py:21: fileinput.filename()))
fileinput_example.py:6:"""Example for fileinput module.
fileinput_example.py:10:import fileinput
fileinput_example.py:30:for line in fileinput.input(sys.argv[1:]):
fileinput_grep.py:10:import fileinput
fileinput_grep.py:16:for line in fileinput.input(sys.argv[2:]):
fileinput_grep.py:18: if fileinput.isstdin():
fileinput_grep.py:22: print(fmt.format(filename=fileinput.filename(),
fileinput_grep.py:23: lineno=fileinput.filelineno(),
也可以从标准输入读取文本。
$ cat *.py | python fileinput_grep.py fileinput
10:import fileinput
17:for line in fileinput.input(files, inplace=True):
29:import fileinput
37:for line in fileinput.input(files, inplace=True):
38: if fileinput.isfirstline():
40: fileinput.filename()))
54:"""Example for fileinput module.
58:import fileinput
78:for line in fileinput.input(sys.argv[1:]):
101:import fileinput
107:for line in fileinput.input(sys.argv[2:]):
109: if fileinput.isstdin():
113: print(fmt.format(filename=fileinput.filename(),
114: lineno=fileinput.filelineno(),
In-place Filtering
另一种常见的文件处理操作是修改文件的内容,而不是创建新文件。例如,如果子网范围发生变化,则可能需要更新Unix host文件。
#etc_hosts.txt before modifications
##
# Host Database
#
# localhost is used to configure the loopback interface
# when the system is booting. Do not change this entry.
##
127.0.0.1 localhost
255.255.255.255 broadcasthost
::1 localhost
fe80::1%lo0 localhost
10.16.177.128 hubert hubert.hellfly.net
10.16.177.132 cubert cubert.hellfly.net
10.16.177.136 zoidberg zoidberg.hellfly.net
自动进行更改的安全方法是根据输入创建新文件,然后将原始文件替换为编辑后的副本。fileinput使用inplace选项自动支持。
#fileinput_change_subnet.py
import fileinput
import sys
from_base = sys.argv[1]
to_base = sys.argv[2]
files = sys.argv[3:]
for line in fileinput.input(files, inplace=True):
line = line.rstrip().replace(from_base, to_base)
print(line)
虽然脚本使用print(),但不会生成输出,因为fileinput会将标准输出重定向到被覆盖的文件。
$ python3 fileinput_change_subnet.py 10.16 10.17 etc_hosts.txt
更新的文件已更改10.16.0.0/16网络上所有服务器的IP地址。
#etc_hosts.txt after modifications
##
# Host Database
#
# localhost is used to configure the loopback interface
# when the system is booting. Do not change this entry.
##
127.0.0.1 localhost
255.255.255.255 broadcasthost
::1 localhost
fe80::1%lo0 localhost
10.17.177.128 hubert hubert.hellfly.net
10.17.177.132 cubert cubert.hellfly.net
10.17.177.136 zoidberg zoidberg.hellfly.net
在处理开始之前,使用原始名称加上.bak的备份文件被创建。
#fileinput_change_subnet_noisy.py
import fileinput
import glob
import sys
from_base = sys.argv[1]
to_base = sys.argv[2]
files = sys.argv[3:]
for line in fileinput.input(files, inplace=True):
if fileinput.isfirstline():
sys.stderr.write('Started processing {}\n'.format(fileinput.filename()))
sys.stderr.write('Directory contains: {}\n'.format(glob.glob('etc_hosts.txt*')))
line = line.rstrip().replace(from_base, to_base)
print(line)
sys.stderr.write('Finished processing\n')
sys.stderr.write('Directory contains: {}\n'.format(glob.glob('etc_hosts.txt*')))
关闭输入时备份文件被删除。
$ python3 fileinput_change_subnet_noisy.py 10.16. 10.17. etc_hosts.txt
Started processing etc_hosts.txt
Directory contains: ['etc_hosts.txt.bak', 'etc_hosts.txt']
Finished processing
Directory contains: ['etc_hosts.txt']
atexit — Program Shutdown Callbacks
目的:注册程序关闭时要调用的函数。
atexit模块提供了一个接口,用于注册在程序正常关闭时要调用的函数。
Registering Exit Callbacks
这是通过调用register()显式注册函数的示例。
#atexit_simple.py
import atexit
def all_done():
print('all_done()')
print('Registering')
atexit.register(all_done)
print('Registered')
因为程序没有做任何其他事情,所以立即调用all_done()。
$ python3 atexit_simple.py
Registering
Registered
all_done()
也可以注册多个函数并将参数传递给已注册的函数。这对于彻底断开与数据库的连接,删除临时文件等非常有用。可以为每个资源注册单独的清理功能,而不是保留需要释放的资源列表。
#atexit_multiple.py
import atexit
def my_cleanup(name):
print('my_cleanup({})'.format(name))
atexit.register(my_cleanup, 'first')
atexit.register(my_cleanup, 'second')
atexit.register(my_cleanup, 'third')
退出函数的调用顺序与它们的注册顺序相反。此方法允许以与导入模块相反的顺序清理模块(因此注册其atexit函数),这将减少依赖性冲突。
$ python3 atexit_multiple.py
my_cleanup(third)
my_cleanup(second)
my_cleanup(first)
Decorator Syntax
可以使用register()作为装饰器来注册不需要参数的函数。这种替代语法便于“对模块级全局数据进行操作”的清理函数。
#atexit_decorator.py
import atexit
@atexit.register
def all_done():
print('all_done()')
print('starting main program')
由于该函数是在它被定义的时候注册的,因此即使模块没有执行其他工作,也要确保其正常工作,这是重要的。如果它应该清理的资源从未被初始化,则调用退出回调不应该产生错误。
$ python3 atexit_decorator.py
starting main program
all_done()
Canceling Callbacks
要取消退出回调,请使用unregister()将其从注册表中删除。
#atexit_unregister.py
import atexit
def my_cleanup(name):
print('my_cleanup({})'.format(name))
atexit.register(my_cleanup, 'first')
atexit.register(my_cleanup, 'second')
atexit.register(my_cleanup, 'third')
atexit.unregister(my_cleanup)
无论已注册多少次,都会取消对同一回调的所有调用。
$ python3 atexit_unregister.py
删除先前未注册的回调不被视为错误。
#atexit_unregister_not_registered.py
import atexit
def my_cleanup(name):
print('my_cleanup({})'.format(name))
if False:
atexit.register(my_cleanup, 'never registered')
atexit.unregister(my_cleanup)
因为它默默地忽略了未知的回调,所以即使注册序列可能未知,也可以使用unregister()。
$ python3 atexit_unregister_not_registered.py
When Are atexit Callbacks Not Called?
如果满足以下任何条件,则不会调用使用atexit注册的回调:
- 程序因信号而死亡。
- 直接调用
os._exit()。 - 在解释器中检测到致命错误。
可以更新subprocess小节中的示例,以显示程序被信号杀死时会发生什么。涉及两个文件,父程序和子程序。父程序启动子程序,暂停,然后杀死它。
#atexit_signal_parent.py
import os
import signal
import subprocess
import time
proc = subprocess.Popen('./atexit_signal_child.py')
print('PARENT: Pausing before sending signal...')
time.sleep(1)
print('PARENT: Signaling child')
os.kill(proc.pid, signal.SIGTERM)
子程序设置一个atexit回调,然后睡眠直到信号到达。
#atexit_signal_child.py
import atexit
import time
import sys
def not_called():
print('CHILD: atexit handler should not have been called')
print('CHILD: Registering atexit handler')
sys.stdout.flush()
atexit.register(not_called)
print('CHILD: Pausing to wait for signal')
sys.stdout.flush()
time.sleep(5)
运行后输出:
$ python3 atexit_signal_parent.py
CHILD: Registering atexit handler
CHILD: Pausing to wait for signal
PARENT: Pausing before sending signal...
PARENT: Signaling child
孩子不打印嵌入在not_called()中的消息。
如果程序使用os._exit(),则可以避免调用atexit回调。
#atexit_os_exit.py
import atexit
import os
def not_called():
print('This should not be called')
print('Registering')
atexit.register(not_called)
print('Registered')
print('Exiting...')
os._exit(0)
由于此示例绕过了正常的退出路径,因此不会运行回调。打印输出也未刷新,因此使用-u选项运行示例以启用无缓冲I/O.
$ python3 -u atexit_os_exit.py
Registering
Registered
Exiting...
要确保运行回调,请允许程序通过耗尽要执行的语句或通过调用sys.exit()来终止。
#atexit_sys_exit.py
import atexit
import sys
def all_done():
print('all_done()')
print('Registering')
atexit.register(all_done)
print('Registered')
print('Exiting...')
sys.exit()
此示例调用sys.exit(),因此将调用已注册的回调。
$ python3 atexit_sys_exit.py
Registering
Registered
Exiting...
all_done()
Handling Exceptions
将atexit回调中引发的异常的traceback打印到控制台,并将引发的最后一个异常重新引发为程序的最终错误消息。
#atexit_exception.py
import atexit
def exit_with_exception(message):
raise RuntimeError(message)
atexit.register(exit_with_exception, 'Registered first')
atexit.register(exit_with_exception, 'Registered second')
注册顺序控制执行顺序。如果一个回调中的错误在另一个(更早注册,但更晚调用的)回调中引入错误,则向用户显示的最终错误消息可能不是最有用的错误消息。
$ python3 atexit_exception.py
Error in atexit._run_exitfuncs:
Traceback (most recent call last):
File "atexit_exception.py", line 11, in exit_with_exception
raise RuntimeError(message)
RuntimeError: Registered second
Error in atexit._run_exitfuncs:
Traceback (most recent call last):
File "atexit_exception.py", line 11, in exit_with_exception
raise RuntimeError(message)
RuntimeError: Registered first
通常最好在清理函数中处理并安静地记录所有异常,因为在退出时出现程序转储错误很麻烦。
sched — Timed Event Scheduler
目的:通用事件调度程序。
sched模块实现了一个通用事件调度程序,用于在特定时间运行任务。调度程序类使用一个time函数来获取当前时间,并使用delay函数来等待特定的时间段。实际的时间单位并不重要,这使得接口足够灵活,可用于多种用途。
调用time函数时不带任何参数,并应返回表示当前时间的数字。使用“与time函数相同尺度的”单个整数参数调用delay函数,并且应该在返回之前等待那么多时间单位。默认使用time模块的monotonic()和sleep()函数,但本节中的示例使用time.time(),它也符合要求,因为它使输出更容易理解。为了支持多线程应用程序,在生成每个事件后使用参数0调用delay函数,以确保其他线程也有机会运行。
Running Events With a Delay
事件可以安排在延迟之后或特定时间运行。要使用延迟调度它们,请使用带有四个参数的enter()方法。
- A number representing the delay
- A priority value
- The function to call
- A tuple of arguments for the function
此示例分别调度两个不同的事件,分别在两秒和三秒后运行。当事件的时间到来时,调用print_event()打印当前时间和传递给事件的名称参数。
#sched_basic.py
import sched
import time
scheduler = sched.scheduler(time.time, time.sleep)
def print_event(name, start):
now = time.time()
elapsed = int(now - start)
print('EVENT: {} elapsed={} name={}'.format(time.ctime(now), elapsed, name))
start = time.time()
print('START:', time.ctime(start))
scheduler.enter(2, 1, print_event, ('first', start))
scheduler.enter(3, 1, print_event, ('second', start))
scheduler.run()
运行程序会产生:
$ python3 sched_basic.py
START: Sun Sep 4 16:21:01 2016
EVENT: Sun Sep 4 16:21:03 2016 elapsed=2 name=first
EVENT: Sun Sep 4 16:21:04 2016 elapsed=3 name=second
第一个事件打印的时间是启动后两秒,第二个事件的时间是启动后三秒。
Overlapping Events
对run()的调用将阻塞,直到处理完所有事件。每个事件都在同一个线程中运行,因此如果事件运行的时间比事件之间的延迟长,则会有重叠。通过推迟后一事件来解决重叠。没有事件丢失,但某些事件可能比调度时间晚。在下一个示例中,long_event()会休眠,但它也可以通过执行长计算或阻塞I/O来很容易地实现延迟。
#sched_overlap.py
import sched
import time
scheduler = sched.scheduler(time.time, time.sleep)
def long_event(name):
print('BEGIN EVENT :', time.ctime(time.time()), name)
time.sleep(2)
print('FINISH EVENT:', time.ctime(time.time()), name)
print('START:', time.ctime(time.time()))
scheduler.enter(2, 1, long_event, ('first',))
scheduler.enter(3, 1, long_event, ('second',))
scheduler.run()
结果是第二个事件在第一个事件结束后立即运行,因为第一个事件花了足够长的时间来推动时钟,使之超过第二个事件的期望开始时间。
$ python3 sched_overlap.py
START: Sun Sep 4 16:21:04 2016
BEGIN EVENT : Sun Sep 4 16:21:06 2016 first
FINISH EVENT: Sun Sep 4 16:21:08 2016 first
BEGIN EVENT : Sun Sep 4 16:21:08 2016 second
FINISH EVENT: Sun Sep 4 16:21:10 2016 second
Event Priorities
如果同时安排了多个事件,则使用其优先级值来确定它们的运行顺序。
#sched_priority.py
import sched
import time
scheduler = sched.scheduler(time.time, time.sleep)
def print_event(name):
print('EVENT:', time.ctime(time.time()), name)
now = time.time()
print('START:', time.ctime(now))
scheduler.enterabs(now + 2, 2, print_event, ('first',))
scheduler.enterabs(now + 2, 1, print_event, ('second',))
scheduler.run()
此示例需要确保它们安排在完全相同的时间,因此使用enterabs()方法而不是enter()。enterabs()的第一个参数是运行事件的时间,而不是延迟的时间。
$ python3 sched_priority.py
START: Sun Sep 4 16:21:10 2016
EVENT: Sun Sep 4 16:21:12 2016 second
EVENT: Sun Sep 4 16:21:12 2016 first
Canceling Events
enter()和enterabs()都返回对事件的引用,稍后可以用它来取消它。因为run()阻塞,所以必须在一个不同的线程中取消该事件。对于此示例,启动线程以运行调度程序,然后主处理线程用于取消事件。
#sched_cancel.py
import sched
import threading
import time
scheduler = sched.scheduler(time.time, time.sleep)
# Set up a global to be modified by the threads
counter = 0
def increment_counter(name):
global counter
print('EVENT:', time.ctime(time.time()), name)
counter += 1
print('NOW:', counter)
print('START:', time.ctime(time.time()))
e1 = scheduler.enter(2, 1, increment_counter, ('E1',))
e2 = scheduler.enter(3, 1, increment_counter, ('E2',))
# Start a thread to run the events
t = threading.Thread(target=scheduler.run)
t.start()
# Back in the main thread, cancel the first scheduled event.
scheduler.cancel(e1)
# Wait for the scheduler to finish running in the thread
t.join()
print('FINAL:', counter)
安排了两个活动,但第一个活动后来取消了。仅运行第二个事件,因此计数器变量仅增加一次。
$ python3 sched_cancel.py
START: Sun Sep 4 16:21:13 2016
EVENT: Sun Sep 4 16:21:16 2016 E2
NOW: 1
FINAL: 1